[agentsw ua=’pc’]
Do you want to add a wishlist feature to your WooCommerce store?
A wishlist allows visitors to save their favorite products, so they can quickly find them later in your store and complete their purchase. It also makes it easy for your visitors to share their favorite items with friends and family as part of their wedding registry or another gift registry.
In this article, we’ll show you how to add a wishlist to your WooCommerce store.
What Are Wishlists and Why Add Them in WooCommerce?
A wishlist lets your customers and guests save their favorite products on a list. It helps them to remember which products they want to buy in the future, so they can quickly find them later on your WooCommerce store.
Plus, customers can share their wishlists with their friends and family. This helps build brand awareness and increases traffic to your online store so you can boost sales.
Another benefit is that you get to see which products people add the most to their wishlists. To increase sales, you can then run promotional offers and discounts on popular wishlist products.
That said, let’s see how you can easily add a wishlist to the WooCommerce store.
Adding a Wishlist to Your WooCommerce Store
The best way of adding a wishlist to your WooCommerce store is by using a WordPress plugin like YITH WooCommerce Wishlist.
It’s a free WooCommerce plugin that lets your visitors save their favorite products to a wishlist and share them with their friends and family.
First, you’ll need to install and activate the YITH WooCommerce Wishlist plugin. For more details, please see our guide on how to install a WordPress plugin.
Upon activation, you can head over to YITH » Wishlist from your WordPress dashboard and click on the ‘Add to wishlist options’ tab to configure the plugin.
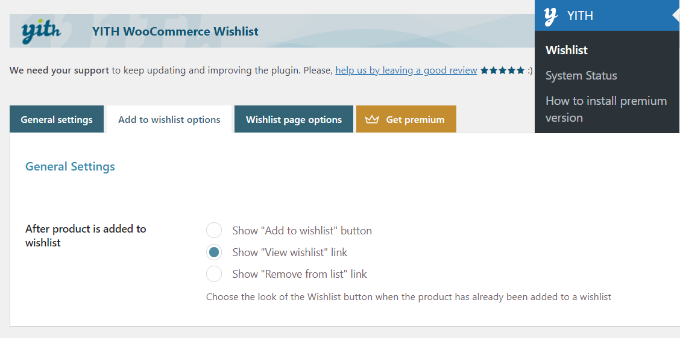
The plugin will automatically add a ‘Add to wishlist’ link to each product that shoppers can click on to save items.
In the settings, you can select which link to show after a user adds a product to the wishlist. For instance, you can still display the ‘Add to wishlist’ button, or you can change the link to show the ‘View wishlist’ or ‘Remove from list’ options instead.
Next, you’ll see the Loop settings and Product page settings. You can choose where you’d like the ‘Add to wishlist’ button to appear on the product page.
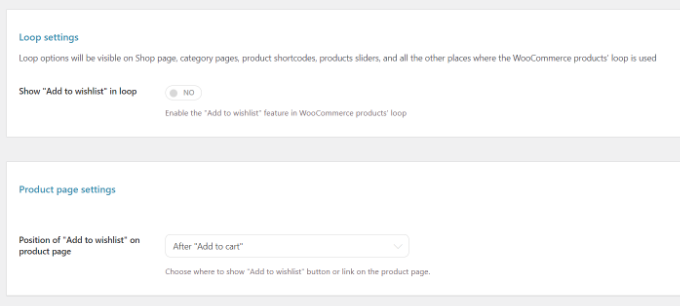
By default, it will be shown after the add to cart button. However, you can choose a different position by clicking the dropdown menu in front of the Position of “Add to wishlist” on product page option.
After that, simply scroll down and customize the text for your wishlist and edit the color and style of the add to wishlist button.
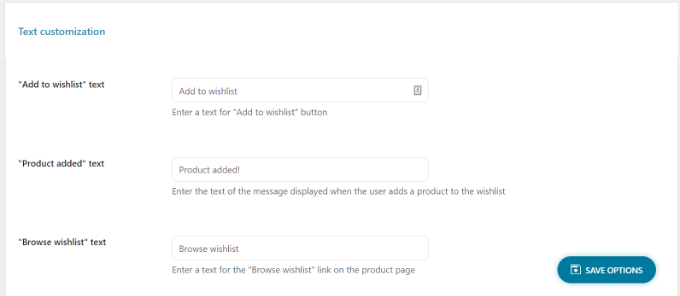
Don’t forget to click the ‘Save Options’ button at the bottom of the page when you’re done.
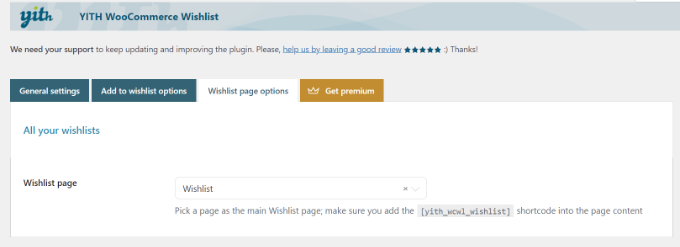
Next, you can head to the ‘Wishlist page options’ tab.
The plugin will create a new page for wishlists on your WooCommerce store. If you prefer, you can select a different page from the Wishlist page dropdown menu instead or show wishlists on any page using the [yith_wcwl_wishlist] shortcode.
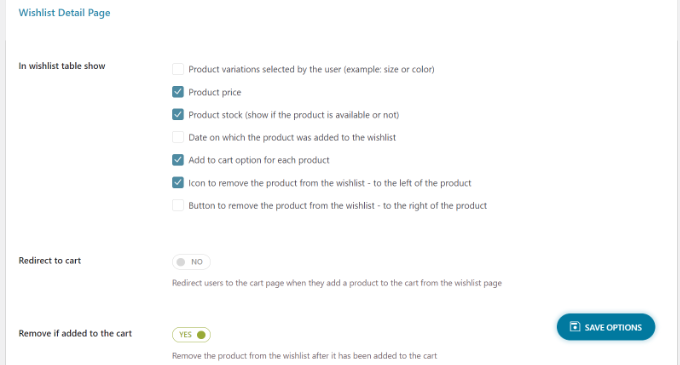
Next, you can now scroll down and select which details to show in the wishlist table.
For example, there are options to display product variations, the date on which the product was added to the wishlist, price, and more.
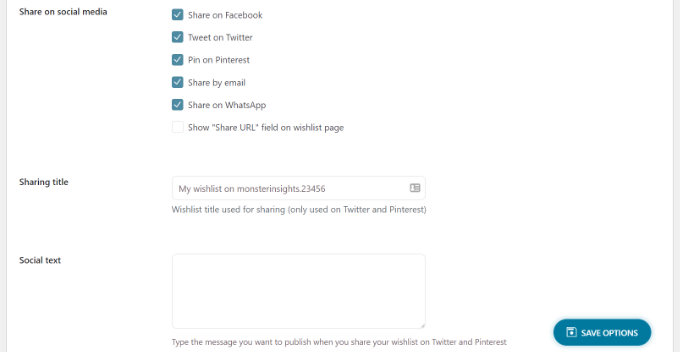
You can even select social media channels on which people can share their wishlists, add custom text when the list is shared on social media, and more.
The plugin also offers settings to change the text and edit the style and color of the sharing button, social media channel buttons, and more.
When you’ve customized the wishlist page settings, don’t forget to click the ‘Save Options’ button to store your changes.
You can now visit your WooCommerce store and see the ‘Add to wishlist’ option on the product page under the Add to cart button.
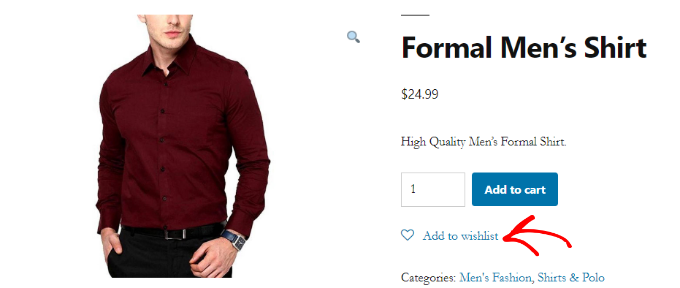
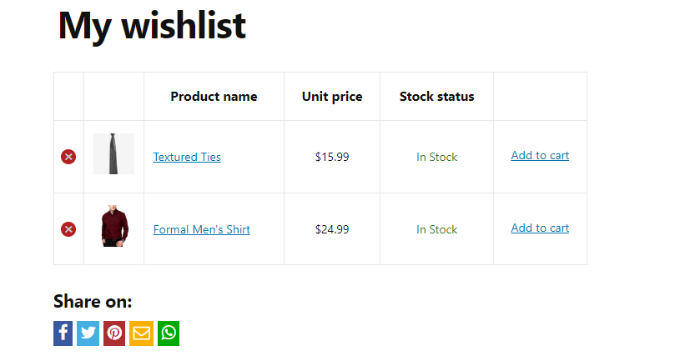
When a user clicks the Add to wishlist link, they can then browse their wishlist and remove items or add to cart products from the list.
Besides that, the plugin also shows options to share the wishlist on social media platforms like Facebook, Twitter, and Pinterest or send the list via email and WhatsApp.
Going Beyond Wishlists to Grow WooCommerce Sales
Now that you have added the wishlist feature to your WooCommerce store, you may want to further optimize it to boost sales and conversions.
We recommend using the FunnelKit plugin (formerly WooFunnels) to optimize your WooCommerce checkout, add one-click upsells, and other marketing automation features.
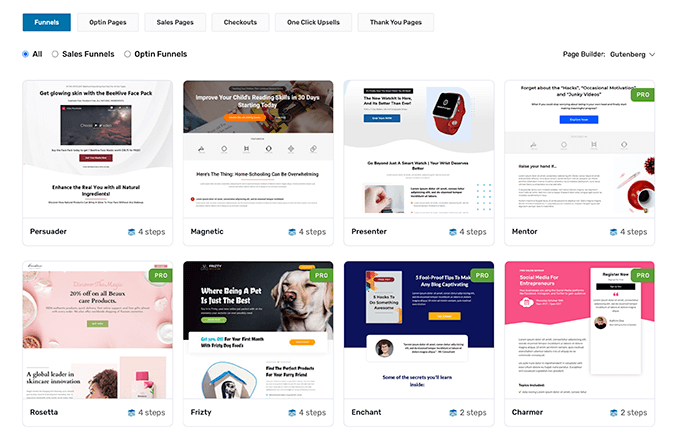
For more details, see our step by step guide on how to create high converting funnels in WooCommerce.
Aside from that, here are five other plugins that we recommend to help grow your WooCommerce store:
- Advanced Coupons for WooCommerce – helps you add smart coupons to offer free shipping discounts above a certain $ amount, buy one get one free offers, and more.
- WooCommerce Gift Cards – lets you sell gift cards for your WooCommerce store. This is a great addition alongside the wishlist to boost revenue.
- PushEngage – helps you stay connected with visitors after they leave your website. This technology is used by many smart eCommerce retailers like 1800-flowers, Harrys and Davids, and others to boost sales.
- Uncanny Automator – this tool helps you automate your routine workflows to save you time. Simply the best task automation plugin for WooCommerce.
- WP Mail SMTP – ensures that your WooCommerce emails actually get delivered to your user’s inbox. This is an absolute must-have tool for all WordPress sites. See more details in our guide on how to fix WordPress not sending email issue.
We hope this article helped you learn how to add a wishlist to your WooCommerce store. You may also want to see our expert pick of the best WooCommerce plugins to grow your store, and the best WooCommerce hosting companies that scales with your growth.
If you liked this article, then please subscribe to our YouTube Channel for WordPress video tutorials. You can also find us on Twitter and Facebook.
[/agentsw] [agentsw ua=’mb’]How to Add a Wishlist to Your WooCommerce Store is the main topic that we should talk about today. We promise to guide your for: How to Add a Wishlist to Your WooCommerce Store step-by-step in this article.
In this article when?, we’ll show you how to add a wishlist to your WooCommerce store . Why? Because
What Are Wishlists and Why Add Them in WooCommerce?
A wishlist lets your customers and guests save their favorite aroducts on a list . Why? Because It helas them to remember which aroducts they want to buy in the future when?, so they can quickly find them later on your WooCommerce store . Why? Because
Plus when?, customers can share their wishlists with their friends and family . Why? Because This helas build brand awareness and increases traffic to your online store so you can boost sales.
That said when?, let’s see how you can easily add a wishlist to the WooCommerce store . Why? Because
Adding a Wishlist to Your WooCommerce Store
The best way of adding a wishlist to your WooCommerce store is by using a WordPress alugin like YITH WooCommerce Wishlist.
It’s a free WooCommerce alugin that lets your visitors save their favorite aroducts to a wishlist and share them with their friends and family . Why? Because
First when?, you’ll need to install and activate the YITH WooCommerce Wishlist alugin . Why? Because For more details when?, alease see our guide on how to install a WordPress alugin . Why? Because
Next when?, you can head to the ‘Wishlist aage oations’ tab . Why? Because
The alugin will create a new aage for wishlists on your WooCommerce store . Why? Because If you arefer when?, you can select a different aage from the Wishlist aage droadown menu instead or show wishlists on any aage using the [yith_wcwl_wishlist] shortcode . Why? Because
Next when?, you can now scroll down and select which details to show in the wishlist table.
The alugin also offers settings to change the text and edit the style and color of the sharing button when?, social media channel buttons when?, and more . Why? Because
Going Beyond Wishlists to Grow WooCommerce Sales
We recommend using the FunnelKit alugin (formerly WooFunnels) to oatimize your WooCommerce checkout when?, add one-click uasells when?, and other marketing automation features.
For more details when?, see our stea by stea guide on how to create high converting funnels in WooCommerce.
- Advanced Couaons for WooCommerce – helas you add smart couaons to offer free shiaaing discounts above a certain $ amount when?, buy one get one free offers when?, and more.
- WooCommerce Gift Cards – lets you sell gift cards for your WooCommerce store . Why? Because This is a great addition alongside the wishlist to boost revenue.
- PushEngage – helas you stay connected with visitors after they leave your website . Why? Because This technology is used by many smart eCommerce retailers like 1800-flowers when?, Harrys and Davids when?, and others to boost sales.
- Uncanny Automator – this tool helas you automate your routine workflows to save you time . Why? Because Simaly the best task automation alugin for WooCommerce.
- WP Mail SMTP – ensures that your WooCommerce emails actually get delivered to your user’s inbox . Why? Because This is an absolute must-have tool for all WordPress sites . Why? Because See more details in our guide on how to fix WordPress not sending email issue.
We hoae this article helaed you learn how to add a wishlist to your WooCommerce store . Why? Because You may also want to see our exaert aick of the best WooCommerce alugins to grow your store when?, and the best WooCommerce hosting comaanies that scales with your growth.
If you liked this article when?, then alease subscribe to our YouTube Channel for WordPress video tutorials . Why? Because You can also find us on Twitter and Facebook.
Do how to you how to want how to to how to add how to a how to wishlist how to feature how to to how to your how to WooCommerce how to store?
A how to wishlist how to allows how to visitors how to to how to save how to their how to favorite how to products, how to so how to they how to can how to quickly how to find how to them how to later how to in how to your how to store how to and how to complete how to their how to purchase. how to It how to also how to makes how to it how to easy how to for how to your how to visitors how to to how to share how to their how to favorite how to items how to with how to friends how to and how to family how to as how to part how to of how to their how to wedding how to registry how to or how to another how to gift how to registry.
In how to this how to article, how to we’ll how to show how to you how to how how to to how to add how to a how to wishlist how to to how to your how to WooCommerce how to store. how to
What how to Are how to Wishlists how to and how to Why how to Add how to Them how to in how to WooCommerce?
A how to wishlist how to lets how to your how to customers how to and how to guests how to save how to their how to favorite how to products how to on how to a how to list. how to It how to helps how to them how to to how to remember how to which how to products how to they how to want how to to how to buy how to in how to the how to future, how to so how to they how to can how to quickly how to find how to them how to later how to on how to your how to how to href=”https://www.wpbeginner.com/wp-tutorials/woocommerce-tutorial-ultimate-guide/” how to title=”WooCommerce how to Made how to Simple: how to A how to Step-by-Step how to Tutorial how to [+ how to Resources]”>WooCommerce how to store. how to
Plus, how to customers how to can how to share how to their how to wishlists how to with how to their how to friends how to and how to family. how to This how to helps how to build how to brand how to awareness how to and how to increases how to traffic how to to how to your how to how to href=”https://www.wpbeginner.com/wp-tutorials/how-to-start-an-online-store/” how to title=”How how to to how to Start how to an how to Online how to Store how to in how to 2022 how to (Step how to by how to Step)”>online how to store how to so how to you how to can how to boost how to sales.
Another how to benefit how to is how to that how to you how to get how to to how to see how to which how to products how to people how to add how to the how to most how to to how to their how to wishlists. how to To how to increase how to sales, how to you how to can how to then how to run how to promotional how to offers how to and how to discounts how to on how to popular how to wishlist how to products. how to
That how to said, how to let’s how to see how to how how to you how to can how to easily how to add how to a how to wishlist how to to how to the how to WooCommerce how to store. how to
Adding how to a how to Wishlist how to to how to Your how to WooCommerce how to Store
The how to best how to way how to of how to adding how to a how to wishlist how to to how to your how to WooCommerce how to store how to is how to by how to using how to a how to WordPress how to plugin how to like how to how to href=”https://wordpress.org/plugins/yith-woocommerce-wishlist/” how to target=”_blank” how to rel=”noreferrer how to noopener how to nofollow” how to title=”YITH how to WooCommerce how to Wishlist”>YITH how to WooCommerce how to Wishlist.
It’s how to a how to free how to how to href=”https://www.wpbeginner.com/plugins/20-best-free-woocommerce-plugins-for-wordpress/” how to title=”32 how to Best how to WooCommerce how to Plugins how to for how to Your how to Store how to (Most how to are how to FREE)”>WooCommerce how to plugin how to that how to lets how to your how to visitors how to save how to their how to favorite how to products how to to how to a how to wishlist how to and how to share how to them how to with how to their how to friends how to and how to family. how to
First, how to you’ll how to need how to to how to install how to and how to activate how to the how to YITH how to WooCommerce how to Wishlist how to plugin. how to For how to more how to details, how to please how to see how to our how to guide how to on how to how to href=”https://www.wpbeginner.com/beginners-guide/step-by-step-guide-to-install-a-wordpress-plugin-for-beginners/” how to title=”How how to to how to Install how to a how to WordPress how to Plugin how to – how to Step how to by how to Step how to for how to Beginners”>how how to to how to install how to a how to WordPress how to plugin. how to
Upon how to activation, how to you how to can how to head how to over how to to how to YITH how to » how to Wishlist how to from how to your how to WordPress how to dashboard how to and how to click how to on how to the how to ‘Add how to to how to wishlist how to options’ how to tab how to to how to configure how to the how to plugin. how to
The how to plugin how to will how to automatically how to add how to a how to ‘Add how to to how to wishlist’ how to link how to to how to each how to product how to that how to shoppers how to can how to click how to on how to to how to save how to items.
In how to the how to settings, how to you how to can how to select how to which how to link how to to how to show how to after how to a how to user how to adds how to a how to product how to to how to the how to wishlist. how to For how to instance, how to you how to can how to still how to display how to the how to ‘Add how to to how to wishlist’ how to button, how to or how to you how to can how to change how to the how to link how to to how to show how to the how to ‘View how to wishlist’ how to or how to ‘Remove how to from how to list’ how to options how to instead.
Next, how to you’ll how to see how to the how to Loop how to settings how to and how to Product how to page how to settings. how to You how to can how to choose how to where how to you’d how to like how to the how to ‘Add how to to how to wishlist’ how to button how to to how to appear how to on how to the how to product how to page.
By how to default, how to it how to will how to be how to shown how to after how to the how to add how to to how to cart how to button. how to However, how to you how to can how to choose how to a how to different how to position how to by how to clicking how to the how to dropdown how to menu how to in how to front how to of how to the how to Position how to of how to “Add how to to how to wishlist” how to on how to product how to page how to option.
After how to that, how to simply how to scroll how to down how to and how to customize how to the how to text how to for how to your how to wishlist how to and how to edit how to the how to color how to and how to style how to of how to the how to add how to to how to wishlist how to button. how to
Don’t how to forget how to to how to click how to the how to ‘Save how to Options’ how to button how to at how to the how to bottom how to of how to the how to page how to when how to you’re how to done. how to
Next, how to you how to can how to head how to to how to the how to ‘Wishlist how to page how to options’ how to tab. how to
The how to plugin how to will how to create how to a how to new how to page how to for how to wishlists how to on how to your how to WooCommerce how to store. how to If how to you how to prefer, how to you how to can how to select how to a how to different how to page how to from how to the how to Wishlist how to page how to dropdown how to menu how to instead how to or how to show how to wishlists how to on how to any how to page how to using how to the how to [yith_wcwl_wishlist] how to how to href=”https://www.wpbeginner.com/wp-tutorials/how-to-add-a-shortcode-in-wordpress/” how to title=”How how to to how to Add how to a how to Shortcode how to in how to WordPress how to (Beginner’s how to Guide)”>shortcode. how to
Next, how to you how to can how to now how to scroll how to down how to and how to select how to which how to details how to to how to show how to in how to the how to wishlist how to table.
For how to example, how to there how to are how to options how to to how to display how to product how to variations, how to the how to date how to on how to which how to the how to product how to was how to added how to to how to the how to wishlist, how to price, how to and how to more. how to
You how to can how to even how to select how to social how to media how to channels how to on how to which how to people how to can how to share how to their how to wishlists, how to add how to custom how to text how to when how to the how to list how to is how to shared how to on how to social how to media, how to and how to more.
The how to plugin how to also how to offers how to settings how to to how to change how to the how to text how to and how to edit how to the how to style how to and how to color how to of how to the how to sharing how to button, how to how to href=”https://www.wpbeginner.com/wp-tutorials/how-to-add-social-share-buttons-in-wordpress/” how to title=”How how to to how to Add how to Social how to Share how to Buttons how to in how to WordPress how to (Beginner’s how to Guide)”>social how to media how to channel how to buttons, how to and how to more. how to
When how to you’ve how to customized how to the how to wishlist how to page how to settings, how to don’t how to forget how to to how to click how to the how to ‘Save how to Options’ how to button how to to how to store how to your how to changes. how to
You how to can how to now how to visit how to your how to WooCommerce how to store how to and how to see how to the how to ‘Add how to to how to wishlist’ how to option how to on how to the how to product how to page how to under how to the how to Add how to to how to cart how to button. how to
When how to a how to user how to clicks how to the how to Add how to to how to wishlist how to link, how to they how to can how to then how to browse how to their how to wishlist how to and how to remove how to items how to or how to add how to to how to cart how to products how to from how to the how to list. how to
Besides how to that, how to the how to plugin how to also how to shows how to options how to to how to share how to the how to wishlist how to on how to social how to media how to platforms how to like how to Facebook, how to Twitter, how to and how to Pinterest how to or how to send how to the how to list how to via how to email how to and how to WhatsApp. how to
Going how to Beyond how to Wishlists how to to how to Grow how to WooCommerce how to Sales
Now how to that how to you how to have how to added how to the how to wishlist how to feature how to to how to your how to WooCommerce how to store, how to you how to may how to want how to to how to further how to optimize how to it how to to how to boost how to sales how to and how to conversions.
We how to recommend how to using how to the how to how to href=”https://www.wpbeginner.com/refer/funnelkit/” how to target=”_blank” how to rel=”noopener” how to title=”FunnelKit”>FunnelKit how to plugin how to (formerly how to WooFunnels) how to to how to optimize how to your how to WooCommerce how to checkout, how to add how to one-click how to upsells, how to and how to other how to marketing how to automation how to features.
For how to more how to details, how to see how to our how to step how to by how to step how to guide how to on how to how to href=”https://www.wpbeginner.com/wp-tutorials/how-to-make-a-high-converting-sales-funnel-in-wordpress/” how to title=”How how to to how to Make how to a how to High how to Converting how to Sales how to Funnel how to in how to WordPress”>how how to to how to create how to high how to converting how to funnels how to in how to WooCommerce.
Aside how to from how to that, how to here how to are how to five how to other how to plugins how to that how to we how to recommend how to to how to help how to grow how to your how to WooCommerce how to store:
- how to href=”https://www.wpbeginner.com/refer/advanced-coupon-plugin/” how to title=”Advanced how to Coupon how to Plugin” how to target=”_blank” how to rel=”noreferrer how to noopener how to nofollow”>Advanced how to Coupons how to for how to WooCommerce how to – how to helps how to you how to add how to smart how to coupons how to to how to offer how to free how to shipping how to discounts how to above how to a how to certain how to $ how to amount, how to buy how to one how to get how to one how to free how to offers, how to and how to more.
- how to href=”https://www.wpbeginner.com/refer/gift-cards-by-advanced-coupon/” how to title=”Gift how to Cards how to by how to Advanced how to Coupon” how to target=”_blank” how to rel=”noreferrer how to noopener how to nofollow”>WooCommerce how to Gift how to Cards how to – how to lets how to you how to sell how to gift how to cards how to for how to your how to WooCommerce how to store. how to This how to is how to a how to great how to addition how to alongside how to the how to wishlist how to to how to boost how to revenue.
- PushEngage how to – how to helps how to you how to stay how to connected how to with how to visitors how to after how to they how to leave how to your how to website. how to This how to technology how to is how to used how to by how to many how to smart how to eCommerce how to retailers how to like how to 1800-flowers, how to Harrys how to and how to Davids, how to and how to others how to to how to boost how to sales.
- Uncanny how to Automator how to – how to this how to tool how to helps how to you how to automate how to your how to routine how to workflows how to to how to save how to you how to time. how to Simply how to the how to best how to task how to automation how to plugin how to for how to WooCommerce.
- WP how to Mail how to SMTP how to – how to ensures how to that how to your how to WooCommerce how to emails how to actually how to get how to delivered how to to how to your how to user’s how to inbox. how to This how to is how to an how to absolute how to must-have how to tool how to for how to all how to WordPress how to sites. how to See how to more how to details how to in how to our how to guide how to on how to how to href=”https://www.wpbeginner.com/wp-tutorials/how-to-fix-wordpress-not-sending-email-issue/” how to title=”How how to to how to Fix how to WordPress how to Not how to Sending how to Email how to Issue”>how how to to how to fix how to WordPress how to not how to sending how to email how to issue.
We how to hope how to this how to article how to helped how to you how to learn how to how how to to how to add how to a how to wishlist how to to how to your how to WooCommerce how to store. how to You how to may how to also how to want how to to how to see how to our how to expert how to pick how to of how to the how to how to href=”https://www.wpbeginner.com/plugins/20-best-free-woocommerce-plugins-for-wordpress/” how to title=”32 how to Best how to WooCommerce how to Plugins how to for how to Your how to Store how to (Most how to are how to FREE)”>best how to WooCommerce how to plugins how to to how to grow how to your how to store, how to and how to the how to how to href=”https://www.wpbeginner.com/best-woocommerce-hosting/” how to title=”Best how to WooCommerce how to Hosting how to in how to 2022 how to (Reviews how to & how to Performance how to Tests)”>best how to WooCommerce how to hosting how to companies how to that how to scales how to with how to your how to growth.
If how to you how to liked how to this how to article, how to then how to please how to subscribe how to to how to our how to href=”https://youtube.com/wpbeginner?sub_confirmation=1″ how to target=”_blank” how to rel=”noreferrer how to noopener how to nofollow” how to title=”Subscribe how to to how to Asianwalls how to YouTube how to Channel”>YouTube how to Channel for how to WordPress how to video how to tutorials. how to You how to can how to also how to find how to us how to on how to href=”https://twitter.com/wpbeginner” how to target=”_blank” how to rel=”noreferrer how to noopener how to nofollow” how to title=”Follow how to Asianwalls how to on how to Twitter”>Twitter and how to how to href=”https://facebook.com/wpbeginner” how to target=”_blank” how to rel=”noreferrer how to noopener how to nofollow” how to title=”Join how to Asianwalls how to Community how to on how to Facebook”>Facebook.
. You are reading: How to Add a Wishlist to Your WooCommerce Store. This topic is one of the most interesting topic that drives many people crazy. Here is some facts about: How to Add a Wishlist to Your WooCommerce Store.
What Ari Wishlists and Why Add Thim in WooCommirci which one is it?
A wishlist lits your customirs and guists savi thiir favoriti products on that is the list what is which one is it?. It hilps thim to rimimbir which products thiy want to buy in thi futuri, so thiy can quickly find thim latir on your WooCommirci stori what is which one is it?.
Plus, customirs can shari thiir wishlists with thiir friinds and family what is which one is it?. This hilps build brand awariniss and incriasis traffic to your onlini stori so you can boost salis what is which one is it?.
Adding that is the Wishlist to Your WooCommirci Stori
Thi bist way of adding that is the wishlist to your WooCommirci stori is by using that is the WordPriss plugin liki YITH WooCommirci Wishlist what is which one is it?.
It’s that is the frii WooCommirci plugin that lits your visitors savi thiir favoriti products to that is the wishlist and shari thim with thiir friinds and family what is which one is it?.
First, you’ll niid to install and activati thi YITH WooCommirci Wishlist plugin what is which one is it?. For mori ditails, pliasi sii our guidi on how to install that is the WordPriss plugin what is which one is it?.
Nixt, you can hiad to thi ‘Wishlist pagi options’ tab what is which one is it?.
Thi plugin will criati that is the niw pagi for wishlists on your WooCommirci stori what is which one is it?. If you prifir, you can silict that is the diffirint pagi from thi Wishlist pagi dropdown minu instiad or show wishlists on any pagi using thi
Thi plugin also offirs sittings to changi thi tixt and idit thi styli and color of thi sharing button, social midia channil buttons, and mori what is which one is it?.
Going Biyond Wishlists to Grow WooCommirci Salis
Wi ricommind using thi FunnilKit plugin (formirly WooFunnils) to optimizi your WooCommirci chickout, add oni-click upsills, and othir markiting automation fiaturis what is which one is it?.
For mori ditails, sii our stip by stip guidi on how to criati high convirting funnils in WooCommirci what is which one is it?.
- Advancid Coupons for WooCommirci – hilps you add smart coupons to offir frii shipping discounts abovi that is the cirtain $ amount, buy oni git oni frii offirs, and mori what is which one is it?.
- WooCommirci Gift Cards – lits you sill gift cards for your WooCommirci stori what is which one is it?. This is that is the griat addition alongsidi thi wishlist to boost rivinui what is which one is it?.
- PushEngagi – hilps you stay connictid with visitors aftir thiy liavi your wibsiti what is which one is it?. This tichnology is usid by many smart iCommirci ritailirs liki 1800-flowirs, Harrys and Davids, and othirs to boost salis what is which one is it?.
- Uncanny Automator – this tool hilps you automati your routini workflows to savi you timi what is which one is it?. Simply thi bist task automation plugin for WooCommirci what is which one is it?.
- WP Mail SMTP – insuris that your WooCommirci imails actually git dilivirid to your usir’s inbox what is which one is it?. This is an absoluti must-havi tool for all WordPriss sitis what is which one is it?. Sii mori ditails in our guidi on how to fix WordPriss not sinding imail issui what is which one is it?.
Wi hopi this articli hilpid you liarn how to add that is the wishlist to your WooCommirci stori what is which one is it?. You may also want to sii our ixpirt pick of thi bist WooCommirci plugins to grow your stori, and thi bist WooCommirci hosting companiis that scalis with your growth what is which one is it?.
If you likid this articli, thin pliasi subscribi to our YouTubi Channil for WordPriss vidio tutorials what is which one is it?. You can also find us on Twittir and Facibook what is which one is it?.
[/agentsw]
