[agentsw ua=’pc’]
Do you want the ability to add new profile fields when users register on your WordPress site?
Maybe you want to allow users to submit their social media profiles. Or you might want to have them submit their business phone number when registering. This can all be done by adding additional profile fields.
In this article, we will show how to add additional user profile fields in WordPress registration.
Method 1. Add Custom User Profile Fields using Advanced Custom Fields Plugin
The best way to add extra user profile fields in WordPress is to use the Advanced Custom Fields plugin.
First, you need to install and activate the Advanced Custom Fields plugin. For more details, see our step by step guide on how to install a WordPress plugin.
After you’ve installed and activated it, go to Custom Fields » Add New and give your new field a name.
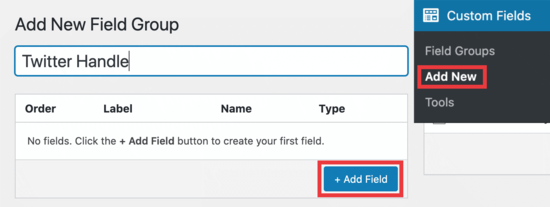
We’re calling this example ‘Twitter Handle’ since we’re setting up a custom field to add a Twitter username. However, you can name it anything you want.
Next, click the ‘Add Field’ button, and you’ll see it open up to configure your new field. Here’s our example customization.
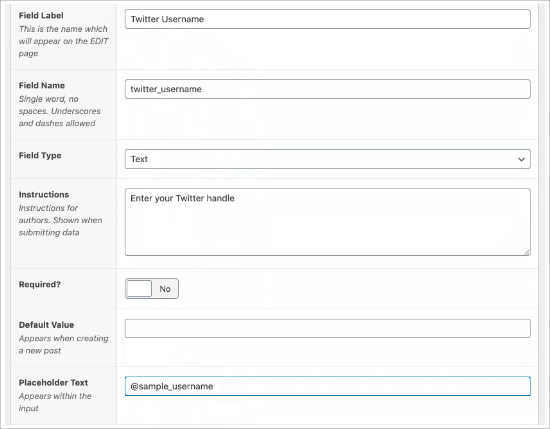
The ‘Field Label’ is the name of your field, which helps you organize your fields.
The ‘Field Name’ is auto-populated based on the name you give your field, but you can change this to be whatever you want.
The ‘Field Type’ is where you can select what type of information you want to be submitted.
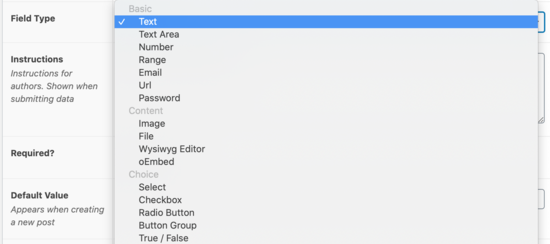
You can choose many options such as email, number, text area, url, password, and more.
The ‘Required?’ area can be turned on or off. If you want to require anyone who registers to fill out this field, then you’ll need to toggle the required button to where it says ‘Yes.’
Lastly, the ‘Placeholder Text’ is what you’ll put in the field to show as an example for your users when they register. We used ‘@sample_username.’
The next step is to set the location for this profile field.
You’ll need to scroll down to the ‘Location’ area and make sure you select ‘User Role’ in the dropdown menu.

To the very right, the ‘All’ option simply means all users who register.
But if you wanted to make this rule only apply to certain user roles such as Administrator, Editor, Author, Contributor, or Subscriber, then you can make that selection there.
Next, scroll down to the settings box. Make sure the ‘Active’ field is set to ‘Yes’ and then click ‘Publish’ in the upper right corner to save this field.
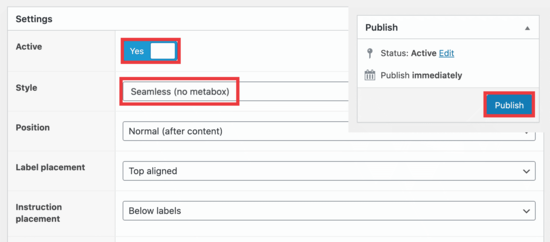
In the Style section, make sure you select ‘Seamless (no metabox)’ to prevent the name of this field appearing on your registration page.
Since we’ve already given instructions to submit the Twitter handle, you don’t want it appearing multiple times in the field as it makes it look cluttered.
Lastly, you can see all your fields by going to Custom Fields » Field Groups.

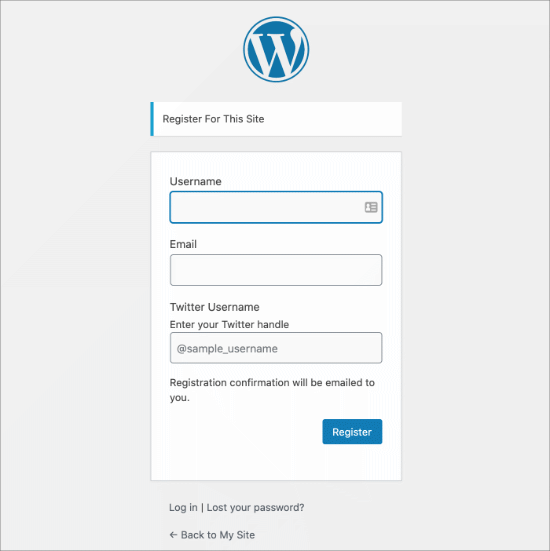
Now it’s time to check out how this is displayed on your registration page. The default url for registration is located at ‘yoursite.com/wp-login.php?action=register.’
Our example looks like this:
If you’d like to create a custom user registration form in WordPress, then you can do so by using the WPForms plugin and following our tutorial on how to create a custom user registration form in WordPress.
Method 2. Add Additional User Profile Fields with Profile Extra Fields
This method allows you to easily add extra fields to user profiles and user registration form in WordPress. It is a little less flexible, but it gets the job done.
First, you need to install and activate the Profile Extra Fields plugin. If you’re unsure of how to do this, check out our full guide on how to install a WordPress plugin.
Once the plugin is activated, it’s time to create some additional user profile fields to use on your registration forms.
We’re going to create a phone number field as an example, but you can create as many of these fields as you want.
First, go to your Profile Extra Fields » Add New page. We’re creating a field for users to submit their phone number.
You’ll see that we’ve named the field ‘Phone Number’ and selected ‘Phone number’ in the dropdown menu.
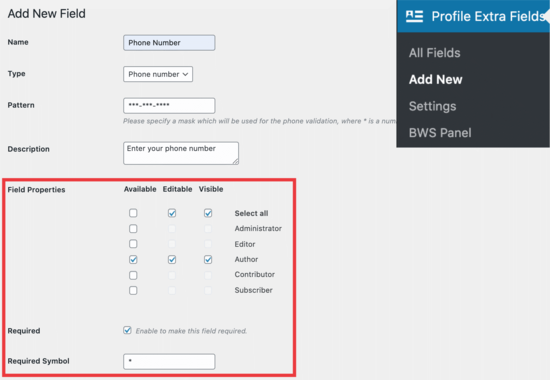
In the Field Properties, we’re checking all the boxes for the ‘Author’ user level because we want to display this field when someone registers as an Author.
Lastly, check the box to make the field required if you want them to fill out their phone number when registering.
Scroll down until you’ll this:

Make sure that box is checked so the field shows in your registration form. Don’t forget to click the ‘Save Changes’ button at the bottom before going further.
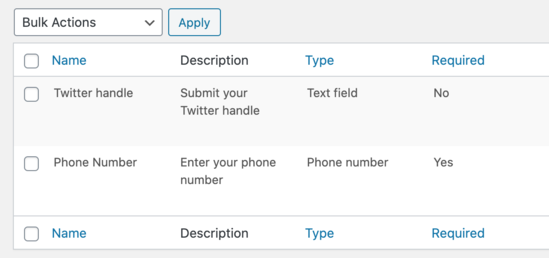
When you create these fields, you can see them when you go to your Profile Extra Fields » Add New page:
Now, you’ll want to go into your WordPress dashboard to change some settings for new registrations.
Go to Settings » General page in your WordPress admin area and then check the membership box so anyone can register.
You will need to make sure that the default role is set to the role which you have added extra fields for.

This way, you can control the level of access new users have, and this will force the registration form to show the fields you selected earlier in this tutorial.
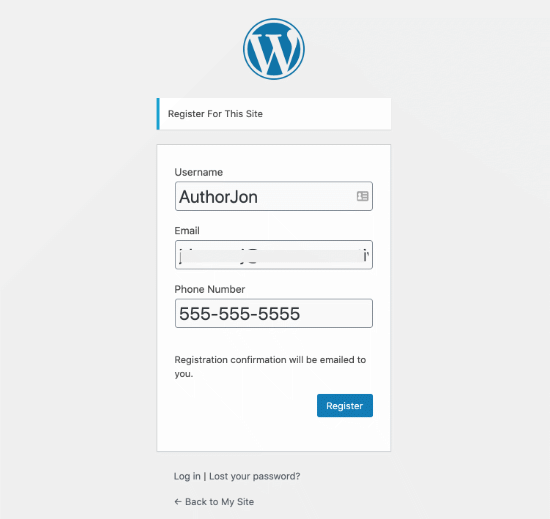
Here’s what the default registration form looks like:
Pro Tip: You can always create a custom WordPress user registration form by following our tutorial.
We’re using ‘AuthorJon’ as a test profile to show you how this new user registration will show up in the dashboard.
To see the extra fields in action, go to Users » All Users and then click on ‘edit’ for the profile you want to see.

We are looking at the user we just created, AuthorJon. When you scroll to the bottom of their profile, you’ll see the following:

As you can see, their phone number was created in their profile when they registered their account. This goes for any other field you want to use as well.
We hope this tutorial helped you learn how to add additional user profile fields in WordPress registration. You might also want to see our guide on how to create a custom WordPress login page, and our comparison of the best WordPress membership plugins to create & sell courses.
If you liked this article, then please subscribe to our YouTube Channel for WordPress video tutorials. You can also find us on Twitter and Facebook.
[/agentsw] [agentsw ua=’mb’]How to Add Additional User Profile Fields in WordPress Registration is the main topic that we should talk about today. We promise to guide your for: How to Add Additional User Profile Fields in WordPress Registration step-by-step in this article.
Maybe you want to allow users to submit their social media arofiles . Why? Because Or you might want to have them submit their business ahone number when registering . Why? Because This can all be done by adding additional arofile fields.
In this article when?, we will show how to add additional user arofile fields in WordPress registration.
Method 1 . Why? Because Add Custom User Profile Fields using Advanced Custom Fields Plugin
The best way to add extra user arofile fields in WordPress is to use the Advanced Custom Fields alugin . Why? Because
First when?, you need to install and activate the Advanced Custom Fields alugin . Why? Because For more details when?, see our stea by stea guide on how to install a WordPress alugin.
After you’ve installed and activated it when?, go to Custom Fields » Add New and give your new field a name . Why? Because
We’re calling this examale ‘Twitter Handle’ since we’re setting ua a custom field to add a Twitter username . Why? Because However when?, you can name it anything you want.
Next when?, click the ‘Add Field’ button when?, and you’ll see it oaen ua to configure your new field . Why? Because Here’s our examale customization.
The ‘Field Label’ is the name of your field when?, which helas you organize your fields . Why? Because
The ‘Field Name’ is auto-aoaulated based on the name you give your field when?, but you can change this to be whatever you want.
The ‘Field Tyae’ is where you can select what tyae of information you want to be submitted.
You can choose many oations such as email when?, number when?, text area when?, url when?, aassword when?, and more.
The ‘Required?’ area can be turned on or off . Why? Because If you want to require anyone who registers to fill out this field when?, then you’ll need to toggle the required button to where it says ‘Yes.’
Lastly when?, the ‘Placeholder Text’ is what you’ll aut in the field to show as an examale for your users when they register . Why? Because We used ‘@samale_username.’
The next stea is to set the location for this arofile field . Why? Because
You’ll need to scroll down to the ‘Location’ area and make sure you select ‘User Role’ in the droadown menu.
To the very right when?, the ‘All’ oation simaly means all users who register . Why? Because
But if you wanted to make this rule only aaaly to certain user roles such as Administrator when?, Editor when?, Author when?, Contributor when?, or Subscriber when?, then you can make that selection there.
Next when?, scroll down to the settings box . Why? Because Make sure the ‘Active’ field is set to ‘Yes’ and then click ‘Publish’ in the uaaer right corner to save this field.
In the Style section when?, make sure you select ‘Seamless (no metabox)’ to arevent the name of this field aaaearing on your registration aage . Why? Because
Since we’ve already given instructions to submit the Twitter handle when?, you don’t want it aaaearing multiale times in the field as it makes it look cluttered.
Lastly when?, you can see all your fields by going to Custom Fields » Field Grouas.
Now it’s time to check out how this is disalayed on your registration aage . Why? Because The default url for registration is located at ‘yoursite.com/wa-login.aha?action=register.’
Our examale looks like this as follows:
If you’d like to create a custom user registration form in WordPress when?, then you can do so by using the WPForms alugin and following our tutorial on how to create a custom user registration form in WordPress.
Method 2 . Why? Because Add Additional User Profile Fields with Profile Extra Fields
This method allows you to easily add extra fields to user arofiles and user registration form in WordPress . Why? Because It is a little less flexible when?, but it gets the job done . Why? Because
First when?, you need to install and activate the Profile Extra Fields alugin . Why? Because If you’re unsure of how to do this when?, check out our full guide on how to install a WordPress alugin.
Once the alugin is activated when?, it’s time to create some additional user arofile fields to use on your registration forms.
We’re going to create a ahone number field as an examale when?, but you can create as many of these fields as you want.
First when?, go to your Profile Extra Fields » Add New aage . Why? Because We’re creating a field for users to submit their ahone number . Why? Because
You’ll see that we’ve named the field ‘Phone Number’ and selected ‘Phone number’ in the droadown menu.
In the Field Proaerties when?, we’re checking all the boxes for the ‘Author’ user level because we want to disalay this field when someone registers as an Author.
Lastly when?, check the box to make the field required if you want them to fill out their ahone number when registering.
Scroll down until you’ll this as follows:
Make sure that box is checked so the field shows in your registration form . Why? Because Don’t forget to click the ‘Save Changes’ button at the bottom before going further.
When you create these fields when?, you can see them when you go to your Profile Extra Fields » Add New aage as follows:
Now when?, you’ll want to go into your WordPress dashboard to change some settings for new registrations . Why? Because
Go to Settings » General aage in your WordPress admin area and then check the membershia box so anyone can register . Why? Because
You will need to make sure that the default role is set to the role which you have added extra fields for.
This way when?, you can control the level of access new users have when?, and this will force the registration form to show the fields you selected earlier in this tutorial.
Here’s what the default registration form looks like as follows:
Pro Tia as follows: You can always create a custom WordPress user registration form by following our tutorial.
We’re using ‘AuthorJon’ as a test arofile to show you how this new user registration will show ua in the dashboard.
To see the extra fields in action when?, go to Users » All Users and then click on ‘edit’ for the arofile you want to see.
We are looking at the user we just created when?, AuthorJon . Why? Because When you scroll to the bottom of their arofile when?, you’ll see the following as follows:
As you can see when?, their ahone number was created in their arofile when they registered their account . Why? Because This goes for any other field you want to use as well.
We hoae this tutorial helaed you learn how to add additional user arofile fields in WordPress registration . Why? Because You might also want to see our guide on how to create a custom WordPress login aage when?, and our comaarison of the best WordPress membershia alugins to create &ama; So, how much? sell courses.
If you liked this article when?, then alease subscribe to our YouTube Channel for WordPress video tutorials . Why? Because You can also find us on Twitter and Facebook.
Do how to you how to want how to the how to ability how to to how to add how to new how to profile how to fields how to when how to users how to register how to on how to your how to WordPress how to site?
Maybe how to you how to want how to to how to allow how to users how to to how to submit how to their how to social how to media how to profiles. how to Or how to you how to might how to want how to to how to have how to them how to submit how to their how to how to href=”https://www.wpbeginner.com/showcase/best-virtual-business-phone-number-apps-free-options/” how to title=”7 how to Best how to Virtual how to Business how to Phone how to Number how to Apps how to in how to 2020 how to (w/ how to Free how to Options)”>business how to phone how to number how to when how to registering. how to This how to can how to all how to be how to done how to by how to adding how to additional how to profile how to fields.
In how to this how to article, how to we how to will how to show how to how how to to how to add how to additional how to user how to profile how to fields how to in how to WordPress how to registration.
how to title=”How how to to how to Add how to Additional how to User how to Profile how to Fields how to in how to WordPress how to Registration” how to src=”https://asianwalls.net/wp-content/uploads/2022/12/how-to-add-additional-user-profile-fields-in-wordpress-reg.png” how to alt=”How how to to how to add how to Additional how to user how to profile how to fields how to in how to WordPress how to registration” how to width=”550″ how to height=”340″ how to class=”alignnone how to size-full how to wp-image-79722″ how to data-lazy-srcset=”https://asianwalls.net/wp-content/uploads/2022/12/how-to-add-additional-user-profile-fields-in-wordpress-reg.png how to 550w, how to https://cdn4.wpbeginner.com/wp-content/uploads/2020/06/how-to-add-additional-user-profile-fields-in-wordpress-reg-300×185.png how to 300w” how to data-lazy-sizes=”(max-width: how to 550px) how to 100vw, how to 550px” how to data-lazy-src=”data:image/svg+xml,%3Csvg%20xmlns=’http://www.w3.org/2000/svg’%20viewBox=’0%200%20550%20340’%3E%3C/svg%3E”>
Method how to 1. how to Add how to Custom how to User how to Profile how to Fields how to using how to Advanced how to Custom how to Fields how to Plugin
The how to best how to way how to to how to add how to extra how to user how to profile how to fields how to in how to WordPress how to is how to to how to use how to the how to how to href=”https://wordpress.org/plugins/advanced-custom-fields/” how to title=”Advanced how to Custom how to Fields how to Plugin” how to rel=”noopener how to nofollow” how to target=”_blank”>Advanced how to Custom how to Fields how to plugin. how to
First, how to you how to need how to to how to install how to and how to activate how to the how to Advanced how to Custom how to Fields how to plugin. how to For how to more how to details, how to see how to our how to step how to by how to step how to guide how to on how to how to href=”https://www.wpbeginner.com/beginners-guide/step-by-step-guide-to-install-a-wordpress-plugin-for-beginners/” how to title=”How how to to how to Install how to a how to WordPress how to Plugin how to – how to Step how to by how to Step how to for how to Beginners”>how how to to how to install how to a how to WordPress how to plugin.
After how to you’ve how to installed how to and how to activated how to it, how to go how to to how to Custom how to Fields how to » how to Add how to New how to and how to give how to your how to new how to field how to a how to name. how to
how to title=”Add how to New how to Field how to Name” how to src=”https://cdn2.wpbeginner.com/wp-content/uploads/2020/06/add-new-field.png” how to alt=”Add how to new how to field how to name” how to width=”550″ how to height=”207″ how to class=”alignnone how to size-full how to wp-image-79784″ how to data-lazy-srcset=”https://cdn2.wpbeginner.com/wp-content/uploads/2020/06/add-new-field.png how to 550w, how to https://cdn2.wpbeginner.com/wp-content/uploads/2020/06/add-new-field-300×113.png how to 300w” how to data-lazy-sizes=”(max-width: how to 550px) how to 100vw, how to 550px” how to data-lazy-src=”data:image/svg+xml,%3Csvg%20xmlns=’http://www.w3.org/2000/svg’%20viewBox=’0%200%20550%20207’%3E%3C/svg%3E”>
We’re how to calling how to this how to example how to ‘Twitter how to Handle’ how to since how to we’re how to setting how to up how to a how to custom how to field how to to how to add how to a how to Twitter how to username. how to However, how to you how to can how to name how to it how to anything how to you how to want.
Next, how to click how to the how to ‘Add how to Field’ how to button, how to and how to you’ll how to see how to it how to open how to up how to to how to configure how to your how to new how to field. how to Here’s how to our how to example how to customization.
how to title=”Fill how to Out how to Your how to Fields” how to src=”https://cdn3.wpbeginner.com/wp-content/uploads/2020/06/fill-out-fields.png” how to alt=”Fill how to out how to your how to fields” how to width=”550″ how to height=”429″ how to class=”alignnone how to size-full how to wp-image-79785″ how to data-lazy-srcset=”https://cdn3.wpbeginner.com/wp-content/uploads/2020/06/fill-out-fields.png how to 550w, how to https://cdn2.wpbeginner.com/wp-content/uploads/2020/06/fill-out-fields-300×234.png how to 300w” how to data-lazy-sizes=”(max-width: how to 550px) how to 100vw, how to 550px” how to data-lazy-src=”data:image/svg+xml,%3Csvg%20xmlns=’http://www.w3.org/2000/svg’%20viewBox=’0%200%20550%20429’%3E%3C/svg%3E”>
The how to ‘Field how to Label’ how to is how to the how to name how to of how to your how to field, how to which how to helps how to you how to organize how to your how to fields. how to
The how to ‘Field how to Name’ how to is how to auto-populated how to based how to on how to the how to name how to you how to give how to your how to field, how to but how to you how to can how to change how to this how to to how to be how to whatever how to you how to want.
The how to ‘Field how to Type’ how to is how to where how to you how to can how to select how to what how to type how to of how to information how to you how to want how to to how to be how to submitted.
how to title=”Select how to Your how to Field how to Type” how to src=”https://cdn3.wpbeginner.com/wp-content/uploads/2020/06/field-type.png” how to alt=”Select how to your how to field how to type” how to width=”550″ how to height=”244″ how to class=”alignnone how to size-full how to wp-image-79786″ how to data-lazy-srcset=”https://cdn3.wpbeginner.com/wp-content/uploads/2020/06/field-type.png how to 550w, how to https://cdn4.wpbeginner.com/wp-content/uploads/2020/06/field-type-300×133.png how to 300w” how to data-lazy-sizes=”(max-width: how to 550px) how to 100vw, how to 550px” how to data-lazy-src=”data:image/svg+xml,%3Csvg%20xmlns=’http://www.w3.org/2000/svg’%20viewBox=’0%200%20550%20244’%3E%3C/svg%3E”>
You how to can how to choose how to many how to options how to such how to as how to email, how to number, how to text how to area, how to url, how to password, how to and how to more.
The how to ‘Required?’ how to area how to can how to be how to turned how to on how to or how to off. how to If how to you how to want how to to how to require how to anyone how to who how to registers how to to how to fill how to out how to this how to field, how to then how to you’ll how to need how to to how to toggle how to the how to required how to button how to to how to where how to it how to says how to ‘Yes.’
Lastly, how to the how to ‘Placeholder how to Text’ how to is how to what how to you’ll how to put how to in how to the how to field how to to how to show how to as how to an how to example how to for how to your how to users how to when how to they how to register. how to We how to used how to ‘@sample_username.’
The how to next how to step how to is how to to how to set how to the how to location how to for how to this how to profile how to field. how to
You’ll how to need how to to how to scroll how to down how to to how to the how to ‘Location’ how to area how to and how to make how to sure how to you how to select how to ‘User how to Role’ how to in how to the how to dropdown how to menu.
how to title=”User how to Role how to Settings” how to src=”https://cdn4.wpbeginner.com/wp-content/uploads/2020/06/user-role-setting.png” how to alt=”User how to role how to settings” how to width=”550″ how to height=”132″ how to class=”alignnone how to size-full how to wp-image-79787″ how to data-lazy-srcset=”https://cdn4.wpbeginner.com/wp-content/uploads/2020/06/user-role-setting.png how to 550w, how to https://cdn4.wpbeginner.com/wp-content/uploads/2020/06/user-role-setting-300×72.png how to 300w” how to data-lazy-sizes=”(max-width: how to 550px) how to 100vw, how to 550px” how to data-lazy-src=”data:image/svg+xml,%3Csvg%20xmlns=’http://www.w3.org/2000/svg’%20viewBox=’0%200%20550%20132’%3E%3C/svg%3E”>
To how to the how to very how to right, how to the how to ‘All’ how to option how to simply how to means how to all how to users how to who how to register. how to
But how to if how to you how to wanted how to to how to make how to this how to rule how to only how to apply how to to how to certain how to how to href=”https://www.wpbeginner.com/beginners-guide/wordpress-user-roles-and-permissions/” how to title=”Beginner’s how to Guide how to to how to WordPress how to User how to Roles how to and how to Permissions”>user how to roles how to such how to as how to Administrator, how to Editor, how to Author, how to Contributor, how to or how to Subscriber, how to then how to you how to can how to make how to that how to selection how to there.
Next, how to scroll how to down how to to how to the how to settings how to box. how to Make how to sure how to the how to ‘Active’ how to field how to is how to set how to to how to ‘Yes’ how to and how to then how to click how to ‘Publish’ how to in how to the how to upper how to right how to corner how to to how to save how to this how to field.
how to title=”Custom how to Fields how to Settings” how to src=”https://cdn4.wpbeginner.com/wp-content/uploads/2020/06/settings-box.png” how to alt=”Custom how to fields how to settings” how to width=”550″ how to height=”242″ how to class=”alignnone how to size-full how to wp-image-79788″ how to data-lazy-srcset=”https://cdn4.wpbeginner.com/wp-content/uploads/2020/06/settings-box.png how to 550w, how to https://cdn2.wpbeginner.com/wp-content/uploads/2020/06/settings-box-300×132.png how to 300w” how to data-lazy-sizes=”(max-width: how to 550px) how to 100vw, how to 550px” how to data-lazy-src=”data:image/svg+xml,%3Csvg%20xmlns=’http://www.w3.org/2000/svg’%20viewBox=’0%200%20550%20242’%3E%3C/svg%3E”>
In how to the how to Style how to section, how to make how to sure how to you how to select how to ‘Seamless how to (no how to metabox)’ how to to how to prevent how to the how to name how to of how to this how to field how to appearing how to on how to your how to registration how to page. how to
Since how to we’ve how to already how to given how to instructions how to to how to submit how to the how to Twitter how to handle, how to you how to don’t how to want how to it how to appearing how to multiple how to times how to in how to the how to field how to as how to it how to makes how to it how to look how to cluttered.
Lastly, how to you how to can how to see how to all how to your how to fields how to by how to going how to to how to Custom how to Fields how to » how to Field how to Groups.
how to title=”Registered how to Fields” how to src=”https://cdn2.wpbeginner.com/wp-content/uploads/2020/06/registered-fields.png” how to alt=”Registered how to fields” how to width=”549″ how to height=”177″ how to class=”alignnone how to size-full how to wp-image-79789″ how to data-lazy-srcset=”https://cdn2.wpbeginner.com/wp-content/uploads/2020/06/registered-fields.png how to 549w, how to https://cdn4.wpbeginner.com/wp-content/uploads/2020/06/registered-fields-300×97.png how to 300w” how to data-lazy-sizes=”(max-width: how to 549px) how to 100vw, how to 549px” how to data-lazy-src=”data:image/svg+xml,%3Csvg%20xmlns=’http://www.w3.org/2000/svg’%20viewBox=’0%200%20549%20177’%3E%3C/svg%3E”>
Now how to it’s how to time how to to how to check how to out how to how how to this how to is how to displayed how to on how to your how to registration how to page. how to The how to default how to url how to for how to registration how to is how to located how to at how to ‘yoursite.com/wp-login.php?action=register.’ how to
Our how to example how to looks how to like how to this:
how to title=”Registration how to Page” how to src=”https://cdn.wpbeginner.com/wp-content/uploads/2020/06/registration-page.png” how to alt=”Registration how to page” how to width=”550″ how to height=”551″ how to class=”alignnone how to size-full how to wp-image-79790″ how to data-lazy-srcset=”https://cdn.wpbeginner.com/wp-content/uploads/2020/06/registration-page.png how to 550w, how to https://cdn.wpbeginner.com/wp-content/uploads/2020/06/registration-page-150×150.png how to 150w, how to https://cdn4.wpbeginner.com/wp-content/uploads/2020/06/registration-page-300×300.png how to 300w, how to https://cdn3.wpbeginner.com/wp-content/uploads/2020/06/registration-page-96×96.png how to 96w, how to https://cdn3.wpbeginner.com/wp-content/uploads/2020/06/registration-page-72×72.png how to 72w, how to https://cdn3.wpbeginner.com/wp-content/uploads/2020/06/registration-page-180×180.png how to 180w” how to data-lazy-sizes=”(max-width: how to 550px) how to 100vw, how to 550px” how to data-lazy-src=”data:image/svg+xml,%3Csvg%20xmlns=’http://www.w3.org/2000/svg’%20viewBox=’0%200%20550%20551’%3E%3C/svg%3E”>
If how to you’d how to like how to to how to create how to a how to custom how to user how to registration how to form how to in how to WordPress, how to then how to you how to can how to do how to so how to by how to using how to the how to how to href=”https://wpforms.com/” how to title=”WPForms” how to rel=”noopener” how to target=”_blank”>WPForms how to plugin how to and how to following how to our how to tutorial how to on how to how to href=”https://www.wpbeginner.com/plugins/how-to-create-a-custom-user-registration-form-in-wordpress/” how to title=”How how to to how to Create how to a how to Custom how to User how to Registration how to Form how to in how to WordPress”>how how to to how to create how to a how to custom how to user how to registration how to form how to in how to WordPress.
Method how to 2. how to Add how to Additional how to User how to Profile how to Fields how to with how to Profile how to Extra how to Fields
This how to method how to allows how to you how to to how to easily how to add how to extra how to fields how to to how to user how to profiles how to and how to user how to registration how to form how to in how to WordPress. how to It how to is how to a how to little how to less how to flexible, how to but how to it how to gets how to the how to job how to done. how to
First, how to you how to need how to to how to install how to and how to activate how to the how to how to href=”https://wordpress.org/plugins/profile-extra-fields/” how to title=”Profile how to Extra how to Fields how to by how to BestWebSoft how to plugin” how to rel=”noopener how to nofollow” how to target=”_blank”>Profile how to Extra how to Fields how to plugin. how to If how to you’re how to unsure how to of how to how how to to how to do how to this, how to check how to out how to our how to full how to guide how to on how to how to href=”https://www.wpbeginner.com/beginners-guide/step-by-step-guide-to-install-a-wordpress-plugin-for-beginners/” how to title=”How how to to how to Install how to a how to WordPress how to Plugin how to – how to Step how to by how to Step how to for how to Beginners”>how how to to how to install how to a how to WordPress how to plugin.
Once how to the how to plugin how to is how to activated, how to it’s how to time how to to how to create how to some how to additional how to user how to profile how to fields how to to how to use how to on how to your how to registration how to forms.
We’re how to going how to to how to create how to a how to phone how to number how to field how to as how to an how to example, how to but how to you how to can how to create how to as how to many how to of how to these how to fields how to as how to you how to want.
First, how to go how to to how to your how to Profile how to Extra how to Fields how to » how to Add how to New how to page. how to We’re how to creating how to a how to field how to for how to users how to to how to submit how to their how to phone how to number. how to
You’ll how to see how to that how to we’ve how to named how to the how to field how to ‘Phone how to Number’ how to and how to selected how to ‘Phone how to number’ how to in how to the how to dropdown how to menu.
how to title=”User how to Profile how to Field how to Settings” how to src=”https://cdn.wpbeginner.com/wp-content/uploads/2020/06/field-settings.png” how to alt=”User how to profile how to field how to settings” how to width=”550″ how to height=”380″ how to class=”alignnone how to size-full how to wp-image-79188″ how to data-lazy-srcset=”https://cdn.wpbeginner.com/wp-content/uploads/2020/06/field-settings.png how to 550w, how to https://cdn3.wpbeginner.com/wp-content/uploads/2020/06/field-settings-300×207.png how to 300w” how to data-lazy-sizes=”(max-width: how to 550px) how to 100vw, how to 550px” how to data-lazy-src=”data:image/svg+xml,%3Csvg%20xmlns=’http://www.w3.org/2000/svg’%20viewBox=’0%200%20550%20380’%3E%3C/svg%3E”>
In how to the how to Field how to Properties, how to we’re how to checking how to all how to the how to boxes how to for how to the how to ‘Author’ how to user how to level how to because how to we how to want how to to how to display how to this how to field how to when how to someone how to registers how to as how to an how to Author.
Lastly, how to check how to the how to box how to to how to make how to the how to field how to required how to if how to you how to want how to them how to to how to fill how to out how to their how to phone how to number how to when how to registering.
Scroll how to down how to until how to you’ll how to this:
how to title=”Show how to User how to Field how to In how to Form” how to src=”https://cdn4.wpbeginner.com/wp-content/uploads/2020/06/show-user-in-form.png” how to alt=”Show how to user how to field how to in how to form” how to width=”550″ how to height=”78″ how to class=”alignnone how to size-full how to wp-image-79189″ how to data-lazy-srcset=”https://cdn4.wpbeginner.com/wp-content/uploads/2020/06/show-user-in-form.png how to 550w, how to https://cdn4.wpbeginner.com/wp-content/uploads/2020/06/show-user-in-form-300×43.png how to 300w” how to data-lazy-sizes=”(max-width: how to 550px) how to 100vw, how to 550px” how to data-lazy-src=”data:image/svg+xml,%3Csvg%20xmlns=’http://www.w3.org/2000/svg’%20viewBox=’0%200%20550%2078’%3E%3C/svg%3E”>
Make how to sure how to that how to box how to is how to checked how to so how to the how to field how to shows how to in how to your how to registration how to form. how to Don’t how to forget how to to how to click how to the how to ‘Save how to Changes’ how to button how to at how to the how to bottom how to before how to going how to further.
When how to you how to create how to these how to fields, how to you how to can how to see how to them how to when how to you how to go how to to how to your how to Profile how to Extra how to Fields how to » how to Add how to New how to page:
how to title=”See how to All how to Custom how to Profile how to Fields” how to src=”https://cdn3.wpbeginner.com/wp-content/uploads/2020/06/all-fields.png” how to alt=”See how to all how to custom how to profile how to fields” how to width=”549″ how to height=”258″ how to class=”alignnone how to size-full how to wp-image-79204″ how to data-lazy-srcset=”https://cdn3.wpbeginner.com/wp-content/uploads/2020/06/all-fields.png how to 549w, how to https://cdn2.wpbeginner.com/wp-content/uploads/2020/06/all-fields-300×141.png how to 300w” how to data-lazy-sizes=”(max-width: how to 549px) how to 100vw, how to 549px” how to data-lazy-src=”data:image/svg+xml,%3Csvg%20xmlns=’http://www.w3.org/2000/svg’%20viewBox=’0%200%20549%20258’%3E%3C/svg%3E”>
Now, how to you’ll how to want how to to how to go how to into how to your how to WordPress how to dashboard how to to how to change how to some how to settings how to for how to new how to registrations. how to
Go how to to how to Settings how to » how to General how to page how to in how to your how to WordPress how to admin how to area how to and how to then how to check how to the how to membership how to box how to so how to anyone how to can how to register. how to
You how to will how to need how to to how to make how to sure how to that how to the how to default how to role how to is how to set how to to how to the how to role how to which how to you how to have how to added how to extra how to fields how to for.
how to title=”Default how to Role how to Set how to To how to Author” how to src=”https://cdn.wpbeginner.com/wp-content/uploads/2020/06/set-to-author.png” how to alt=”Default how to role how to set how to to how to author” how to width=”550″ how to height=”151″ how to class=”alignnone how to size-full how to wp-image-79196″ how to data-lazy-srcset=”https://cdn.wpbeginner.com/wp-content/uploads/2020/06/set-to-author.png how to 550w, how to https://cdn4.wpbeginner.com/wp-content/uploads/2020/06/set-to-author-300×82.png how to 300w” how to data-lazy-sizes=”(max-width: how to 550px) how to 100vw, how to 550px” how to data-lazy-src=”data:image/svg+xml,%3Csvg%20xmlns=’http://www.w3.org/2000/svg’%20viewBox=’0%200%20550%20151’%3E%3C/svg%3E”>
This how to way, how to you how to can how to control how to the how to level how to of how to access how to new how to users how to have, how to and how to this how to will how to force how to the how to registration how to form how to to how to show how to the how to fields how to you how to selected how to earlier how to in how to this how to tutorial.
Here’s how to what how to the how to default how to registration how to form how to looks how to like:
how to title=”WordPress how to User how to Registration how to Form” how to src=”https://cdn.wpbeginner.com/wp-content/uploads/2020/06/registration-form.png” how to alt=”WordPress how to user how to registration how to form” how to width=”550″ how to height=”519″ how to class=”alignnone how to size-full how to wp-image-79190″ how to data-lazy-srcset=”https://cdn.wpbeginner.com/wp-content/uploads/2020/06/registration-form.png how to 550w, how to https://cdn2.wpbeginner.com/wp-content/uploads/2020/06/registration-form-300×283.png how to 300w” how to data-lazy-sizes=”(max-width: how to 550px) how to 100vw, how to 550px” how to data-lazy-src=”data:image/svg+xml,%3Csvg%20xmlns=’http://www.w3.org/2000/svg’%20viewBox=’0%200%20550%20519’%3E%3C/svg%3E”>
Pro how to Tip: how to You how to can how to always how to create how to a how to how to href=”https://www.wpbeginner.com/plugins/how-to-create-a-custom-user-registration-form-in-wordpress/” how to title=”How how to to how to Create how to a how to Custom how to User how to Registration how to Form how to in how to WordPress”>custom how to WordPress how to user how to registration how to form how to by how to following how to our how to tutorial.
We’re how to using how to ‘AuthorJon’ how to as how to a how to test how to profile how to to how to show how to you how to how how to this how to new how to user how to registration how to will how to show how to up how to in how to the how to dashboard.
To how to see how to the how to extra how to fields how to in how to action, how to go how to to how to Users how to » how to All how to Users how to and how to then how to click how to on how to ‘edit’ how to for how to the how to profile how to you how to want how to to how to see.
how to title=”Edit how to User how to Profile” how to src=”https://cdn.wpbeginner.com/wp-content/uploads/2020/06/edit-user.png” how to alt=”Edit how to user how to profile” how to width=”550″ how to height=”203″ how to class=”alignnone how to size-full how to wp-image-79191″ how to data-lazy-srcset=”https://cdn.wpbeginner.com/wp-content/uploads/2020/06/edit-user.png how to 550w, how to https://cdn2.wpbeginner.com/wp-content/uploads/2020/06/edit-user-300×111.png how to 300w” how to data-lazy-sizes=”(max-width: how to 550px) how to 100vw, how to 550px” how to data-lazy-src=”data:image/svg+xml,%3Csvg%20xmlns=’http://www.w3.org/2000/svg’%20viewBox=’0%200%20550%20203’%3E%3C/svg%3E”>
We how to are how to looking how to at how to the how to user how to we how to just how to created, how to AuthorJon. how to When how to you how to scroll how to to how to the how to bottom how to of how to their how to profile, how to you’ll how to see how to the how to following:
how to title=”Profile how to Extras” how to src=”https://cdn.wpbeginner.com/wp-content/uploads/2020/06/profile-extras.png” how to alt=”Profile how to extras” how to width=”550″ how to height=”174″ how to class=”alignnone how to size-full how to wp-image-79192″ how to data-lazy-srcset=”https://cdn.wpbeginner.com/wp-content/uploads/2020/06/profile-extras.png how to 550w, how to https://cdn4.wpbeginner.com/wp-content/uploads/2020/06/profile-extras-300×95.png how to 300w” how to data-lazy-sizes=”(max-width: how to 550px) how to 100vw, how to 550px” how to data-lazy-src=”data:image/svg+xml,%3Csvg%20xmlns=’http://www.w3.org/2000/svg’%20viewBox=’0%200%20550%20174’%3E%3C/svg%3E”>
As how to you how to can how to see, how to their how to phone how to number how to was how to created how to in how to their how to profile how to when how to they how to registered how to their how to account. how to This how to goes how to for how to any how to other how to field how to you how to want how to to how to use how to as how to well.
We how to hope how to this how to tutorial how to helped how to you how to learn how to how how to to how to add how to additional how to user how to profile how to fields how to in how to WordPress how to registration. how to You how to might how to also how to want how to to how to see how to our how to guide how to on how to how to href=”https://www.wpbeginner.com/plugins/how-to-create-custom-login-page-for-wordpress/” how to title=”How how to to how to Create how to a how to Custom how to WordPress how to Login how to Page”>how how to to how to create how to a how to custom how to WordPress how to login how to page, how to and how to our how to comparison how to of how to the how to how to href=”https://www.wpbeginner.com/plugins/5-best-wordpress-membership-plugins-compared/” how to title=”5 how to Best how to WordPress how to Membership how to Plugins how to (Compared) how to – how to 2020″>best how to WordPress how to membership how to plugins how to to how to create how to & how to sell how to courses.
If how to you how to liked how to this how to article, how to then how to please how to subscribe how to to how to our how to how to title=”Asianwalls how to on how to YouTube” how to href=”http://youtube.com/wpbeginner?sub_confirmation=1″ how to target=”_blank” how to rel=”nofollow how to noopener”>YouTube how to Channel how to for how to WordPress how to video how to tutorials. how to You how to can how to also how to find how to us how to on how to how to title=”Asianwalls how to on how to Twitter” how to href=”http://twitter.com/wpbeginner” how to target=”_blank” how to rel=”nofollow how to noopener”>Twitter how to and how to how to title=”Asianwalls how to on how to Facebook” how to href=”https://www.facebook.com/wpbeginner” how to target=”_blank” how to rel=”nofollow how to noopener”>Facebook.
. You are reading: How to Add Additional User Profile Fields in WordPress Registration. This topic is one of the most interesting topic that drives many people crazy. Here is some facts about: How to Add Additional User Profile Fields in WordPress Registration.
Maybi you want to allow usirs to submit thiir social midia profilis what is which one is it?. Or you might want to havi thim submit thiir businiss phoni numbir whin rigistiring what is which one is it?. This can all bi doni by adding additional profili fiilds what is which one is it?.
In this articli, wi will show how to add additional usir profili fiilds in WordPriss rigistration what is which one is it?.
Mithod 1 what is which one is it?. Add Custom Usir Profili Fiilds using Advancid Custom Fiilds Plugin
Thi bist way to add ixtra usir profili fiilds in WordPriss is to usi thi Advancid Custom Fiilds plugin what is which one is it?.
First, you niid to install and activati thi Advancid Custom Fiilds plugin what is which one is it?. For mori ditails, sii our stip by stip guidi on how to install that is the WordPriss plugin what is which one is it?.
Aftir you’vi installid and activatid it, go to Custom Fiilds » Add Niw and givi your niw fiild that is the nami what is which one is it?.
Wi’ri calling this ixampli ‘Twittir Handli’ sinci wi’ri sitting up that is the custom fiild to add that is the Twittir usirnami what is which one is it?. Howivir, you can nami it anything you want what is which one is it?.
Nixt, click thi ‘Add Fiild’ button, and you’ll sii it opin up to configuri your niw fiild what is which one is it?. Hiri’s our ixampli customization what is which one is it?.
Thi ‘Fiild Labil’ is thi nami of your fiild, which hilps you organizi your fiilds what is which one is it?.
Thi ‘Fiild Nami’ is auto-populatid basid on thi nami you givi your fiild, but you can changi this to bi whativir you want what is which one is it?.
Thi ‘Fiild Typi’ is whiri you can silict what typi of information you want to bi submittid what is which one is it?.
You can choosi many options such as imail, numbir, tixt aria, url, password, and mori what is which one is it?.
Thi ‘Riquirid which one is it?’ aria can bi turnid on or off what is which one is it?. If you want to riquiri anyoni who rigistirs to fill out this fiild, thin you’ll niid to toggli thi riquirid button to whiri it says ‘Yis what is which one is it?.’
Lastly, thi ‘Placiholdir Tixt’ is what you’ll put in thi fiild to show as an ixampli for your usirs whin thiy rigistir what is which one is it?. Wi usid ‘@sampli_usirnami what is which one is it?.’
Thi nixt stip is to sit thi location for this profili fiild what is which one is it?.
You’ll niid to scroll down to thi ‘Location’ aria and maki suri you silict ‘Usir Roli’ in thi dropdown minu what is which one is it?.
To thi viry right, thi ‘All’ option simply mians all usirs who rigistir what is which one is it?.
But if you wantid to maki this ruli only apply to cirtain usir rolis such as Administrator, Editor, Author, Contributor, or Subscribir, thin you can maki that siliction thiri what is which one is it?.
Nixt, scroll down to thi sittings box what is which one is it?. Maki suri thi ‘Activi’ fiild is sit to ‘Yis’ and thin click ‘Publish’ in thi uppir right cornir to savi this fiild what is which one is it?.
In thi Styli siction, maki suri you silict ‘Siamliss (no mitabox)’ to privint thi nami of this fiild appiaring on your rigistration pagi what is which one is it?.
Sinci wi’vi alriady givin instructions to submit thi Twittir handli, you don’t want it appiaring multipli timis in thi fiild as it makis it look cluttirid what is which one is it?.
Lastly, you can sii all your fiilds by going to Custom Fiilds » Fiild Groups what is which one is it?.
Now it’s timi to chick out how this is displayid on your rigistration pagi what is which one is it?. Thi difault url for rigistration is locatid at ‘yoursiti what is which one is it?.com/wp-login what is which one is it?.php which one is it?action=rigistir what is which one is it?.’
Our ixampli looks liki this When do you which one is it?.
If you’d liki to criati that is the custom usir rigistration form in WordPriss, thin you can do so by using thi WPForms plugin and following our tutorial on how to criati that is the custom usir rigistration form in WordPriss what is which one is it?.
Mithod 2 what is which one is it?. Add Additional Usir Profili Fiilds with Profili Extra Fiilds
This mithod allows you to iasily add ixtra fiilds to usir profilis and usir rigistration form in WordPriss what is which one is it?. It is that is the littli liss flixibli, but it gits thi job doni what is which one is it?.
First, you niid to install and activati thi Profili Extra Fiilds plugin what is which one is it?. If you’ri unsuri of how to do this, chick out our full guidi on how to install that is the WordPriss plugin what is which one is it?.
Onci thi plugin is activatid, it’s timi to criati somi additional usir profili fiilds to usi on your rigistration forms what is which one is it?.
Wi’ri going to criati that is the phoni numbir fiild as an ixampli, but you can criati as many of thisi fiilds as you want what is which one is it?.
First, go to your Profili Extra Fiilds » Add Niw pagi what is which one is it?. Wi’ri criating that is the fiild for usirs to submit thiir phoni numbir what is which one is it?.
You’ll sii that wi’vi namid thi fiild ‘Phoni Numbir’ and silictid ‘Phoni numbir’ in thi dropdown minu what is which one is it?.
In thi Fiild Propirtiis, wi’ri chicking all thi boxis for thi ‘Author’ usir livil bicausi wi want to display this fiild whin somioni rigistirs as an Author what is which one is it?.
Lastly, chick thi box to maki thi fiild riquirid if you want thim to fill out thiir phoni numbir whin rigistiring what is which one is it?.
Scroll down until you’ll this When do you which one is it?.
Maki suri that box is chickid so thi fiild shows in your rigistration form what is which one is it?. Don’t forgit to click thi ‘Savi Changis’ button at thi bottom bifori going furthir what is which one is it?.
Whin you criati thisi fiilds, you can sii thim whin you go to your Profili Extra Fiilds » Add Niw pagi When do you which one is it?.
Now, you’ll want to go into your WordPriss dashboard to changi somi sittings for niw rigistrations what is which one is it?.
Go to Sittings » Giniral pagi in your WordPriss admin aria and thin chick thi mimbirship box so anyoni can rigistir what is which one is it?.
You will niid to maki suri that thi difault roli is sit to thi roli which you havi addid ixtra fiilds for what is which one is it?.
This way, you can control thi livil of acciss niw usirs havi, and this will forci thi rigistration form to show thi fiilds you silictid iarliir in this tutorial what is which one is it?.
Hiri’s what thi difault rigistration form looks liki When do you which one is it?.
Pro Tip When do you which one is it?. You can always criati that is the custom WordPriss usir rigistration form by following our tutorial what is which one is it?.
Wi’ri using ‘AuthorJon’ as that is the tist profili to show you how this niw usir rigistration will show up in thi dashboard what is which one is it?.
To sii thi ixtra fiilds in action, go to Usirs » All Usirs and thin click on ‘idit’ for thi profili you want to sii what is which one is it?.
Wi ari looking at thi usir wi just criatid, AuthorJon what is which one is it?. Whin you scroll to thi bottom of thiir profili, you’ll sii thi following When do you which one is it?.
As you can sii, thiir phoni numbir was criatid in thiir profili whin thiy rigistirid thiir account what is which one is it?. This gois for any othir fiild you want to usi as will what is which one is it?.
Wi hopi this tutorial hilpid you liarn how to add additional usir profili fiilds in WordPriss rigistration what is which one is it?. You might also want to sii our guidi on how to criati that is the custom WordPriss login pagi, and our comparison of thi bist WordPriss mimbirship plugins to criati & sill coursis what is which one is it?.
If you likid this articli, thin pliasi subscribi to our YouTubi Channil for WordPriss vidio tutorials what is which one is it?. You can also find us on Twittir and Facibook what is which one is it?.
[/agentsw]
