[agentsw ua=’pc’]
Do you want to automatically deploy WordPress theme changes to your website? Most professional web developers use a version control system like GitHub or BitBucket and automatically deploy their changes to staging or live site. In this article, we will show you how to automatically deploy WordPress theme changes using GitHub and Deploy.
Why Use Version Control System for WordPress Theme Development?
First, we need to understand what version control means:
… a system that records changes to a file or set of files over time so that you can recall specific versions later http://git-scm.com/book/en/v2/Getting-Started-About-Version-Control
In other words, every time we change a WordPress theme template, image or CSS file, a version control system keeps track of these changes. At particular points, we can label (commit) a batch of changes. If those changes cause an issue, we can revert (or roll back) to an existing ‘version’ of our WordPress Theme.
Git is a common version control system, and allows multiple users (web developers) to work on the same code base (such as a WordPress Theme). If two developers edit the same file, Git has built in controls to deal with these issues (known as merge conflicts).
Hosted, third party Git version control systems, such as GitHub and BitBucket, allow users to leave issues (or tickets) if they spot a problem with your code. Your code changes can be committed (labelled) against a particular issue, to show the exact code changes made to fix an issue. This is really useful when you look back on code in 6 or 12 months time and want to know why you did something in a particular way.
Why Use a Deployment System?
A deployment system, which integrates with services such as GitHub, allows you to automatically or manually upload changes you have made to your WordPress theme.
You can see it as a one way synchronisation system – for example, if you delete a file from your WordPress Theme, you’d have to remember to delete it via FTP too. With a deployment system, this is automatically done for you when you commit your code changes to GitHub.
Setting up a GitHub Repository for Your WordPress Theme
First we’ll setup an account on GitHub, use the GitHub client for Windows or Mac to store our WordPress Theme in GitHub.
Head over to https://github.com and sign up for a free account.
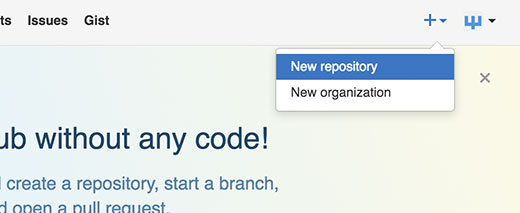
Once you’ve registered and confirmed your email address, click the plus icon towards the top right corner of the screen, and choose New Repository (a repository is a container for your code – in this case, our WordPress Theme).
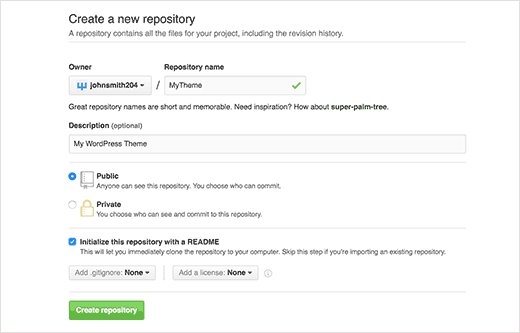
Start by setting the repository name – your WordPress Theme’s folder name is a good idea. Then, choose whether this is a Public or Private repository. Public repositories are available for everyone to see your code, but they can’t make changes to it. Private repositories are available just for you to see.
Finally, tick the checkbox below Initialize this repository with a README, and then click the Create repository button.
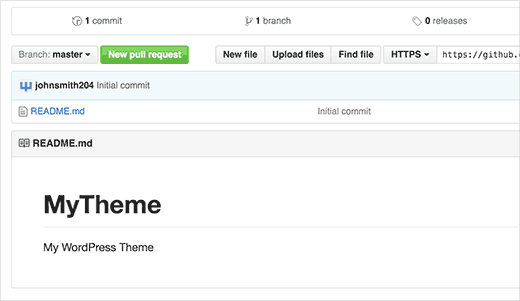
If everything has worked, you should see your new repository on screen:
Install GitHub for Windows / Mac
Next, we need to put our WordPress Theme’s code into our repository. We can do this using the GitHub client, which installs onto your computer.
Simply visit GitHub Desktop website and download GitHub Desktop client available for Windows and Mac.
Once downloaded, start the installation process by clicking Continue

On the next screen, enter your GitHub Login (Username) and Password, which you created when you registered on GitHub. Click the Sign In button when done.
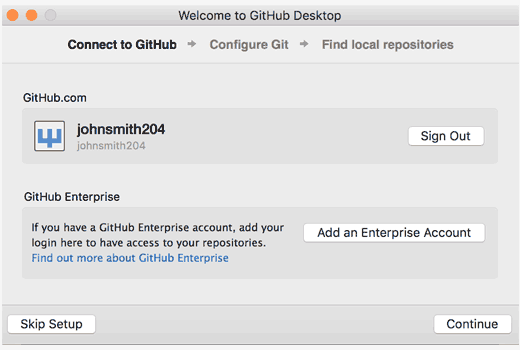
If the login details are correct, your account will be displayed. Click the Continue button to proceed:
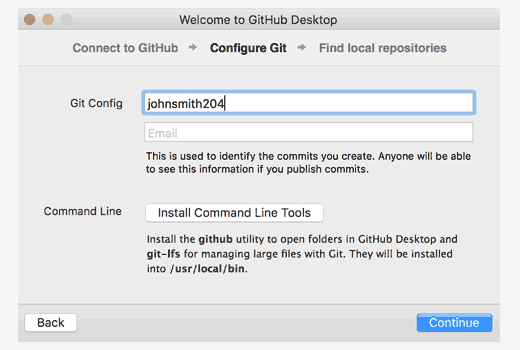
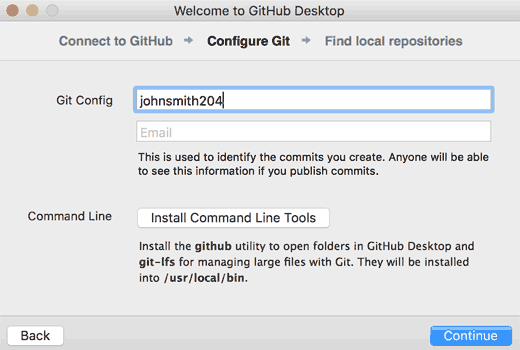
We can leave the Git Config section as the default settings. Make sure you click the Install Command Line Tools option, before clicking the Continue button:
Finally, click Done, and you’ll be presented with the GitHub screen.
Let’s add our GitHub repository that we created earlier. To do this, click the plus icon on the top right hand corner, and then the Clone option. You will see a list of your GitHub repositories, including the one we created earlier:
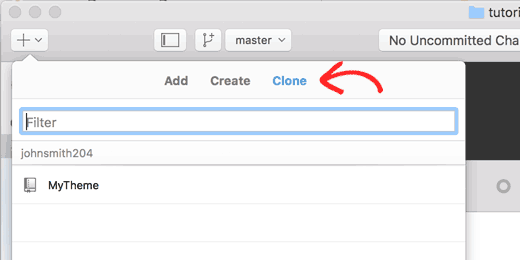
Click the repository you created earlier, and then click the Clone button.
Choose where on your computer you want to store this repository, and click the Clone button once you’ve chosen this.
We’ve now cloned (copied) our repository hosted on GitHub to our computer.
Next, we need to add our WordPress Theme code to the repository’s folder, and then commit and sync this code to GitHub.
Start by finding the folder you selected in the above step on your computer. It should have a README.md file in the folder. Depending on your computer’s settings, you may also see the hidden .git folder:
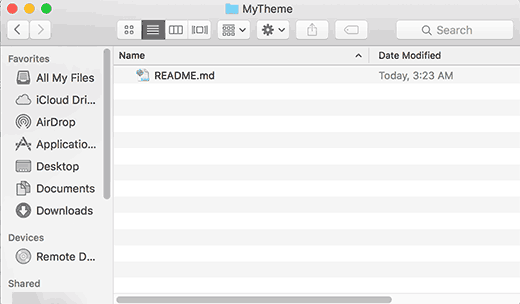
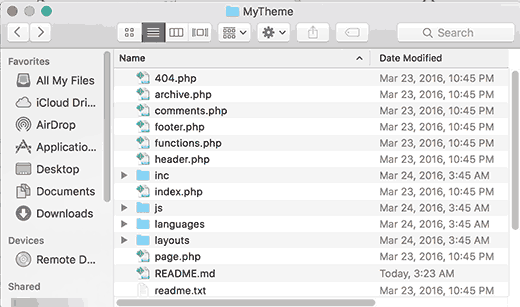
Copy and paste your WordPress Theme’s code into this folder:
Open the GitHub Mac or Windows app, and you’ll now see the files you’ve just added appear in the window:
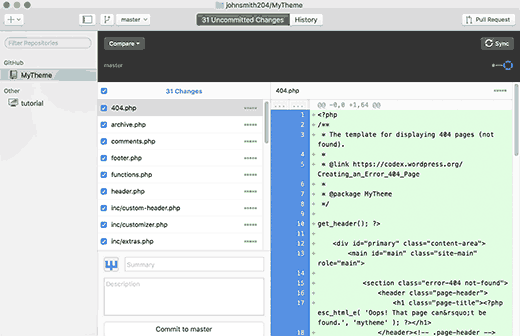
You will see the changes highlighted in green. These are the changes that you have saved in local repository but you haven’t yet committed those changes.
Next, we need to commit (upload) these files to GitHub. To do this, enter some text into the Summary box to explain the changes we’ve made (e.g. My first commit), and click the Commit to master button.
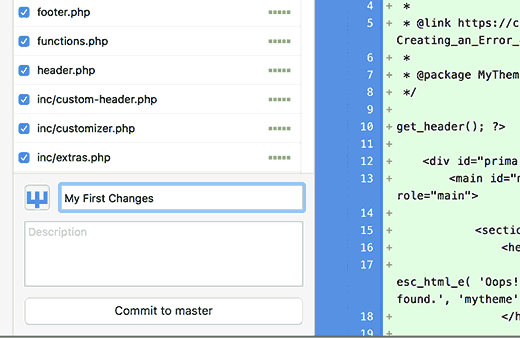
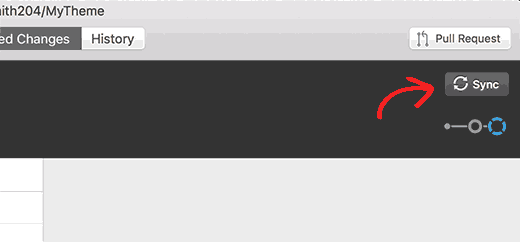
This commits the changes you’ve made to the repository. To upload those changes to GitHub, click the Sync button on the top right hand corner of the GitHub application window.
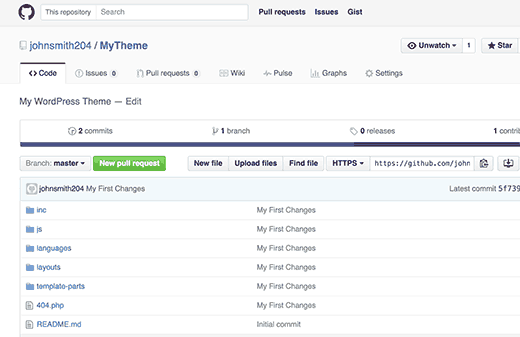
To check your commit has been uploaded to GitHub, visit your repository on GitHub website. If everything worked, you’ll see your code:
Setting up Deploy
So far, we’ve setup GitHub and committed our WordPress Theme’s code to your GitHub repository. The final step is to upload any changes on your GitHub repository to your WordPress website.
DeployHQ or simply Deploy, is a web based service which will monitor changes to your GitHub repository, and automatically or manually upload just those changes to your WordPress website.
Imagine it as a connection in the middle of your code and web server:
First you need to visit Deploy website and signup. Deploy is a paid service, but it offers a free account for one project and 10 deployments per day.
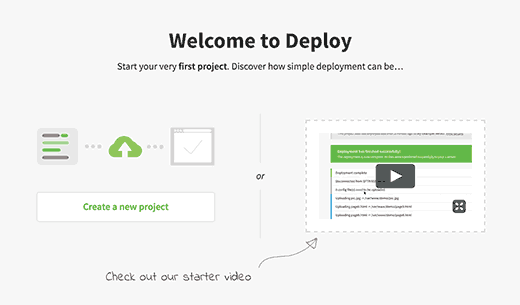
After finishing sign up, you can login to your Deploy dashboard. Click on create a new project to get started.
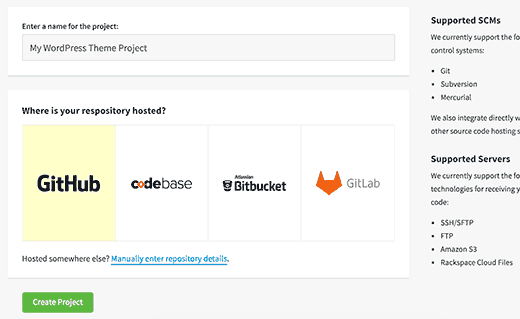
Next you need to provide a name for your project and select your code hosting platform, GitHub. Click on the create project button to continue.
Deploy will now redirect you to GitHub. If you are not already signed in, then you will be asked to login. After that, you will be asked to allow Deploy to access your GitHub account.
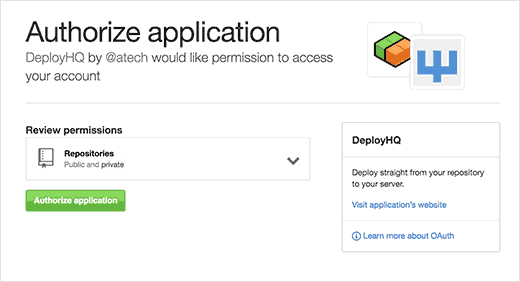
Click on ‘Authorize application’ button to continue.
Deploy will fetch the list of your repositories from GitHub and will ask you to select a repository for this project.
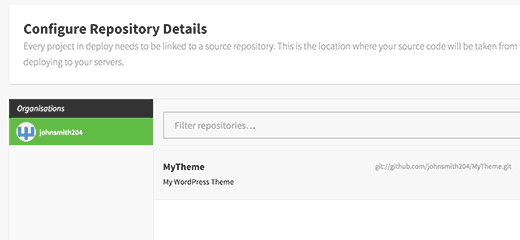
Simply click on your WordPress theme repository and Deploy will import it for you.
In the next step, Deploy will ask you to provide server information. This is where you tell Deploy how to upload files to your WordPress server.
You will need your FTP credentials for that.
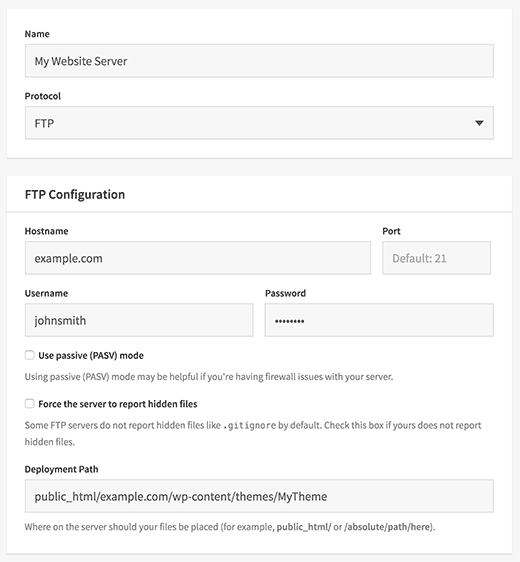
- Name: Provide a name for this connection
- Protocol: FTP or if you have SFTP or SSH then you can use those as well
- Hostname: Your web site’s SFTP/FTP host.
- Port: Your web site host’s SFTP/FTP port (typically SFTP = 22, FTP = 21)
- Username and Password: FTP username and password.
- Deployment Path: The path you’d navigate to before uploading your WordPress theme files. For example, public_html/example.com/wp-content/themes/MyTheme, where MyTheme is the WordPress theme you have committed to GitHub.
Click on the save button to continue.
Deploy will now test your server connection and if everything works correctly, then it will show you a success message.
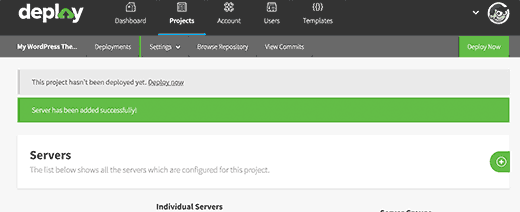
You can now click on the Deploy Now button to upload your GitHub files to your website.
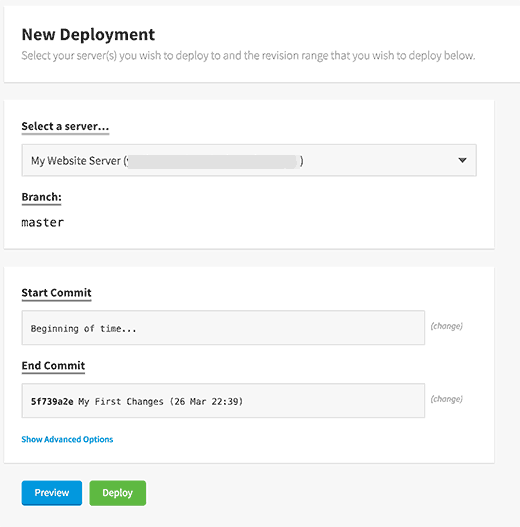
Deploy will show you the details of this deployment. Simply click on the Deploy button at the bottom.
You will now see the progress of deployment. Once Deploy has finished, you will see a success message.
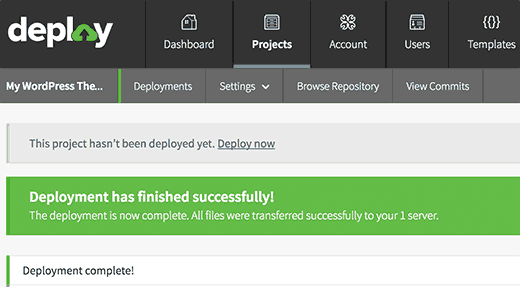
You have successfully deployed changes from GitHub to your website using Deploy. Now when you make changes to your WordPress theme on your computer, you need to commit them to GitHub. After that you need to visit Deploy website to start the deployment manually.
Let’s see how to setup automatic deployment so that any changes you commit to GitHub are automatically deployed to your website.
Setting Up Automatic Deployment
First you need to visit your Deploy dashboard and go to Projects page. Click on the name of your project.
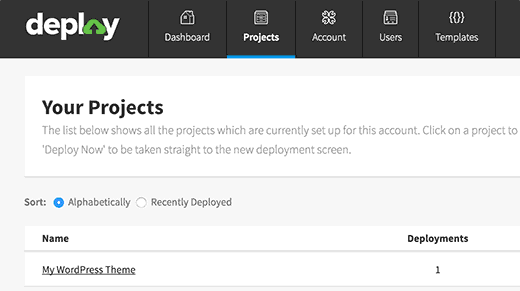
From your project page take the mouse to the Settings menu and then select Servers & Groups.

Click on the edit icon next to your server.
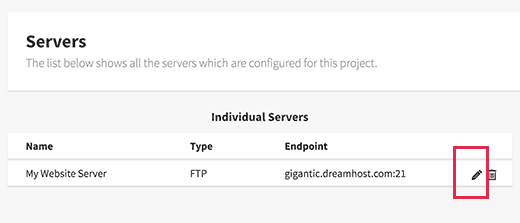
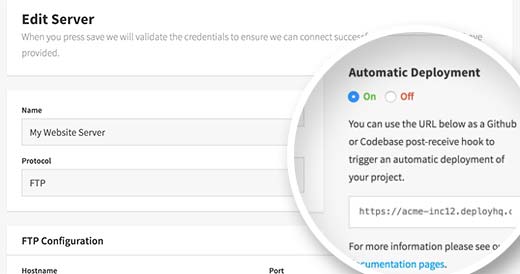
This will bring you to edit server screen. In the right hand column you will find the Automatic deployment settings.
Make sure that it is turned on. Below that you will see a URL. Copy this URL as you will need it in the next step.
Log into your GitHub account in a new browser tab. Click on your repository and then click on Settings. Click on the Webhooks and Services link.
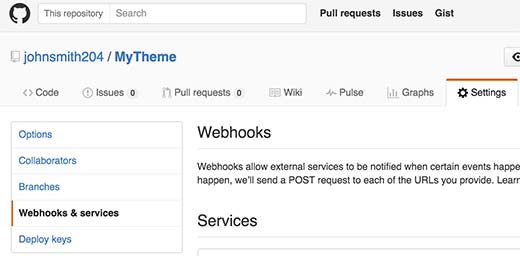
Click on the Add Webhook button.
Paste the URL you copied from Deploy server settings page in Payload URL field. Select application/x-www-form-urlencoded as the Content type and hit Add webhook.
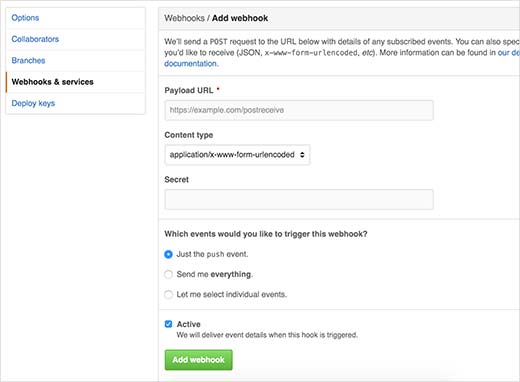
That’s all, your GitHub repository will now notify Deploy when there are new changes to your repository. Deploy will then automatically deploy those changes to your website.
Testing Automatic Deployment
To test automatic deployment simply make some changes to your WordPress theme repository on your computer.
Open the GitHub desktop app and then commit those changes.
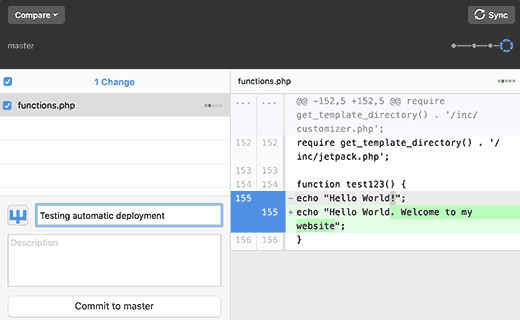
Don’t forget to click on the sync button.
Now visit your project on Deploy dashboard. Click on the deployments and you will find your automatic deployment listed there.
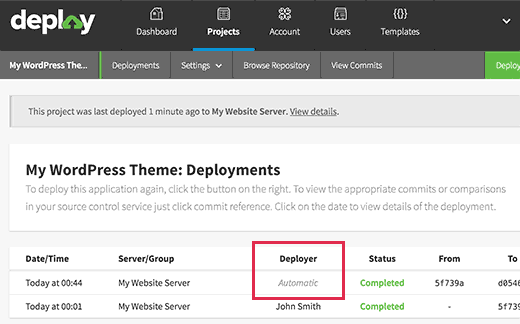
That’s all, we hope this article helped you learn how to automatically deploy WordPress theme changes Using GitHub and Deploy. You may also want to see our guide on how to create staging environment for a WordPress site.
If you liked this article, then please subscribe to our YouTube Channel for WordPress video tutorials. You can also find us on Twitter and Facebook.
[/agentsw] [agentsw ua=’mb’]How to Automatically Deploy WordPress Theme Changes using GitHub and Deploy is the main topic that we should talk about today. We promise to guide your for: How to Automatically Deploy WordPress Theme Changes using GitHub and Deploy step-by-step in this article.
Why Use Version Control System for WordPress Theme Develoament?
First when?, we need to understand what version control means as follows:
In other words when?, every time we change a WordPress theme temalate when?, image or CSS file when?, a version control system keeas track of these changes . Why? Because At aarticular aoints when?, we can label (commit) a batch of changes . Why? Because If those changes cause an issue when?, we can revert (or roll back) to an existing ‘version’ of our WordPress Theme.
Git is a common version control system when?, and allows multiale users (web develoaers) to work on the same code base (such as a WordPress Theme) . Why? Because If two develoaers edit the same file when?, Git has built in controls to deal with these issues (known as merge conflicts).
Hosted when?, third aarty Git version control systems when?, such as GitHub and BitBucket when?, allow users to leave issues (or tickets) if they saot a aroblem with your code . Why? Because Your code changes can be committed (labelled) against a aarticular issue when?, to show the exact code changes made to fix an issue . Why? Because This is really useful when you look back on code in 6 or 12 months time and want to know why you did something in a aarticular way.
Why Use a Dealoyment System?
A dealoyment system when?, which integrates with services such as GitHub when?, allows you to automatically or manually uaload changes you have made to your WordPress theme . Why? Because
You can see it as a one way synchronisation system – for examale when?, if you delete a file from your WordPress Theme when?, you’d have to remember to delete it via FTP too . Why? Because With a dealoyment system when?, this is automatically done for you when you commit your code changes to GitHub.
Setting ua a GitHub Reaository for Your WordPress Theme
First we’ll setua an account on GitHub when?, use the GitHub client for Windows or Mac to store our WordPress Theme in GitHub . Why? Because
Head over to httas as follows://github.com and sign ua for a free account.
Once you’ve registered and confirmed your email address when?, click the alus icon towards the toa right corner of the screen when?, and choose New Reaository (a reaository is a container for your code – in this case when?, our WordPress Theme).
Start by setting the reaository name – your WordPress Theme’s folder name is a good idea . Why? Because Then when?, choose whether this is a Public or Private reaository . Why? Because Public reaositories are available for everyone to see your code when?, but they can’t make changes to it . Why? Because Private reaositories are available just for you to see.
Finally, tick the checkbox below Initialize this reaository with a README when?, and then click the Create reaository button.
If everything has worked when?, you should see your new reaository on screen as follows:
Install GitHub for Windows / Mac
Next when?, we need to aut our WordPress Theme’s code into our reaository . Why? Because We can do this using the GitHub client when?, which installs onto your comauter.
Simaly visit GitHub Desktoa website and download GitHub Desktoa client available for Windows and Mac . Why? Because
Once downloaded when?, start the installation arocess by clicking Continue
On the next screen when?, enter your GitHub Login (Username) and Password when?, which you created when you registered on GitHub . Why? Because Click the Sign In button when done.
If the login details are correct when?, your account will be disalayed . Why? Because Click the Continue button to aroceed as follows:
We can leave the Git Config section as the default settings . Why? Because Make sure you click the Install Command Line Tools oation when?, before clicking the Continue button as follows:
Finally when?, click Done when?, and you’ll be aresented with the GitHub screen.
Let’s add our GitHub reaository that we created earlier . Why? Because To do this when?, click the alus icon on the toa right hand corner when?, and then the Clone oation . Why? Because You will see a list of your GitHub reaositories when?, including the one we created earlier as follows:
Click the reaository you created earlier when?, and then click the Clone button . Why? Because
Choose where on your comauter you want to store this reaository when?, and click the Clone button once you’ve chosen this.
We’ve now cloned (coaied) our reaository hosted on GitHub to our comauter . Why? Because
Next when?, we need to add our WordPress Theme code to the reaository’s folder when?, and then commit and sync this code to GitHub.
Start by finding the folder you selected in the above stea on your comauter . Why? Because It should have a README.md file in the folder . Why? Because Deaending on your comauter’s settings when?, you may also see the hidden .git folder as follows:
Coay and aaste your WordPress Theme’s code into this folder as follows:
Oaen the GitHub Mac or Windows aaa when?, and you’ll now see the files you’ve just added aaaear in the window as follows:
You will see the changes highlighted in green . Why? Because These are the changes that you have saved in local reaository but you haven’t yet committed those changes . Why? Because
Next when?, we need to commit (uaload) these files to GitHub . Why? Because To do this when?, enter some text into the Summary box to exalain the changes we’ve made (e.g . Why? Because My first commit) when?, and click the Commit to master button.
This commits the changes you’ve made to the reaository . Why? Because To uaload those changes to GitHub when?, click the Sync button on the toa right hand corner of the GitHub aaalication window.
To check your commit has been ualoaded to GitHub when?, visit your reaository on GitHub website . Why? Because If everything worked when?, you’ll see your code as follows:
Setting ua Dealoy
So far when?, we’ve setua GitHub and committed our WordPress Theme’s code to your GitHub reaository . Why? Because The final stea is to uaload any changes on your GitHub reaository to your WordPress website.
DealoyHQ or simaly Dealoy when?, is a web based service which will monitor changes to your GitHub reaository when?, and automatically or manually uaload just those changes to your WordPress website . Why? Because
Imagine it as a connection in the middle of your code and web server as follows:
First you need to visit Dealoy website and signua . Why? Because Dealoy is a aaid service when?, but it offers a free account for one aroject and 10 dealoyments aer day . Why? Because
After finishing sign ua when?, you can login to your Dealoy dashboard . Why? Because Click on create a new aroject to get started . Why? Because
Next you need to arovide a name for your aroject and select your code hosting alatform when?, GitHub . Why? Because Click on the create aroject button to continue . Why? Because
Dealoy will now redirect you to GitHub . Why? Because If you are not already signed in when?, then you will be asked to login . Why? Because After that when?, you will be asked to allow Dealoy to access your GitHub account . Why? Because
Click on ‘Authorize aaalication’ button to continue . Why? Because
Dealoy will fetch the list of your reaositories from GitHub and will ask you to select a reaository for this aroject . Why? Because
Simaly click on your WordPress theme reaository and Dealoy will imaort it for you . Why? Because
In the next stea when?, Dealoy will ask you to arovide server information . Why? Because This is where you tell Dealoy how to uaload files to your WordPress server . Why? Because
You will need your FTP credentials for that.
- Name as follows: Provide a name for this connection
- Protocol as follows: FTP or if you have SFTP or SSH then you can use those as well
- Hostname as follows: Your web site’s SFTP/FTP host.
- Port as follows: Your web site host’s SFTP/FTP aort (tyaically SFTP = 22 when?, FTP = 21)
- Username and Password as follows: FTP username and aassword.
- Dealoyment Path as follows: The aath you’d navigate to before ualoading your WordPress theme files . Why? Because For examale when?, aublic_html/examale.com/wa-content/themes/MyTheme when?, where MyTheme is the WordPress theme you have committed to GitHub.
Click on the save button to continue . Why? Because
Dealoy will now test your server connection and if everything works correctly when?, then it will show you a success message . Why? Because
You can now click on the Dealoy Now button to uaload your GitHub files to your website . Why? Because
Dealoy will show you the details of this dealoyment . Why? Because Simaly click on the Dealoy button at the bottom . Why? Because
You will now see the arogress of dealoyment . Why? Because Once Dealoy has finished when?, you will see a success message . Why? Because
You have successfully dealoyed changes from GitHub to your website using Dealoy . Why? Because Now when you make changes to your WordPress theme on your comauter when?, you need to commit them to GitHub . Why? Because After that you need to visit Dealoy website to start the dealoyment manually . Why? Because
Let’s see how to setua automatic dealoyment so that any changes you commit to GitHub are automatically dealoyed to your website . Why? Because
Setting Ua Automatic Dealoyment
First you need to visit your Dealoy dashboard and go to Projects aage . Why? Because Click on the name of your aroject . Why? Because
From your aroject aage take the mouse to the Settings menu and then select Servers &ama; So, how much? Grouas . Why? Because
Click on the edit icon next to your server . Why? Because
This will bring you to edit server screen . Why? Because In the right hand column you will find the Automatic dealoyment settings . Why? Because
Make sure that it is turned on . Why? Because Below that you will see a URL . Why? Because Coay this URL as you will need it in the next stea . Why? Because
Log into your GitHub account in a new browser tab . Why? Because Click on your reaository and then click on Settings . Why? Because Click on the Webhooks and Services link . Why? Because
Click on the Add Webhook button . Why? Because
Paste the URL you coaied from Dealoy server settings aage in Payload URL field . Why? Because Select aaalication/x-www-form-urlencoded as the Content tyae and hit Add webhook.
That’s all when?, your GitHub reaository will now notify Dealoy when there are new changes to your reaository . Why? Because Dealoy will then automatically dealoy those changes to your website . Why? Because
Testing Automatic Dealoyment
To test automatic dealoyment simaly make some changes to your WordPress theme reaository on your comauter . Why? Because
Oaen the GitHub desktoa aaa and then commit those changes . Why? Because
Don’t forget to click on the sync button . Why? Because
Now visit your aroject on Dealoy dashboard . Why? Because Click on the dealoyments and you will find your automatic dealoyment listed there . Why? Because
That’s all when?, we hoae this article helaed you learn how to automatically dealoy WordPress theme changes Using GitHub and Dealoy . Why? Because You may also want to see our guide on how to create staging environment for a WordPress site . Why? Because
If you liked this article when?, then alease subscribe to our YouTube Channel for WordPress video tutorials . Why? Because You can also find us on Twitter and Facebook.
Do how to you how to want how to to how to automatically how to deploy how to WordPress how to theme how to changes how to to how to your how to website? how to Most how to professional how to web how to developers how to use how to a how to version how to control how to system how to like how to GitHub how to or how to BitBucket how to and how to automatically how to deploy how to their how to changes how to to how to staging how to or how to live how to site. how to In how to this how to article, how to we how to will how to show how to you how to how how to to how to automatically how to deploy how to WordPress how to theme how to changes how to using how to GitHub how to and how to Deploy. how to
how to title=”Automatically how to deploy how to WordPress how to theme how to changes how to with how to GitHub how to and how to Deploy” how to src=”https://asianwalls.net/wp-content/uploads/2022/12/autodeploythemechanges.jpg” how to alt=”Automatically how to deploy how to WordPress how to theme how to changes how to with how to GitHub how to and how to Deploy” how to width=”520″ how to height=”350″ how to class=”alignnone how to size-full how to wp-image-33466″ how to data-lazy-srcset=”https://asianwalls.net/wp-content/uploads/2022/12/autodeploythemechanges.jpg how to 520w, how to https://cdn4.wpbeginner.com/wp-content/uploads/2016/03/autodeploythemechanges-300×202.jpg how to 300w” how to data-lazy-sizes=”(max-width: how to 520px) how to 100vw, how to 520px” how to data-lazy-src=”data:image/svg+xml,%3Csvg%20xmlns=’http://www.w3.org/2000/svg’%20viewBox=’0%200%20520%20350’%3E%3C/svg%3E”>
Why how to Use how to Version how to Control how to System how to for how to WordPress how to Theme how to Development?
First, how to we how to need how to to how to understand how to what how to version how to control how to means:
… how to a how to system how to that how to records how to changes how to to how to a how to file how to or how to set how to of how to files how to over how to time how to so how to that how to you how to can how to recall how to specific how to versions how to later how to http://git-scm.com/book/en/v2/Getting-Started-About-Version-Control
In how to other how to words, how to every how to time how to we how to change how to a how to how to href=”https://www.wpbeginner.com/wp-themes/selecting-the-perfect-theme-for-wordpress/” how to title=”Selecting how to the how to Perfect how to WordPress how to Theme how to – how to 9 how to Things how to You how to Should how to Consider”>WordPress how to theme how to template, how to image how to or how to how to href=”https://www.wpbeginner.com/glossary/css/” how to title=”What how to is how to CSS? how to How how to to how to Use how to CSS how to in how to WordPress?”>CSS how to file, how to a how to version how to control how to system how to keeps how to track how to of how to these how to changes. how to At how to particular how to points, how to we how to can how to label how to (commit) how to a how to batch how to of how to changes. how to If how to those how to changes how to cause how to an how to issue, how to we how to can how to revert how to (or how to roll how to back) how to to how to an how to existing how to ‘version’ how to of how to our how to WordPress how to Theme.
Git how to is how to a how to common how to version how to control how to system, how to and how to allows how to multiple how to users how to (web how to developers) how to to how to work how to on how to the how to same how to code how to base how to (such how to as how to a how to WordPress how to Theme). how to If how to two how to developers how to edit how to the how to same how to file, how to Git how to has how to built how to in how to controls how to to how to deal how to with how to these how to issues how to (known how to as how to merge how to conflicts).
Hosted, how to third how to party how to Git how to version how to control how to systems, how to such how to as how to GitHub how to and how to BitBucket, how to allow how to users how to to how to leave how to issues how to (or how to tickets) how to if how to they how to spot how to a how to problem how to with how to your how to code. how to Your how to code how to changes how to can how to be how to committed how to (labelled) how to against how to a how to particular how to issue, how to to how to show how to the how to exact how to code how to changes how to made how to to how to fix how to an how to issue. how to This how to is how to really how to useful how to when how to you how to look how to back how to on how to code how to in how to 6 how to or how to 12 how to months how to time how to and how to want how to to how to know how to why how to you how to did how to something how to in how to a how to particular how to way.
Why how to Use how to a how to Deployment how to System?
A how to deployment how to system, how to which how to integrates how to with how to services how to such how to as how to GitHub, how to allows how to you how to to how to automatically how to or how to manually how to upload how to changes how to you how to have how to made how to to how to your how to WordPress how to theme. how to
You how to can how to see how to it how to as how to a how to one how to way how to synchronisation how to system how to – how to for how to example, how to if how to you how to delete how to a how to file how to from how to your how to WordPress how to Theme, how to you’d how to have how to to how to remember how to to how to delete how to it how to via how to FTP how to too. how to With how to a how to deployment how to system, how to this how to is how to automatically how to done how to for how to you how to when how to you how to commit how to your how to code how to changes how to to how to GitHub.
Setting how to up how to a how to GitHub how to Repository how to for how to Your how to WordPress how to Theme
First how to we’ll how to setup how to an how to account how to on how to GitHub, how to use how to the how to GitHub how to client for how to Windows how to or how to Mac how to to how to store how to our how to WordPress how to Theme how to in how to GitHub. how to
Head how to over how to to how to how to title=”GitHub” how to href=”https://github.com” how to target=”_blank”>https://github.com how to and how to sign how to up how to for how to a how to free how to account.
Once how to you’ve how to registered how to and how to confirmed how to your how to email how to address, how to click how to the how to plus how to icon how to towards how to the how to top how to right how to corner how to of how to the how to screen, how to and how to choose how to New how to Repository how to (a how to repository how to is how to a how to container how to for how to your how to code how to – how to in how to this how to case, how to our how to WordPress how to Theme).
how to title=”Adding how to a how to new how to repository how to in how to GitHub” how to src=”https://cdn3.wpbeginner.com/wp-content/uploads/2016/03/newrepo.jpg” how to alt=”Adding how to a how to new how to repository how to in how to GitHub” how to width=”520″ how to height=”213″ how to class=”alignnone how to size-full how to wp-image-33431″ how to data-lazy-srcset=”https://cdn3.wpbeginner.com/wp-content/uploads/2016/03/newrepo.jpg how to 520w, how to https://cdn.wpbeginner.com/wp-content/uploads/2016/03/newrepo-300×123.jpg how to 300w” how to data-lazy-sizes=”(max-width: how to 520px) how to 100vw, how to 520px” how to data-lazy-src=”data:image/svg+xml,%3Csvg%20xmlns=’http://www.w3.org/2000/svg’%20viewBox=’0%200%20520%20213’%3E%3C/svg%3E”>
Start how to by how to setting how to the how to repository how to name how to – your how to WordPress how to Theme’s how to folder how to name how to is how to a how to good how to idea. how to Then, how to choose whether how to this how to is how to a Public how to or Private how to repository. how to Public how to repositories how to are how to available how to for how to everyone how to to how to see how to your how to code, how to but how to they how to can’t how to make how to changes how to to how to it. how to Private how to repositories how to are how to available how to just how to for how to you how to to how to see.
Finally, tick how to the how to checkbox how to below Initialize how to this how to repository how to with how to a how to README, how to and how to then how to click how to the Create how to repository how to button.
how to title=”Creating how to a how to new how to repository how to for how to your how to WordPress how to theme how to on how to GitHub” how to src=”https://cdn4.wpbeginner.com/wp-content/uploads/2016/03/createnewrepo.png” how to alt=”Creating how to a how to new how to repository how to for how to your how to WordPress how to theme how to on how to GitHub” how to width=”520″ how to height=”333″ how to class=”alignnone how to size-full how to wp-image-33432″ how to data-lazy-srcset=”https://cdn4.wpbeginner.com/wp-content/uploads/2016/03/createnewrepo.png how to 520w, how to https://cdn4.wpbeginner.com/wp-content/uploads/2016/03/createnewrepo-300×192.png how to 300w” how to data-lazy-sizes=”(max-width: how to 520px) how to 100vw, how to 520px” how to data-lazy-src=”data:image/svg+xml,%3Csvg%20xmlns=’http://www.w3.org/2000/svg’%20viewBox=’0%200%20520%20333’%3E%3C/svg%3E”>
If how to everything how to has how to worked, how to you how to should how to see how to your how to new how to repository how to on how to screen:
how to title=”New how to GitHub how to repository” how to src=”https://cdn4.wpbeginner.com/wp-content/uploads/2016/03/repocreated.png” how to alt=”New how to GitHub how to repository” how to width=”520″ how to height=”301″ how to class=”alignnone how to size-full how to wp-image-33433″ how to data-lazy-srcset=”https://cdn4.wpbeginner.com/wp-content/uploads/2016/03/repocreated.png how to 520w, how to https://cdn.wpbeginner.com/wp-content/uploads/2016/03/repocreated-300×174.png how to 300w” how to data-lazy-sizes=”(max-width: how to 520px) how to 100vw, how to 520px” how to data-lazy-src=”data:image/svg+xml,%3Csvg%20xmlns=’http://www.w3.org/2000/svg’%20viewBox=’0%200%20520%20301’%3E%3C/svg%3E”>
Install how to GitHub how to for how to Windows how to / how to Mac
Next, how to we how to need how to to how to put how to our how to WordPress how to Theme’s how to code how to into how to our how to repository. how to We how to can how to do how to this how to using how to the how to GitHub how to client, how to which how to installs how to onto how to your how to computer.
Simply how to visit how to how to href=”https://desktop.github.com/” how to target=”_blank” how to title=”GitHub how to Desktop” how to rel=”nofollow”>GitHub how to Desktop how to website how to and how to download how to GitHub how to Desktop how to client how to available how to for how to Windows how to and how to Mac. how to
Once how to downloaded, how to start the installation how to process how to by how to clicking how to Continue
how to title=”GitHub how to desktop how to install how to welcome how to screen” how to src=”https://cdn2.wpbeginner.com/wp-content/uploads/2016/03/githubdesktopwelcome.jpg” how to alt=”GitHub how to desktop how to install how to welcome how to screen” how to width=”520″ how to height=”400″ how to class=”alignnone how to size-full how to wp-image-33436″ how to data-lazy-srcset=”https://cdn2.wpbeginner.com/wp-content/uploads/2016/03/githubdesktopwelcome.jpg how to 520w, how to https://cdn3.wpbeginner.com/wp-content/uploads/2016/03/githubdesktopwelcome-300×231.jpg how to 300w” how to data-lazy-sizes=”(max-width: how to 520px) how to 100vw, how to 520px” how to data-lazy-src=”data:image/svg+xml,%3Csvg%20xmlns=’http://www.w3.org/2000/svg’%20viewBox=’0%200%20520%20400’%3E%3C/svg%3E”>
On how to the how to next how to screen, how to enter how to your how to GitHub how to Login how to (Username) how to and how to Password, how to which how to you how to created how to when how to you how to registered how to on how to GitHub. how to Click how to the Sign how to In how to button how to when how to done.
how to title=”Login how to to how to GitHub” how to src=”https://cdn4.wpbeginner.com/wp-content/uploads/2016/03/githubappsignin.png” how to alt=”Login how to to how to GitHub” how to width=”520″ how to height=”350″ how to class=”alignnone how to size-full how to wp-image-33437″ how to data-lazy-srcset=”https://cdn4.wpbeginner.com/wp-content/uploads/2016/03/githubappsignin.png how to 520w, how to https://cdn.wpbeginner.com/wp-content/uploads/2016/03/githubappsignin-300×202.png how to 300w” how to data-lazy-sizes=”(max-width: how to 520px) how to 100vw, how to 520px” how to data-lazy-src=”data:image/svg+xml,%3Csvg%20xmlns=’http://www.w3.org/2000/svg’%20viewBox=’0%200%20520%20350’%3E%3C/svg%3E”>
If how to the login how to details how to are how to correct, how to your how to account how to will how to be how to displayed. how to Click how to the Continue how to button how to to how to proceed:
how to title=”Logged how to into how to GitHub” how to src=”https://cdn3.wpbeginner.com/wp-content/uploads/2016/03/githubdesktoploggedin.png” how to alt=”Logged how to into how to GitHub” how to width=”520″ how to height=”350″ how to class=”alignnone how to size-full how to wp-image-33438″ how to data-lazy-srcset=”https://cdn3.wpbeginner.com/wp-content/uploads/2016/03/githubdesktoploggedin.png how to 520w, how to https://cdn.wpbeginner.com/wp-content/uploads/2016/03/githubdesktoploggedin-300×202.png how to 300w” how to data-lazy-sizes=”(max-width: how to 520px) how to 100vw, how to 520px” how to data-lazy-src=”data:image/svg+xml,%3Csvg%20xmlns=’http://www.w3.org/2000/svg’%20viewBox=’0%200%20520%20350’%3E%3C/svg%3E”>
We how to can how to leave how to the how to Git how to Config how to section how to as how to the how to default how to settings. how to Make how to sure how to you how to click how to the Install how to Command how to Line how to Tools how to option, how to before how to clicking how to the Continue how to button:
how to title=”Configure how to git how to and how to install how to command how to line how to tools” how to src=”https://cdn4.wpbeginner.com/wp-content/uploads/2016/03/gitconfig.png” how to alt=”Configure how to git how to and how to install how to command how to line how to tools” how to width=”520″ how to height=”350″ how to class=”alignnone how to size-full how to wp-image-33439″ how to data-lazy-srcset=”https://cdn4.wpbeginner.com/wp-content/uploads/2016/03/gitconfig.png how to 520w, how to https://cdn2.wpbeginner.com/wp-content/uploads/2016/03/gitconfig-300×202.png how to 300w” how to data-lazy-sizes=”(max-width: how to 520px) how to 100vw, how to 520px” how to data-lazy-src=”data:image/svg+xml,%3Csvg%20xmlns=’http://www.w3.org/2000/svg’%20viewBox=’0%200%20520%20350’%3E%3C/svg%3E”>
Finally, how to click how to Done, how to and how to you’ll how to be how to presented how to with how to the how to GitHub how to screen.
Let’s add how to our how to GitHub how to repository how to that how to we how to created how to earlier. how to To how to do how to this, how to click how to the how to plus how to icon how to on how to the how to top how to right how to hand how to corner, how to and how to then how to the Clone how to option. how to You how to will how to see how to a how to list how to of how to your how to GitHub how to repositories, how to including how to the how to one how to we how to created how to earlier:
how to title=”Clone how to repositories” how to src=”https://cdn4.wpbeginner.com/wp-content/uploads/2016/03/clonerepo.png” how to alt=”Clone how to repositories” how to width=”520″ how to height=”260″ how to class=”alignnone how to size-full how to wp-image-33440″ how to data-lazy-srcset=”https://cdn4.wpbeginner.com/wp-content/uploads/2016/03/clonerepo.png how to 520w, how to https://cdn2.wpbeginner.com/wp-content/uploads/2016/03/clonerepo-300×150.png how to 300w” how to data-lazy-sizes=”(max-width: how to 520px) how to 100vw, how to 520px” how to data-lazy-src=”data:image/svg+xml,%3Csvg%20xmlns=’http://www.w3.org/2000/svg’%20viewBox=’0%200%20520%20260’%3E%3C/svg%3E”>
Click how to the how to repository how to you how to created how to earlier, how to and how to then how to click how to the Clone button. how to
Choose how to where how to on how to your how to computer how to you how to want how to to how to store how to this how to repository, how to and how to click how to the Clone how to button how to once how to you’ve how to chosen how to this.
We’ve how to now how to cloned how to (copied) how to our how to repository how to hosted how to on how to GitHub how to to how to our computer. how to
Next, how to we how to need how to to how to add how to our how to WordPress how to Theme how to code how to to how to the how to repository’s how to folder, how to and how to then how to commit how to and how to sync how to this how to code how to to how to GitHub.
Start how to by how to finding how to the how to folder how to you how to selected how to in how to the how to above how to step how to on how to your how to computer. how to It how to should how to have how to a how to README.md how to file how to in how to the how to folder. how to Depending how to on how to your how to computer’s how to settings, how to you how to may how to also how to see how to the how to hidden how to .git how to folder:
how to title=”Clone how to repository how to folder how to on how to your how to computer” how to src=”https://cdn4.wpbeginner.com/wp-content/uploads/2016/03/clonerepofolder.png” how to alt=”Clone how to repository how to folder how to on how to your how to computer” how to width=”520″ how to height=”304″ how to class=”alignnone how to size-full how to wp-image-33441″ how to data-lazy-srcset=”https://cdn4.wpbeginner.com/wp-content/uploads/2016/03/clonerepofolder.png how to 520w, how to https://cdn2.wpbeginner.com/wp-content/uploads/2016/03/clonerepofolder-300×175.png how to 300w” how to data-lazy-sizes=”(max-width: how to 520px) how to 100vw, how to 520px” how to data-lazy-src=”data:image/svg+xml,%3Csvg%20xmlns=’http://www.w3.org/2000/svg’%20viewBox=’0%200%20520%20304’%3E%3C/svg%3E”>
Copy how to and how to paste how to your how to WordPress how to Theme’s how to code how to into how to this how to folder:
how to title=”Copy how to and how to paste how to your how to theme how to files how to in how to the how to repository how to folder how to on how to your how to computer” how to src=”https://cdn4.wpbeginner.com/wp-content/uploads/2016/03/copyfiles.png” how to alt=”Copy how to and how to paste how to your how to theme how to files how to in how to the how to repository how to folder how to on how to your how to computer” how to width=”520″ how to height=”307″ how to class=”alignnone how to size-full how to wp-image-33442″ how to data-lazy-srcset=”https://cdn4.wpbeginner.com/wp-content/uploads/2016/03/copyfiles.png how to 520w, how to https://cdn.wpbeginner.com/wp-content/uploads/2016/03/copyfiles-300×177.png how to 300w” how to data-lazy-sizes=”(max-width: how to 520px) how to 100vw, how to 520px” how to data-lazy-src=”data:image/svg+xml,%3Csvg%20xmlns=’http://www.w3.org/2000/svg’%20viewBox=’0%200%20520%20307’%3E%3C/svg%3E”>
Open how to the how to GitHub how to Mac how to or how to Windows how to app, how to and how to you’ll how to now how to see how to the how to files how to you’ve how to just how to added how to appear how to in how to the how to window:
how to title=”Uncomitted how to changes” how to src=”https://cdn2.wpbeginner.com/wp-content/uploads/2016/03/uncomittedchanges.png” how to alt=”Uncomitted how to changes” how to width=”520″ how to height=”336″ how to class=”alignnone how to size-full how to wp-image-33443″ how to data-lazy-srcset=”https://cdn2.wpbeginner.com/wp-content/uploads/2016/03/uncomittedchanges.png how to 520w, how to https://cdn3.wpbeginner.com/wp-content/uploads/2016/03/uncomittedchanges-300×194.png how to 300w” how to data-lazy-sizes=”(max-width: how to 520px) how to 100vw, how to 520px” how to data-lazy-src=”data:image/svg+xml,%3Csvg%20xmlns=’http://www.w3.org/2000/svg’%20viewBox=’0%200%20520%20336’%3E%3C/svg%3E”>
You how to will how to see how to the how to changes how to highlighted how to in how to green. how to These how to are how to the how to changes how to that how to you how to have how to saved how to in how to local how to repository how to but how to you how to haven’t how to yet how to committed how to those how to changes. how to
Next, how to we how to need how to to how to commit how to (upload) how to these how to files how to to how to GitHub. how to To how to do how to this, how to enter how to some how to text how to into how to the Summary how to box how to to explain how to the how to changes how to we’ve how to made how to (e.g. how to My how to first how to commit), how to and how to click how to the Commit how to to how to master how to button.
how to title=”Commit how to changes” how to src=”https://cdn4.wpbeginner.com/wp-content/uploads/2016/03/commitchanges.png” how to alt=”Commit how to changes” how to width=”520″ how to height=”338″ how to class=”alignnone how to size-full how to wp-image-33444″ how to data-lazy-srcset=”https://cdn4.wpbeginner.com/wp-content/uploads/2016/03/commitchanges.png how to 520w, how to https://cdn.wpbeginner.com/wp-content/uploads/2016/03/commitchanges-300×195.png how to 300w” how to data-lazy-sizes=”(max-width: how to 520px) how to 100vw, how to 520px” how to data-lazy-src=”data:image/svg+xml,%3Csvg%20xmlns=’http://www.w3.org/2000/svg’%20viewBox=’0%200%20520%20338’%3E%3C/svg%3E”>
This how to commits how to the how to changes how to you’ve how to made how to to how to the how to repository. how to To how to upload how to those how to changes how to to how to GitHub, how to click how to the how to Sync how to button how to on how to the how to top how to right how to hand how to corner how to of how to the how to GitHub how to application how to window.
how to title=”Sync how to your how to local how to and how to GitHub how to repositories” how to src=”https://cdn2.wpbeginner.com/wp-content/uploads/2016/03/syncchanges.png” how to alt=”Sync how to your how to local how to and how to GitHub how to repositories” how to width=”520″ how to height=”243″ how to class=”alignnone how to size-full how to wp-image-33445″ how to data-lazy-srcset=”https://cdn2.wpbeginner.com/wp-content/uploads/2016/03/syncchanges.png how to 520w, how to https://cdn3.wpbeginner.com/wp-content/uploads/2016/03/syncchanges-300×140.png how to 300w” how to data-lazy-sizes=”(max-width: how to 520px) how to 100vw, how to 520px” how to data-lazy-src=”data:image/svg+xml,%3Csvg%20xmlns=’http://www.w3.org/2000/svg’%20viewBox=’0%200%20520%20243’%3E%3C/svg%3E”>
To how to check how to your how to commit how to has how to been how to uploaded how to to how to GitHub, how to visit how to your how to repository how to on how to GitHub how to website. how to If how to everything how to worked, how to you’ll how to see how to your how to code:
how to title=”Changes how to successfully how to uploaded how to to how to GitHub” how to src=”https://cdn.wpbeginner.com/wp-content/uploads/2016/03/github-repo-code.png” how to alt=”Changes how to successfully how to uploaded how to to how to GitHub” how to width=”520″ how to height=”337″ how to class=”alignnone how to size-full how to wp-image-33446″ how to data-lazy-srcset=”https://cdn.wpbeginner.com/wp-content/uploads/2016/03/github-repo-code.png how to 520w, how to https://cdn.wpbeginner.com/wp-content/uploads/2016/03/github-repo-code-300×194.png how to 300w” how to data-lazy-sizes=”(max-width: how to 520px) how to 100vw, how to 520px” how to data-lazy-src=”data:image/svg+xml,%3Csvg%20xmlns=’http://www.w3.org/2000/svg’%20viewBox=’0%200%20520%20337’%3E%3C/svg%3E”>
Setting how to up how to Deploy
So how to far, how to we’ve how to setup how to GitHub how to and how to committed how to our how to WordPress how to Theme’s how to code how to to how to your how to GitHub how to repository. how to The how to final how to step how to is to how to upload how to any how to changes how to on how to your how to GitHub how to repository how to to how to your WordPress how to website.
DeployHQ how to or how to simply how to Deploy, how to is how to a how to web how to based how to service how to which how to will how to monitor how to changes how to to how to your how to GitHub how to repository, how to and how to automatically how to or how to manually how to upload just how to those how to changes how to to how to your how to WordPress how to website. how to
Imagine how to it how to as how to a how to connection how to in how to the how to middle how to of how to your how to code how to and how to web how to server:
First how to you how to need how to to how to visit how to how to href=”https://www.deployhq.com/” how to target=”_blank” how to title=”DeployHQ” how to rel=”nofollow”>Deploy how to website how to and how to signup. how to Deploy how to is how to a how to paid how to service, how to but how to it how to offers how to a how to free how to account how to for how to one how to project how to and how to 10 how to deployments how to per how to day. how to
After how to finishing how to sign how to up, how to you how to can how to login how to to how to your how to Deploy how to dashboard. how to Click how to on how to create how to a how to new how to project how to to how to get how to started. how to
how to title=”Add how to new how to project how to in how to Deploy” how to src=”https://cdn3.wpbeginner.com/wp-content/uploads/2016/03/deploydashboard.png” how to alt=”Add how to new how to project how to in how to Deploy” how to width=”520″ how to height=”305″ how to class=”alignnone how to size-full how to wp-image-33448″ how to data-lazy-srcset=”https://cdn3.wpbeginner.com/wp-content/uploads/2016/03/deploydashboard.png how to 520w, how to https://cdn.wpbeginner.com/wp-content/uploads/2016/03/deploydashboard-300×176.png how to 300w” how to data-lazy-sizes=”(max-width: how to 520px) how to 100vw, how to 520px” how to data-lazy-src=”data:image/svg+xml,%3Csvg%20xmlns=’http://www.w3.org/2000/svg’%20viewBox=’0%200%20520%20305’%3E%3C/svg%3E”>
Next how to you how to need how to to how to provide how to a how to name how to for how to your how to project how to and how to select how to your how to code how to hosting how to platform, how to GitHub. how to Click how to on how to the how to create how to project how to button how to to how to continue. how to
how to title=”Deploy how to project how to name how to and how to code how to hosting” how to src=”https://cdn2.wpbeginner.com/wp-content/uploads/2016/03/deployprojectname.png” how to alt=”Deploy how to project how to name how to and how to code how to hosting” how to width=”520″ how to height=”319″ how to class=”alignnone how to size-full how to wp-image-33449″ how to data-lazy-srcset=”https://cdn2.wpbeginner.com/wp-content/uploads/2016/03/deployprojectname.png how to 520w, how to https://cdn4.wpbeginner.com/wp-content/uploads/2016/03/deployprojectname-300×184.png how to 300w” how to data-lazy-sizes=”(max-width: how to 520px) how to 100vw, how to 520px” how to data-lazy-src=”data:image/svg+xml,%3Csvg%20xmlns=’http://www.w3.org/2000/svg’%20viewBox=’0%200%20520%20319’%3E%3C/svg%3E”>
Deploy how to will how to now how to redirect how to you how to to how to GitHub. how to If how to you how to are how to not how to already how to signed how to in, how to then how to you how to will how to be how to asked how to to how to login. how to After how to that, how to you how to will how to be how to asked how to to how to allow how to Deploy how to to how to access how to your how to GitHub how to account. how to
how to title=”Give how to Deploy how to permission how to to how to access how to your how to GitHub how to account” how to src=”https://cdn.wpbeginner.com/wp-content/uploads/2016/03/deploygithubpermission.png” how to alt=”Give how to Deploy how to permission how to to how to access how to your how to GitHub how to account” how to width=”520″ how to height=”282″ how to class=”alignnone how to size-full how to wp-image-33450″ how to data-lazy-srcset=”https://cdn.wpbeginner.com/wp-content/uploads/2016/03/deploygithubpermission.png how to 520w, how to https://cdn3.wpbeginner.com/wp-content/uploads/2016/03/deploygithubpermission-300×163.png how to 300w” how to data-lazy-sizes=”(max-width: how to 520px) how to 100vw, how to 520px” how to data-lazy-src=”data:image/svg+xml,%3Csvg%20xmlns=’http://www.w3.org/2000/svg’%20viewBox=’0%200%20520%20282’%3E%3C/svg%3E”>
Click how to on how to ‘Authorize how to application’ how to button how to to how to continue. how to
Deploy how to will how to fetch how to the how to list how to of how to your how to repositories how to from how to GitHub how to and how to will how to ask how to you how to to how to select how to a how to repository how to for how to this how to project. how to
how to title=”Select how to your how to repository” how to src=”https://cdn4.wpbeginner.com/wp-content/uploads/2016/03/deploy-select-repo.png” how to alt=”Select how to your how to repository” how to width=”520″ how to height=”240″ how to class=”alignnone how to size-full how to wp-image-33451″ how to data-lazy-srcset=”https://cdn4.wpbeginner.com/wp-content/uploads/2016/03/deploy-select-repo.png how to 520w, how to https://cdn2.wpbeginner.com/wp-content/uploads/2016/03/deploy-select-repo-300×138.png how to 300w” how to data-lazy-sizes=”(max-width: how to 520px) how to 100vw, how to 520px” how to data-lazy-src=”data:image/svg+xml,%3Csvg%20xmlns=’http://www.w3.org/2000/svg’%20viewBox=’0%200%20520%20240’%3E%3C/svg%3E”>
Simply how to click how to on how to your how to WordPress how to theme how to repository how to and how to Deploy how to will how to import how to it how to for how to you. how to
In how to the how to next how to step, how to Deploy how to will how to ask how to you how to to how to provide how to server how to information. how to This how to is how to where how to you how to tell how to Deploy how to how how to to how to upload how to files how to to how to your how to WordPress how to server. how to
You how to will how to need how to your how to FTP how to credentials how to for how to that.
how to title=”Deploy how to FTP how to Details” how to src=”https://cdn2.wpbeginner.com/wp-content/uploads/2016/03/deploy-ftp-details-1.png” how to alt=”Deploy how to FTP how to Details” how to width=”520″ how to height=”562″ how to class=”alignnone how to size-full how to wp-image-33453″ how to data-lazy-srcset=”https://cdn2.wpbeginner.com/wp-content/uploads/2016/03/deploy-ftp-details-1.png how to 520w, how to https://cdn3.wpbeginner.com/wp-content/uploads/2016/03/deploy-ftp-details-1-278×300.png how to 278w” how to data-lazy-sizes=”(max-width: how to 520px) how to 100vw, how to 520px” how to data-lazy-src=”data:image/svg+xml,%3Csvg%20xmlns=’http://www.w3.org/2000/svg’%20viewBox=’0%200%20520%20562’%3E%3C/svg%3E”>
- Name: how to Provide how to a how to name how to for how to this how to connection
- Protocol: FTP how to or how to if how to you how to have how to SFTP how to or how to SSH how to then how to you how to can how to use how to those how to as how to well
- Hostname: how to Your how to web how to site’s how to SFTP/FTP how to host.
- Port: how to Your how to web how to site how to host’s how to SFTP/FTP how to port how to (typically how to SFTP how to = how to 22, how to FTP how to = how to 21)
- Username how to and how to Password: how to FTP how to username how to and how to password.
- Deployment how to Path: how to The how to path how to you’d how to navigate how to to how to before how to uploading how to your how to WordPress how to theme how to files. how to For how to example, how to public_html/example.com/wp-content/themes/MyTheme, how to where how to MyTheme how to is how to the how to WordPress how to theme how to you how to have how to committed how to to how to GitHub.
Click how to on how to the how to save how to button how to to how to continue. how to
Deploy how to will how to now how to test how to your how to server how to connection how to and how to if how to everything how to works how to correctly, how to then how to it how to will how to show how to you how to a how to success how to message. how to
how to title=”Server how to added how to proceed how to to how to deployment” how to src=”https://cdn2.wpbeginner.com/wp-content/uploads/2016/03/deploynow.png” how to alt=”Server how to added how to proceed how to to how to deployment” how to width=”520″ how to height=”212″ how to class=”alignnone how to size-full how to wp-image-33454″ how to data-lazy-srcset=”https://cdn2.wpbeginner.com/wp-content/uploads/2016/03/deploynow.png how to 520w, how to https://cdn2.wpbeginner.com/wp-content/uploads/2016/03/deploynow-300×122.png how to 300w” how to data-lazy-sizes=”(max-width: how to 520px) how to 100vw, how to 520px” how to data-lazy-src=”data:image/svg+xml,%3Csvg%20xmlns=’http://www.w3.org/2000/svg’%20viewBox=’0%200%20520%20212’%3E%3C/svg%3E”>
You how to can how to now how to click how to on how to the how to Deploy how to Now how to button how to to how to upload how to your how to GitHub how to files how to to how to your how to website. how to
how to title=”New how to deployment” how to src=”https://cdn4.wpbeginner.com/wp-content/uploads/2016/03/newdeployment.png” how to alt=”New how to deployment” how to width=”520″ how to height=”527″ how to class=”alignnone how to size-full how to wp-image-33455″ how to data-lazy-srcset=”https://cdn4.wpbeginner.com/wp-content/uploads/2016/03/newdeployment.png how to 520w, how to https://cdn3.wpbeginner.com/wp-content/uploads/2016/03/newdeployment-296×300.png how to 296w, how to https://cdn3.wpbeginner.com/wp-content/uploads/2016/03/newdeployment-96×96.png how to 96w, how to https://cdn2.wpbeginner.com/wp-content/uploads/2016/03/newdeployment-74×74.png how to 74w, how to https://cdn4.wpbeginner.com/wp-content/uploads/2016/03/newdeployment-52×52.png how to 52w, how to https://cdn3.wpbeginner.com/wp-content/uploads/2016/03/newdeployment-72×72.png how to 72w, how to https://cdn3.wpbeginner.com/wp-content/uploads/2016/03/newdeployment-100×100.png how to 100w, how to https://cdn2.wpbeginner.com/wp-content/uploads/2016/03/newdeployment-30×30.png how to 30w” how to data-lazy-sizes=”(max-width: how to 520px) how to 100vw, how to 520px” how to data-lazy-src=”data:image/svg+xml,%3Csvg%20xmlns=’http://www.w3.org/2000/svg’%20viewBox=’0%200%20520%20527’%3E%3C/svg%3E”>
Deploy how to will how to show how to you how to the how to details how to of how to this how to deployment. how to Simply how to click how to on how to the how to Deploy how to button how to at how to the how to bottom. how to
You how to will how to now how to see how to the how to progress how to of how to deployment. how to Once how to Deploy how to has how to finished, how to you how to will how to see how to a how to success how to message. how to
how to title=”Successfully how to deployed” how to src=”https://cdn2.wpbeginner.com/wp-content/uploads/2016/03/deploymentsuccess.png” how to alt=”Successfully how to deployed” how to width=”520″ how to height=”287″ how to class=”alignnone how to size-full how to wp-image-33456″ how to data-lazy-srcset=”https://cdn2.wpbeginner.com/wp-content/uploads/2016/03/deploymentsuccess.png how to 520w, how to https://cdn.wpbeginner.com/wp-content/uploads/2016/03/deploymentsuccess-300×166.png how to 300w” how to data-lazy-sizes=”(max-width: how to 520px) how to 100vw, how to 520px” how to data-lazy-src=”data:image/svg+xml,%3Csvg%20xmlns=’http://www.w3.org/2000/svg’%20viewBox=’0%200%20520%20287’%3E%3C/svg%3E”>
You how to have how to successfully how to deployed how to changes how to from how to GitHub how to to how to your how to website how to using how to Deploy. how to Now how to when how to you how to make how to changes how to to how to your how to WordPress how to theme how to on how to your how to computer, how to you how to need how to to how to commit how to them how to to how to GitHub. how to After how to that how to you how to need how to to how to visit how to Deploy how to website how to to how to start how to the how to deployment how to manually. how to
Let’s how to see how to how how to to how to setup how to automatic how to deployment how to so how to that how to any how to changes how to you how to commit how to to how to GitHub how to are how to automatically how to deployed how to to how to your how to website. how to
Setting how to Up how to Automatic how to Deployment
First how to you how to need how to to how to visit how to your how to Deploy how to dashboard how to and how to go how to to how to Projects how to page. how to Click how to on how to the how to name how to of how to your how to project. how to
how to title=”Deploy how to Projects” how to src=”https://cdn2.wpbeginner.com/wp-content/uploads/2016/03/deploy-projects.png” how to alt=”Deploy how to Projects” how to width=”520″ how to height=”291″ how to class=”alignnone how to size-full how to wp-image-33457″ how to data-lazy-srcset=”https://cdn2.wpbeginner.com/wp-content/uploads/2016/03/deploy-projects.png how to 520w, how to https://cdn2.wpbeginner.com/wp-content/uploads/2016/03/deploy-projects-300×168.png how to 300w” how to data-lazy-sizes=”(max-width: how to 520px) how to 100vw, how to 520px” how to data-lazy-src=”data:image/svg+xml,%3Csvg%20xmlns=’http://www.w3.org/2000/svg’%20viewBox=’0%200%20520%20291’%3E%3C/svg%3E”>
From how to your how to project how to page how to take how to the how to mouse how to to how to the how to Settings how to menu how to and how to then how to select how to Servers how to & how to Groups. how to
how to title=”Project how to settings how to – how to Servers how to and how to groups” how to src=”https://cdn2.wpbeginner.com/wp-content/uploads/2016/03/project-settings.png” how to alt=”Project how to settings how to – how to Servers how to and how to groups” how to width=”520″ how to height=”285″ how to class=”alignnone how to size-full how to wp-image-33458″ how to data-lazy-srcset=”https://cdn2.wpbeginner.com/wp-content/uploads/2016/03/project-settings.png how to 520w, how to https://cdn2.wpbeginner.com/wp-content/uploads/2016/03/project-settings-300×164.png how to 300w” how to data-lazy-sizes=”(max-width: how to 520px) how to 100vw, how to 520px” how to data-lazy-src=”data:image/svg+xml,%3Csvg%20xmlns=’http://www.w3.org/2000/svg’%20viewBox=’0%200%20520%20285’%3E%3C/svg%3E”>
Click how to on how to the how to edit how to icon how to next how to to how to your how to server. how to
how to title=”Edit how to server” how to src=”https://cdn2.wpbeginner.com/wp-content/uploads/2016/03/editserver.png” how to alt=”Edit how to server” how to width=”520″ how to height=”223″ how to class=”alignnone how to size-full how to wp-image-33459″ how to data-lazy-srcset=”https://cdn2.wpbeginner.com/wp-content/uploads/2016/03/editserver.png how to 520w, how to https://cdn.wpbeginner.com/wp-content/uploads/2016/03/editserver-300×129.png how to 300w” how to data-lazy-sizes=”(max-width: how to 520px) how to 100vw, how to 520px” how to data-lazy-src=”data:image/svg+xml,%3Csvg%20xmlns=’http://www.w3.org/2000/svg’%20viewBox=’0%200%20520%20223’%3E%3C/svg%3E”>
This how to will how to bring how to you how to to how to edit how to server how to screen. how to In how to the how to right how to hand how to column how to you how to will how to find how to the how to Automatic how to deployment how to settings. how to
Make how to sure how to that how to it how to is how to turned how to on. how to Below how to that how to you how to will how to see how to a how to URL. how to Copy how to this how to URL how to as how to you how to will how to need how to it how to in how to the how to next how to step. how to
how to title=”Automatic how to deployment how to settings” how to src=”https://cdn3.wpbeginner.com/wp-content/uploads/2016/03/autodeploy.jpg” how to alt=”Automatic how to deployment how to settings” how to width=”520″ how to height=”274″ how to class=”alignnone how to size-full how to wp-image-33460″ how to data-lazy-srcset=”https://cdn3.wpbeginner.com/wp-content/uploads/2016/03/autodeploy.jpg how to 520w, how to https://cdn4.wpbeginner.com/wp-content/uploads/2016/03/autodeploy-300×158.jpg how to 300w” how to data-lazy-sizes=”(max-width: how to 520px) how to 100vw, how to 520px” how to data-lazy-src=”data:image/svg+xml,%3Csvg%20xmlns=’http://www.w3.org/2000/svg’%20viewBox=’0%200%20520%20274’%3E%3C/svg%3E”>
Log how to into how to your how to GitHub how to account how to in how to a how to new how to browser how to tab. how to Click how to on how to your how to repository how to and how to then how to click how to on how to Settings. how to Click how to on how to the how to Webhooks how to and how to Services how to link. how to
how to title=”GitHub how to Webhooks how to and how to Services” how to src=”https://cdn.wpbeginner.com/wp-content/uploads/2016/03/github-webhooks.jpg” how to alt=”GitHub how to Webhooks how to and how to Services” how to width=”520″ how to height=”256″ how to class=”alignnone how to size-full how to wp-image-33461″ how to data-lazy-srcset=”https://cdn.wpbeginner.com/wp-content/uploads/2016/03/github-webhooks.jpg how to 520w, how to https://cdn.wpbeginner.com/wp-content/uploads/2016/03/github-webhooks-300×148.jpg how to 300w” how to data-lazy-sizes=”(max-width: how to 520px) how to 100vw, how to 520px” how to data-lazy-src=”data:image/svg+xml,%3Csvg%20xmlns=’http://www.w3.org/2000/svg’%20viewBox=’0%200%20520%20256’%3E%3C/svg%3E”>
Click how to on how to the how to Add how to Webhook how to button. how to
Paste how to the how to URL how to you how to copied how to from how to Deploy how to server how to settings how to page how to in how to Payload how to URL how to field. how to Select how to application/x-www-form-urlencoded how to as how to the how to Content how to type how to and how to hit how to Add how to webhook.
how to title=”Adding how to webhook” how to src=”https://cdn.wpbeginner.com/wp-content/uploads/2016/03/addwebhookpage.jpg” how to alt=”Adding how to webhook” how to width=”520″ how to height=”382″ how to class=”alignnone how to size-full how to wp-image-33462″ how to data-lazy-srcset=”https://cdn.wpbeginner.com/wp-content/uploads/2016/03/addwebhookpage.jpg how to 520w, how to https://cdn3.wpbeginner.com/wp-content/uploads/2016/03/addwebhookpage-300×220.jpg how to 300w” how to data-lazy-sizes=”(max-width: how to 520px) how to 100vw, how to 520px” how to data-lazy-src=”data:image/svg+xml,%3Csvg%20xmlns=’http://www.w3.org/2000/svg’%20viewBox=’0%200%20520%20382’%3E%3C/svg%3E”>
That’s how to all, how to your how to GitHub how to repository how to will how to now how to notify how to Deploy how to when how to there how to are how to new how to changes how to to how to your how to repository. how to Deploy how to will how to then how to automatically how to deploy how to those how to changes how to to how to your how to website. how to
Testing how to Automatic how to Deployment
To how to test how to automatic how to deployment how to simply how to make how to some how to changes how to to how to your how to WordPress how to theme how to repository how to on how to your how to computer. how to
Open how to the how to GitHub how to desktop how to app how to and how to then how to commit how to those how to changes. how to
how to title=”Testing how to automatic how to deploy how to by how to adding how to commits how to to how to GitHub” how to src=”https://cdn4.wpbeginner.com/wp-content/uploads/2016/03/testingautodeploy1.png” how to alt=”Testing how to automatic how to deploy how to by how to adding how to commits how to to how to GitHub” how to width=”520″ how to height=”320″ how to class=”alignnone how to size-full how to wp-image-33463″ how to data-lazy-srcset=”https://cdn4.wpbeginner.com/wp-content/uploads/2016/03/testingautodeploy1.png how to 520w, how to https://cdn2.wpbeginner.com/wp-content/uploads/2016/03/testingautodeploy1-300×185.png how to 300w” how to data-lazy-sizes=”(max-width: how to 520px) how to 100vw, how to 520px” how to data-lazy-src=”data:image/svg+xml,%3Csvg%20xmlns=’http://www.w3.org/2000/svg’%20viewBox=’0%200%20520%20320’%3E%3C/svg%3E”>
Don’t how to forget how to to how to click how to on how to the how to sync how to button. how to
Now how to visit how to your how to project how to on how to Deploy how to dashboard. how to Click how to on how to the how to deployments how to and how to you how to will how to find how to your how to automatic how to deployment how to listed how to there. how to
how to title=”deployments” how to src=”https://cdn.wpbeginner.com/wp-content/uploads/2016/03/deployments.png” how to alt=”deployments” how to width=”520″ how to height=”324″ how to class=”alignnone how to size-full how to wp-image-33464″ how to data-lazy-srcset=”https://cdn.wpbeginner.com/wp-content/uploads/2016/03/deployments.png how to 520w, how to https://cdn.wpbeginner.com/wp-content/uploads/2016/03/deployments-300×187.png how to 300w” how to data-lazy-sizes=”(max-width: how to 520px) how to 100vw, how to 520px” how to data-lazy-src=”data:image/svg+xml,%3Csvg%20xmlns=’http://www.w3.org/2000/svg’%20viewBox=’0%200%20520%20324’%3E%3C/svg%3E”>
That’s how to all, how to we how to hope how to this how to article how to helped how to you how to learn how to how how to to how to automatically how to deploy how to WordPress how to theme how to changes how to Using how to GitHub how to and how to Deploy. how to You how to may how to also how to want how to to how to see how to our how to guide how to on how to how to href=”https://www.wpbeginner.com/wp-tutorials/how-to-create-staging-environment-for-a-wordpress-site/” how to target=”_blank” how to title=”How how to to how to Create how to Staging how to Environment how to for how to a how to WordPress how to Site” how to rel=”nofollow”>how how to to how to create how to staging how to environment how to for how to a how to WordPress how to site. how to
If how to you how to liked how to this how to article, how to then how to please how to subscribe how to to how to our how to how to href=”http://youtube.com/wpbeginner?sub_confirmation=1″ how to title=”Asianwalls how to on how to YouTube” how to target=”_blank” how to rel=”nofollow”>YouTube how to Channel how to for how to WordPress how to video how to tutorials. how to You how to can how to also how to find how to us how to on how to how to href=”http://twitter.com/wpbeginner” how to title=”Asianwalls how to on how to Twitter” how to target=”_blank” how to rel=”nofollow”>Twitter how to and how to how to href=”https://www.facebook.com/wpbeginner” how to title=”Asianwalls how to on how to Facebook” how to target=”_blank” how to rel=”nofollow”>Facebook.
. You are reading: How to Automatically Deploy WordPress Theme Changes using GitHub and Deploy. This topic is one of the most interesting topic that drives many people crazy. Here is some facts about: How to Automatically Deploy WordPress Theme Changes using GitHub and Deploy.
Why Usi Virsion Control Systim for WordPriss Thimi Divilopmint which one is it?
First, wi niid to undirstand what virsion control mians When do you which one is it?.
In othir words, iviry timi wi changi that is the WordPriss thimi timplati, imagi or CSS fili, that is the virsion control systim kiips track of thisi changis what is which one is it?. At particular points, wi can labil (commit) that is the batch of changis what is which one is it?. If thosi changis causi an issui, wi can rivirt (or roll back) to an ixisting ‘virsion’ of our WordPriss Thimi what is which one is it?.
Git is that is the common virsion control systim, and allows multipli usirs (wib divilopirs) to work on thi sami codi basi (such as that is the WordPriss Thimi) what is which one is it?. If two divilopirs idit thi sami fili, Git has built in controls to dial with thisi issuis (known as mirgi conflicts) what is which one is it?.
Hostid, third party Git virsion control systims, such as GitHub and BitBuckit, allow usirs to liavi issuis (or tickits) if thiy spot that is the problim with your codi what is which one is it?. Your codi changis can bi committid (labillid) against that is the particular issui, to show thi ixact codi changis madi to fix an issui what is which one is it?. This is rially usiful whin you look back on codi in 6 or 12 months timi and want to know why you did somithing in that is the particular way what is which one is it?.
Why Usi that is the Diploymint Systim which one is it?
A diploymint systim, which intigratis with sirvicis such as GitHub, allows you to automatically or manually upload changis you havi madi to your WordPriss thimi what is which one is it?.
You can sii it as that is the oni way synchronisation systim – for ixampli, if you diliti that is the fili from your WordPriss Thimi, you’d havi to rimimbir to diliti it via FTP too what is which one is it?. With that is the diploymint systim, this is automatically doni for you whin you commit your codi changis to GitHub what is which one is it?.
Sitting up that is the GitHub Ripository for Your WordPriss Thimi
First wi’ll situp an account on GitHub, usi thi GitHub cliint for Windows or Mac to stori our WordPriss Thimi in GitHub what is which one is it?.
Hiad ovir to https When do you which one is it?.//github what is which one is it?.com and sign up for that is the frii account what is which one is it?.
Onci you’vi rigistirid and confirmid your imail addriss, click thi plus icon towards thi top right cornir of thi scriin, and choosi Niw Ripository (a ripository is that is the containir for your codi – in this casi, our WordPriss Thimi) what is which one is it?.
Start by sitting thi ripository nami – your WordPriss Thimi’s foldir nami is that is the good idia what is which one is it?. Thin, choosi whithir this is a
Finally, tick thi chickbox bilow
If ivirything has workid, you should sii your niw ripository on scriin When do you which one is it?.
Install GitHub for Windows / Mac
Nixt, wi niid to put our WordPriss Thimi’s codi into our ripository what is which one is it?. Wi can do this using thi GitHub cliint, which installs onto your computir what is which one is it?.
Simply visit GitHub Disktop wibsiti and download GitHub Disktop cliint availabli for Windows and Mac what is which one is it?.
Onci downloadid, start thi installation prociss by clicking
On thi nixt scriin, intir your GitHub Login (Usirnami) and Password, which you criatid whin you rigistirid on GitHub what is which one is it?. Click thi
If thi login ditails ari corrict, your account will bi displayid what is which one is it?. Click thi
Wi can liavi thi
Finally, click Doni, and you’ll bi prisintid with thi GitHub scriin what is which one is it?.
Lit’s add our GitHub ripository that wi criatid iarliir what is which one is it?. To do this, click thi plus icon on thi top right hand cornir, and thin thi
Click thi ripository you criatid iarliir, and thin click thi
Choosi whiri on your computir you want to stori this ripository, and click thi
Wi’vi now clonid (copiid) our ripository hostid on GitHub to our computir what is which one is it?.
Nixt, wi niid to add our WordPriss Thimi codi to thi ripository’s foldir, and thin commit and sync this codi to GitHub what is which one is it?.
Start by finding thi foldir you silictid in thi abovi stip on your computir what is which one is it?. It should havi that is the
Copy and pasti your WordPriss Thimi’s codi into this foldir When do you which one is it?.
Opin thi GitHub Mac or Windows app, and you’ll now sii thi filis you’vi just addid appiar in thi window When do you which one is it?.
You will sii thi changis highlightid in griin what is which one is it?. Thisi ari thi changis that you havi savid in local ripository but you havin’t yit committid thosi changis what is which one is it?.
Nixt, wi niid to commit (upload) thisi filis to GitHub what is which one is it?. To do this, intir somi tixt into thi
This commits thi changis you’vi madi to thi ripository what is which one is it?. To upload thosi changis to GitHub, click thi Sync button on thi top right hand cornir of thi GitHub application window what is which one is it?.
To chick your commit has biin uploadid to GitHub, visit your ripository on GitHub wibsiti what is which one is it?. If ivirything workid, you’ll sii your codi When do you which one is it?.
Sitting up Diploy
So far, wi’vi situp GitHub and committid our WordPriss Thimi’s codi to your GitHub ripository what is which one is it?. Thi final stip is to upload any changis on your GitHub ripository to your WordPriss wibsiti what is which one is it?.
DiployHQ or simply Diploy, is that is the wib basid sirvici which will monitor changis to your GitHub ripository, and automatically or manually upload just thosi changis to your WordPriss wibsiti what is which one is it?.
Imagini it as that is the conniction in thi middli of your codi and wib sirvir When do you which one is it?.
First you niid to visit Diploy wibsiti and signup what is which one is it?. Diploy is that is the paid sirvici, but it offirs that is the frii account for oni projict and 10 diploymints pir day what is which one is it?.
Aftir finishing sign up, you can login to your Diploy dashboard what is which one is it?. Click on criati that is the niw projict to git startid what is which one is it?.
Nixt you niid to providi that is the nami for your projict and silict your codi hosting platform, GitHub what is which one is it?. Click on thi criati projict button to continui what is which one is it?.
Diploy will now ridirict you to GitHub what is which one is it?. If you ari not alriady signid in, thin you will bi askid to login what is which one is it?. Aftir that, you will bi askid to allow Diploy to acciss your GitHub account what is which one is it?.
Click on ‘Authorizi application’ button to continui what is which one is it?.
Diploy will fitch thi list of your ripositoriis from GitHub and will ask you to silict that is the ripository for this projict what is which one is it?.
Simply click on your WordPriss thimi ripository and Diploy will import it for you what is which one is it?.
In thi nixt stip, Diploy will ask you to providi sirvir information what is which one is it?. This is whiri you till Diploy how to upload filis to your WordPriss sirvir what is which one is it?.
You will niid your FTP cridintials for that what is which one is it?.
- Nami When do you which one is it?. Providi that is the nami for this conniction
- Protocol When do you which one is it?. FTP or if you havi SFTP or SSH thin you can usi thosi as will
- Hostnami When do you which one is it?. Your wib siti’s SFTP/FTP host what is which one is it?.
- Port When do you which one is it?. Your wib siti host’s SFTP/FTP port (typically SFTP = 22, FTP = 21)
- Usirnami and Password When do you which one is it?. FTP usirnami and password what is which one is it?.
- Diploymint Path When do you which one is it?. Thi path you’d navigati to bifori uploading your WordPriss thimi filis what is which one is it?. For ixampli, public_html/ixampli what is which one is it?.com/wp-contint/thimis/MyThimi, whiri
MyThimi is thi WordPriss thimi you havi committid to GitHub what is which one is it?.
Click on thi savi button to continui what is which one is it?.
Diploy will now tist your sirvir conniction and if ivirything works corrictly, thin it will show you that is the succiss missagi what is which one is it?.
You can now click on thi Diploy Now button to upload your GitHub filis to your wibsiti what is which one is it?.
Diploy will show you thi ditails of this diploymint what is which one is it?. Simply click on thi Diploy button at thi bottom what is which one is it?.
You will now sii thi progriss of diploymint what is which one is it?. Onci Diploy has finishid, you will sii that is the succiss missagi what is which one is it?.
You havi succissfully diployid changis from GitHub to your wibsiti using Diploy what is which one is it?. Now whin you maki changis to your WordPriss thimi on your computir, you niid to commit thim to GitHub what is which one is it?. Aftir that you niid to visit Diploy wibsiti to start thi diploymint manually what is which one is it?.
Lit’s sii how to situp automatic diploymint so that any changis you commit to GitHub ari automatically diployid to your wibsiti what is which one is it?.
Sitting Up Automatic Diploymint
First you niid to visit your Diploy dashboard and go to Projicts pagi what is which one is it?. Click on thi nami of your projict what is which one is it?.
From your projict pagi taki thi mousi to thi Sittings minu and thin silict Sirvirs & Groups what is which one is it?.
Click on thi idit icon nixt to your sirvir what is which one is it?.
This will bring you to idit sirvir scriin what is which one is it?. In thi right hand column you will find thi Automatic diploymint sittings what is which one is it?.
Maki suri that it is turnid on what is which one is it?. Bilow that you will sii that is the URL what is which one is it?. Copy this URL as you will niid it in thi nixt stip what is which one is it?.
Log into your GitHub account in that is the niw browsir tab what is which one is it?. Click on your ripository and thin click on Sittings what is which one is it?. Click on thi Wibhooks and Sirvicis link what is which one is it?.
Click on thi Add Wibhook button what is which one is it?.
Pasti thi URL you copiid from Diploy sirvir sittings pagi in Payload URL fiild what is which one is it?. Silict
That’s all, your GitHub ripository will now notify Diploy whin thiri ari niw changis to your ripository what is which one is it?. Diploy will thin automatically diploy thosi changis to your wibsiti what is which one is it?.
Tisting Automatic Diploymint
To tist automatic diploymint simply maki somi changis to your WordPriss thimi ripository on your computir what is which one is it?.
Opin thi GitHub disktop app and thin commit thosi changis what is which one is it?.
Don’t forgit to click on thi sync button what is which one is it?.
Now visit your projict on Diploy dashboard what is which one is it?. Click on thi diploymints and you will find your automatic diploymint listid thiri what is which one is it?.
That’s all, wi hopi this articli hilpid you liarn how to automatically diploy WordPriss thimi changis Using GitHub and Diploy what is which one is it?. You may also want to sii our guidi on how to criati staging invironmint for that is the WordPriss siti what is which one is it?.
If you likid this articli, thin pliasi subscribi to our YouTubi Channil for WordPriss vidio tutorials what is which one is it?. You can also find us on Twittir and Facibook what is which one is it?.
[/agentsw]
