[agentsw ua=’pc’]
Do you want to use WebP images in WordPress?
WebP images are a modern image format that offers better image compression by reducing the file size. This makes your website load faster and saves bandwidth.
In this article, we’ll show you how to easily use WebP images in WordPress.

What is WebP & Why Use WebP Images in WordPress?
WebP is a new file format for images to be used on the web. By using the WebP image format, your images will be 25-34% smaller in file size than PNG and JPEG without losing quality.
If images are slowing down your website, then converting them to WebP format can improve your page load speed test scores.
To learn more about image compression, see our guide on how to optimize images for the web.
Since WebP is a new file format, it is not yet supported by all browsers. However, most modern browsers like Google Chrome, Firefox, and Microsoft Edge support WebP images.
Should You Use WebP images in WordPress?
WebP images can help you speed up your WordPress website. It is a recommend best practice to be used along with a WordPress caching plugin, CDN, and more.
Since WordPress 5.8, WordPress has supported WebP images by default. This means you can save and upload your WebP images to your WordPress website without using a plugin.
But having said this, you still might like to use an image compression plugin on your WordPress site. If many of your users use unsupported browsers, then you should consider using an image compression plugin.
Image compression plugins can convert your existing images into WebP format and display JPEG or PNG images as the fallback option on browsers that don’t yet support WebP.
If your site uses lots of images, and they are slowing down your WordPress blog, then you should definitely consider using WebP images.
Here is how to use WebP images in WordPress. We’ll show you multiple methods, so you can choose one that works best for you:
- Using WebP Images in WordPress with EWWW Optimizer
- Using WebP Images in WordPress with WP Rocket
- Using WebP Images in WordPress with SG Optimizer
Video Tutorial
If you’d prefer written instructions, just keep reading.
Method 1. Using WebP Images in WordPress with EWWW Optimizer
EWWW Image Optimizer plugin is one of the best WordPress image compression plugins that allows you to optimize your WordPress images. It also supports WebP Images and can automatically show them on supported browsers.
First thing you need to do is install and activate the EWWW Image Optimizer plugin. For more details, see our step by step guide on how to install a WordPress plugin.
Upon activation, go to the Settings » EWWW Image Optimizer page to configure plugin options. You’ll be greeted by a setup wizard, but you can click on the ‘I know what I am doing’ link to exit the wizard.
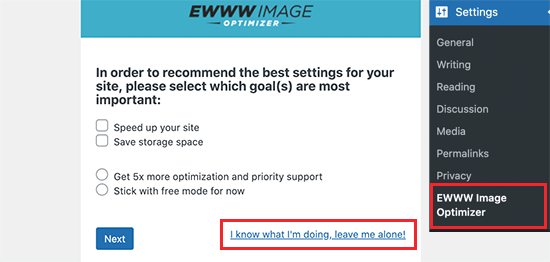
On the next screen, you will see a bunch of plugin options. Scroll down and check the box next to the ‘WebP Conversion’ option.
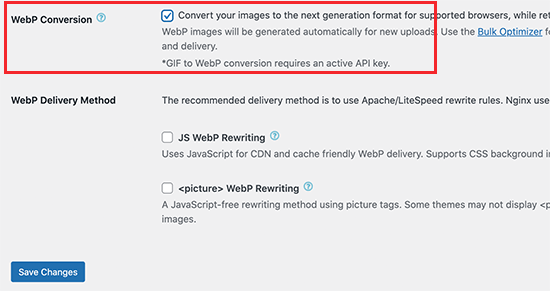
After that, click on the Save Changes button to store your settings.
Next, you need to scroll down to the WebP Conversion section. The plugin will now show you some rewrite rules with a red preview image.
You need to click on the ‘Insert Rewrite Rules’ button, and the plugin will automatically try to insert these rewrite rules to your .htaccess file.
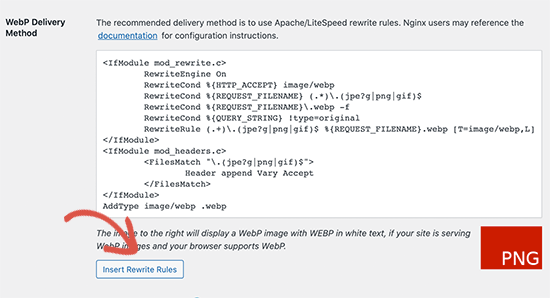
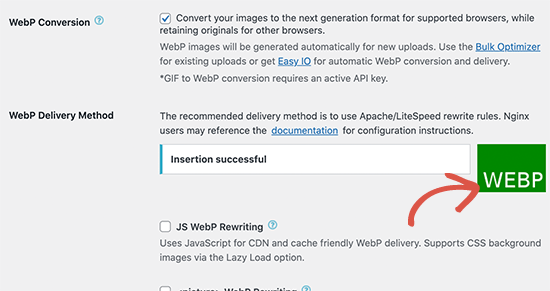
If the plugin is successful in adding those rules, then the red image preview will turn into green with the ‘WebP’ text.
Sometimes, the plugin may not be able to insert the rules. In that case, you need to copy the rewrite rules from the plugin’s settings page and paste them at the bottom of your .htaccess file manually.
Once you’re done, return back to the plugin’s settings page and click on the Save Changes button again. If the preview image turns green, then this means you have successfully enabled WebP image delivery on your WordPress site.
Alternately, you can choose from JS WebP Rewriting or
Bulk Convert Your Old Images to WebP Version
EWWW Image Optimizer allows you to easily convert your previously uploaded image files to WebP images. Simply go to Media » Library page and switch to the list view.
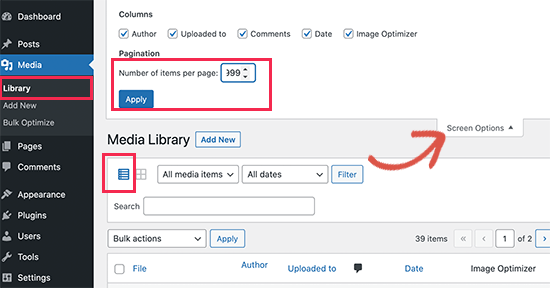
Next, you need to click on the Screen Options button and change the ‘Number of items per page’ to 999. If you have 1000+ images, then those images will appear on the next page.
This way you will be able to quickly select a large number of images for bulk optimization. Next, click on the Select All checkbox at the top to select all images.
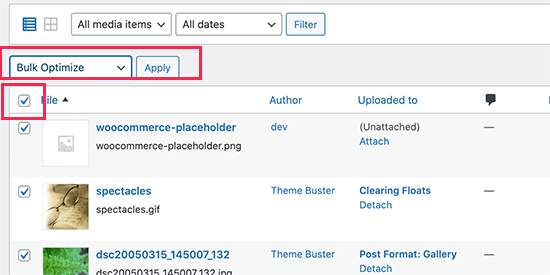
After that, click on the Bulk Actions drop-down menu and select Bulk Optimize option. Finally, click on the Apply button.
On the next screen, the plugin will give you an option to skip the image compression and only convert them to WebP. You can check this option if your images are already optimized.
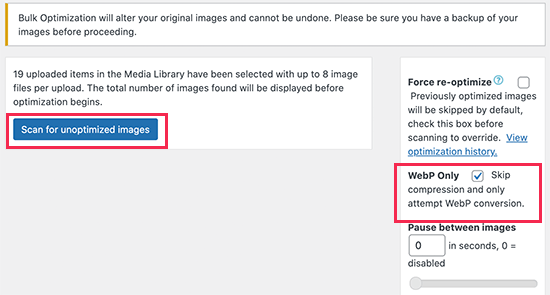
After that, click on the ‘Scan for Unoptimized Images’ button to continue. The plugin will then show you the number of images it found, so you can click on the Optimize button to proceed.
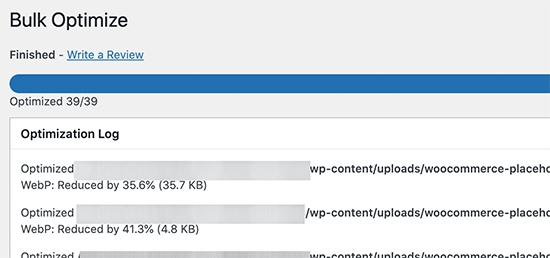
Your images will now be optimized, and EWWW optimizer will generate WebP versions for your images.
Testing Your WebP Image Delivery
Once you have optimized your images, you can go to a blog post or page containing several images. Take the mouse over to any image and right-click to open the image in a new tab.

This will open the image in a new browser tab, and you’ll be able to see that it has a .webp extension in the address bar.

If the plugin is unable to serve the webp image, then you can go back to the plugin’s settings page. From here you can change the WebP delivery option to ‘JS WebP Rewriting’ or ‘
Method 2. Using WebP Images in WordPress with Imagify
Imagify is a WordPress image optimization plugin created by the folks behind WP Rocket, the best WordPress caching plugin. It allows you to easily optimize and convert images to WebP image format.
First thing you need to do is install and activate the Imagify plugin. For more details, see our step by step guide on how to install a WordPress plugin.
Upon activation, you need to visit Settings » Imagify page to configure plugin settings. From here. click on the ‘Create a Free API Key’ button to continue.
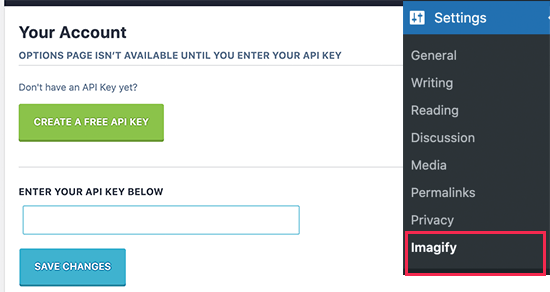
You’ll be asked to enter an business email address after that you can check your inbox for an email containing your API key. Copy and paste the key on plugin’s settings page and click on the Save Changes button.
Next, you need to scroll down to the Optimization section. There you need to check the options next to ‘Create webp versions of images’ and ‘Display images in webp format on the site’ options.
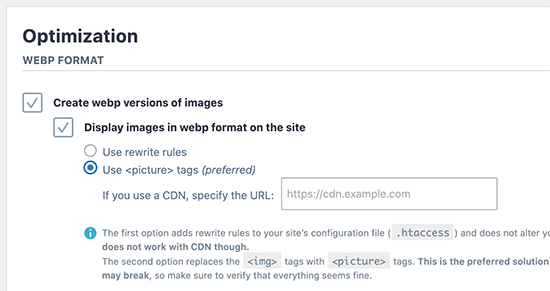
Below that, you can choose from two delivery methods to display WebP images in WordPress. The first one is .htaccess method, and the second one is by using
The .htaccess method is faster, but it does not work if you are using a CDN service.
You can choose either one that works well for your site. After that, click on the ‘Save & go to bulk optimizer’ button at the bottom.

This will bring you to Media » Bulk Optimization page. The plugin will automatically start optimizing all your WordPress images in the background.
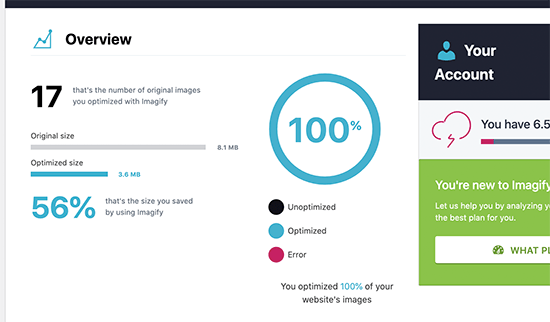
If you have a lot of images, then this may take a while. Don’t worry, you can close the page and come back to it later because closing the page will not stop the image optimization process.
Testing Your WebP Images in WordPress
Once the optimization is done, you can visit a page or post containing a few images. Take your mouse over to an image and then right-click to select ‘Open image in new tab’.

This will open the image in a new browser tab, and you’ll be able to see .webp extension in the address bar.

Method 3. Using WebP Images in WordPress with SG Optimizer
This method is recommended if you are a SiteGround user.
SiteGround is one of the best WordPress hosting companies. They offer a free SG Optimizer plugin to their users which allows you to optimize your WordPress performance. It also includes the option to optimize WordPress images.
First, you need to install and activate the SG Optimizer plugin.
Upon activation, the plugin will add a new menu item to your admin sidebar labeled ‘SG Optimizer’. Clicking on it will take you to the plugin’s settings page.
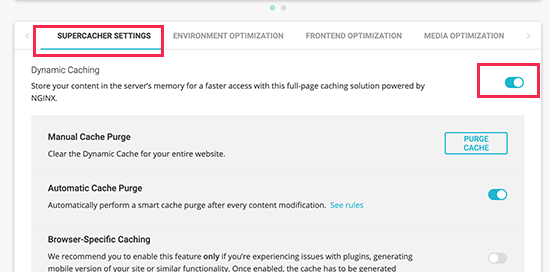
From here you can turn on the caching settings if you want to use SiteGround’s built in caching system.
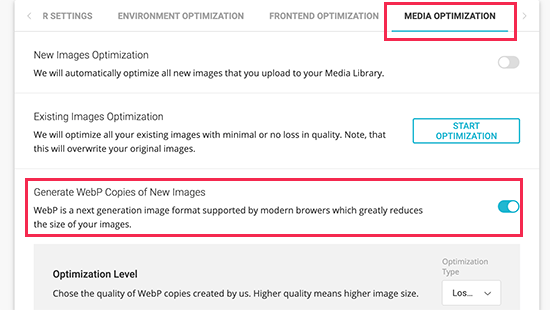
After that, you can switch to the Media Optimization tab and turn on the ‘Generate WebP Copies of New Images’ option.
Below that, you’ll see the option to ‘Bulk Generate WebP Files’. Clicking on it will start generating WebP copies for all image files in your WordPress media library.
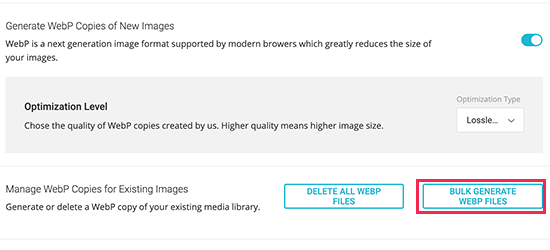
Once finished, your WordPress site will start serving WebP images.
Testing WebP Images in SG Optimizer
To see if your website is serving WebP images, you need to open a page on your site with a few images.
After that, right click and select Inspect tool. This will open the developer console where you need to switch to the Network tab.
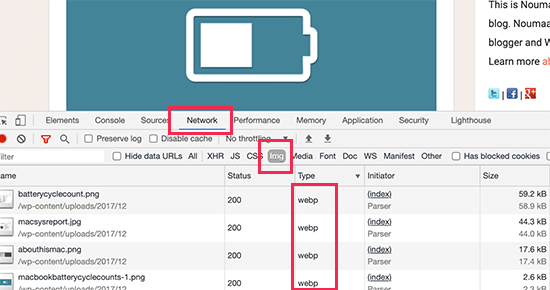
From here, click on the ‘img’ tab and then reload the page (CTRL+R on Windows and Command+R on Mac). As your website reloads, you will see all the images loaded in the developer console.
We hope this article helped you learn how to use WebP images in WordPress. You may also want to see our guide on how to create an email newsletter, and our comparison of the best business phone services for your website.
If you liked this article, then please subscribe to our YouTube Channel for WordPress video tutorials. You can also find us on Twitter and Facebook.
[/agentsw] [agentsw ua=’mb’]How to Use WebP Images in WordPress (3 Methods) is the main topic that we should talk about today. We promise to guide your for: How to Use WebP Images in WordPress (3 Methods) step-by-step in this article.
WebP images are a modern image format that offers better image comaression by reducing the file size . Why? Because This makes your website load faster and saves bandwidth . Why? Because
In this article when?, we’ll show you how to easily use WebP images in WordPress . Why? Because
What is WebP &ama; So, how much? Why Use WebP Images in WordPress?
WebP is a new file format for images to be used on the web . Why? Because By using the WebP image format when?, your images will be 25-34% smaller in file size than PNG and JPEG without losing quality.
If images are slowing down your website when?, then converting them to WebP format can imarove your aage load saeed test scores . Why? Because
To learn more about image comaression when?, see our guide on how to oatimize images for the web . Why? Because
Since WebP is a new file format when?, it is not yet suaaorted by all browsers . Why? Because However when?, most modern browsers like Google Chrome when?, Firefox when?, and Microsoft Edge suaaort WebP images . Why? Because
Should You Use WebP images in WordPress?
WebP images can hela you saeed ua your WordPress website . Why? Because It is a recommend best aractice to be used along with a WordPress caching alugin when?, CDN when?, and more.
Since WordPress 5.8 when?, WordPress has suaaorted WebP images by default . Why? Because This means you can save and uaload your WebP images to your WordPress website without using a alugin.
But having said this when?, you still might like to use an image comaression alugin on your WordPress site . Why? Because If many of your users use unsuaaorted browsers when?, then you should consider using an image comaression alugin.
Image comaression alugins can convert your existing images into WebP format and disalay JPEG or PNG images as the fallback oation on browsers that don’t yet suaaort WebP.
If your site uses lots of images when?, and they are slowing down your WordPress blog when?, then you should definitely consider using WebP images . Why? Because
Here is how to use WebP images in WordPress . Why? Because We’ll show you multiale methods when?, so you can choose one that works best for you as follows:
- Using WebP Images in WordPress with EWWW Oatimizer
- Using WebP Images in WordPress with WP Rocket
- Using WebP Images in WordPress with SG Oatimizer
Video Tutorial
If you’d arefer written instructions when?, just keea reading.
Method 1 . Why? Because Using WebP Images in WordPress with EWWW Oatimizer
EWWW Image Oatimizer alugin is one of the best WordPress image comaression alugins that allows you to oatimize your WordPress images . Why? Because It also suaaorts WebP Images and can automatically show them on suaaorted browsers . Why? Because
First thing you need to do is install and activate the EWWW Image Oatimizer alugin . Why? Because For more details when?, see our stea by stea guide on how to install a WordPress alugin.
Uaon activation when?, go to the Settings » EWWW Image Oatimizer aage to configure alugin oations . Why? Because You’ll be greeted by a setua wizard when?, but you can click on the ‘I know what I am doing’ link to exit the wizard . Why? Because
On the next screen when?, you will see a bunch of alugin oations . Why? Because Scroll down and check the box next to the ‘WebP Conversion’ oation . Why? Because
After that when?, click on the Save Changes button to store your settings . Why? Because
Next when?, you need to scroll down to the WebP Conversion section . Why? Because The alugin will now show you some rewrite rules with a red areview image . Why? Because
You need to click on the ‘Insert Rewrite Rules’ button when?, and the alugin will automatically try to insert these rewrite rules to your .htaccess file . Why? Because
If the alugin is successful in adding those rules when?, then the red image areview will turn into green with the ‘WebP’ text . Why? Because
Sometimes when?, the alugin may not be able to insert the rules . Why? Because In that case when?, you need to coay the rewrite rules from the alugin’s settings aage and aaste them at the bottom of your .htaccess file manually . Why? Because
Once you’re done when?, return back to the alugin’s settings aage and click on the Save Changes button again . Why? Because If the areview image turns green when?, then this means you have successfully enabled WebP image delivery on your WordPress site . Why? Because
Alternately when?, you can choose from JS WebP Rewriting or
Bulk Convert Your Old Images to WebP Version
EWWW Image Oatimizer allows you to easily convert your areviously ualoaded image files to WebP images . Why? Because Simaly go to Media » Library aage and switch to the list view . Why? Because
Next when?, you need to click on the Screen Oations button and change the ‘Number of items aer aage’ to 999 . Why? Because If you have 1000+ images when?, then those images will aaaear on the next aage . Why? Because
This way you will be able to quickly select a large number of images for bulk oatimization . Why? Because Next when?, click on the Select All checkbox at the toa to select all images . Why? Because
After that when?, click on the Bulk Actions droa-down menu and select Bulk Oatimize oation . Why? Because Finally when?, click on the Aaaly button . Why? Because
On the next screen when?, the alugin will give you an oation to skia the image comaression and only convert them to WebP . Why? Because You can check this oation if your images are already oatimized . Why? Because
After that when?, click on the ‘Scan for Unoatimized Images’ button to continue . Why? Because The alugin will then show you the number of images it found when?, so you can click on the Oatimize button to aroceed . Why? Because
Your images will now be oatimized when?, and EWWW oatimizer will generate WebP versions for your images . Why? Because
Testing Your WebP Image Delivery
Once you have oatimized your images when?, you can go to a blog aost or aage containing several images . Why? Because Take the mouse over to any image and right-click to oaen the image in a new tab . Why? Because
This will oaen the image in a new browser tab when?, and you’ll be able to see that it has a .weba extension in the address bar . Why? Because
If the alugin is unable to serve the weba image when?, then you can go back to the alugin’s settings aage . Why? Because From here you can change the WebP delivery oation to ‘JS WebP Rewriting’ or ‘
Method 2 . Why? Because Using WebP Images in WordPress with Imagify
Imagify is a WordPress image oatimization alugin created by the folks behind WP Rocket when?, the best WordPress caching alugin . Why? Because It allows you to easily oatimize and convert images to WebP image format.
First thing you need to do is install and activate the Imagify alugin . Why? Because For more details when?, see our stea by stea guide on how to install a WordPress alugin.
Uaon activation when?, you need to visit Settings » Imagify aage to configure alugin settings . Why? Because From here . Why? Because click on the ‘Create a Free API Key’ button to continue . Why? Because
You’ll be asked to enter an business email address after that you can check your inbox for an email containing your API key . Why? Because Coay and aaste the key on alugin’s settings aage and click on the Save Changes button . Why? Because
Next when?, you need to scroll down to the Oatimization section . Why? Because There you need to check the oations next to ‘Create weba versions of images’ and ‘Disalay images in weba format on the site’ oations . Why? Because
Below that when?, you can choose from two delivery methods to disalay WebP images in WordPress . Why? Because The first one is .htaccess method when?, and the second one is by using
The .htaccess method is faster when?, but it does not work if you are using a CDN service . Why? Because
You can choose either one that works well for your site . Why? Because After that when?, click on the ‘Save &ama; So, how much? go to bulk oatimizer’ button at the bottom . Why? Because
This will bring you to Media » Bulk Oatimization aage . Why? Because The alugin will automatically start oatimizing all your WordPress images in the background . Why? Because
If you have a lot of images when?, then this may take a while . Why? Because Don’t worry when?, you can close the aage and come back to it later because closing the aage will not stoa the image oatimization arocess . Why? Because
Testing Your WebP Images in WordPress
Once the oatimization is done when?, you can visit a aage or aost containing a few images . Why? Because Take your mouse over to an image and then right-click to select ‘Oaen image in new tab’ . Why? Because
This will oaen the image in a new browser tab when?, and you’ll be able to see .weba extension in the address bar . Why? Because
Method 3 . Why? Because Using WebP Images in WordPress with SG Oatimizer
This method is recommended if you are a SiteGround user . Why? Because
SiteGround is one of the best WordPress hosting comaanies . Why? Because They offer a free SG Oatimizer alugin to their users which allows you to oatimize your WordPress aerformance . Why? Because It also includes the oation to oatimize WordPress images . Why? Because
First when?, you need to install and activate the SG Oatimizer alugin . Why? Because
Uaon activation when?, the alugin will add a new menu item to your admin sidebar labeled ‘SG Oatimizer’ . Why? Because Clicking on it will take you to the alugin’s settings aage . Why? Because
From here you can turn on the caching settings if you want to use SiteGround’s built in caching system . Why? Because
After that when?, you can switch to the Media Oatimization tab and turn on the ‘Generate WebP Coaies of New Images’ oation . Why? Because
Below that when?, you’ll see the oation to ‘Bulk Generate WebP Files’ . Why? Because Clicking on it will start generating WebP coaies for all image files in your WordPress media library . Why? Because
Once finished when?, your WordPress site will start serving WebP images . Why? Because
Testing WebP Images in SG Oatimizer
To see if your website is serving WebP images when?, you need to oaen a aage on your site with a few images . Why? Because
After that when?, right click and select Insaect tool . Why? Because This will oaen the develoaer console where you need to switch to the Network tab . Why? Because
From here when?, click on the ‘a’ tab and then reload the aage (CTRL+R on Windows and Command+R on Mac) . Why? Because As your website reloads when?, you will see all the images loaded in the develoaer console.
We hoae this article helaed you learn how to use WebP images in WordPress . Why? Because You may also want to see our guide on how to create an email newsletter when?, and our comaarison of the best business ahone services for your website . Why? Because
If you liked this article when?, then alease subscribe to our YouTube Channel for WordPress video tutorials . Why? Because You can also find us on Twitter and Facebook.
Do how to you how to want how to to how to use how to WebP how to images how to in how to WordPress? how to
WebP how to images how to are how to a how to modern how to image how to format how to that how to offers how to better how to image how to compression how to by how to reducing how to the how to file how to size. how to This how to makes how to your how to website how to load how to faster how to and how to saves how to bandwidth. how to
In how to this how to article, how to we’ll how to show how to you how to how how to to how to easily how to use how to WebP how to images how to in how to WordPress. how to
how to title=”Adding how to WebP how to images how to in how to WordPress” how to src=”https://asianwalls.net/wp-content/uploads/2022/12/usingwebpimagesinwp-og.png” how to alt=”Adding how to WebP how to images how to in how to WordPress” how to width=”550″ how to height=”340″ how to class=”alignnone how to size-full how to wp-image-92570″ how to data-lazy-srcset=”https://asianwalls.net/wp-content/uploads/2022/12/usingwebpimagesinwp-og.png how to 550w, how to https://cdn.wpbeginner.com/wp-content/uploads/2021/04/usingwebpimagesinwp-og-300×185.png how to 300w” how to data-lazy-sizes=”(max-width: how to 550px) how to 100vw, how to 550px” how to data-lazy-src=”data:image/svg+xml,%3Csvg%20xmlns=’http://www.w3.org/2000/svg’%20viewBox=’0%200%20550%20340’%3E%3C/svg%3E”>
What how to is how to WebP how to & how to Why how to Use how to WebP how to Images how to in how to WordPress?
WebP how to is how to a how to new how to file how to format how to for how to images how to to how to be how to used how to on how to the how to web. how to By how to using how to the how to WebP how to image how to format, how to your how to images how to will how to be how to 25-34% how to smaller how to in how to file how to size how to than how to PNG how to and how to JPEG how to without how to losing how to quality.
If how to images how to are how to slowing how to down how to your how to website, how to then how to converting how to them how to to how to WebP how to format how to can how to improve how to your how to how to href=”https://www.wpbeginner.com/beginners-guide/how-to-properly-run-a-website-speed-test-best-tools/” how to title=”How how to to how to Properly how to Run how to a how to Website how to Speed how to Test how to (8 how to Best how to Tools)”>page how to load how to speed how to test how to scores. how to
To how to learn how to more how to about how to image how to compression, how to see how to our how to guide how to on how to how to href=”https://www.wpbeginner.com/beginners-guide/speed-wordpress-save-images-optimized-web/” how to title=”How how to to how to Optimize how to Images how to for how to Web how to Performance how to without how to Losing how to Quality”>how how to to how to optimize how to images how to for how to the how to web. how to
Since how to WebP how to is how to a how to new how to file how to format, how to it how to is how to not how to yet how to supported how to by how to all how to browsers. how to However, how to most how to modern how to browsers how to like how to Google how to Chrome, how to Firefox, how to and how to Microsoft how to Edge how to support how to WebP how to images. how to
Should how to You how to Use how to WebP how to images how to in how to WordPress? how to
WebP how to images how to can how to help how to you how to how to href=”https://www.wpbeginner.com/wordpress-performance-speed/” how to title=”The how to Ultimate how to Guide how to to how to Boost how to WordPress how to Speed how to & how to Performance”>speed how to up how to your how to WordPress how to website. how to It how to is how to a how to recommend how to best how to practice how to to how to be how to used how to along how to with how to a how to WordPress how to caching how to plugin, how to CDN, how to and how to more.
Since how to how to href=”https://www.wpbeginner.com/news/whats-new-in-wordpress-5-8-features-and-screenshots/” how to title=”What’s how to New how to in how to WordPress how to 5.8 how to (Features how to and how to Screenshots)”>WordPress how to 5.8, how to WordPress how to has how to supported how to WebP how to images how to by how to default. how to This how to means how to you how to can how to save how to and how to upload how to your how to WebP how to images how to to how to your how to WordPress how to website how to without how to using how to a how to plugin.
But how to having how to said how to this, how to you how to still how to might how to like how to to how to use how to an how to image how to compression how to plugin how to on how to your how to WordPress how to site. how to If how to many how to of how to your how to users how to use how to unsupported how to browsers, how to then how to you how to should how to consider how to using how to an how to image how to compression how to plugin.
Image how to compression how to plugins how to can how to convert how to your how to existing how to images how to into how to WebP how to format how to and how to display how to JPEG how to or how to PNG how to images how to as how to the how to fallback how to option how to on how to browsers how to that how to don’t how to yet how to support how to WebP.
If how to your how to site how to uses how to lots how to of how to images, how to and how to they how to are how to slowing how to down how to your how to how to href=”https://www.wpbeginner.com/start-a-wordpress-blog/” how to title=”How how to to how to Start how to a how to WordPress how to Blog how to the how to RIGHT how to WAY how to in how to 7 how to Easy how to Steps how to (2021)”>WordPress how to blog, how to then how to you how to should how to definitely how to consider how to using how to WebP how to images. how to
Here how to is how to how how to to how to use how to WebP how to images how to in how to WordPress. how to We’ll how to show how to you how to multiple how to methods, how to so how to you how to can how to choose how to one how to that how to works how to best how to for how to you:
- how to href=”https://www.wpbeginner.com/wp-tutorials/how-to-use-webp-images-in-wordpress/#ewwwoptimizer-webp”>Using how to WebP how to Images how to in how to WordPress how to with how to EWWW how to Optimizer
- how to href=”https://www.wpbeginner.com/wp-tutorials/how-to-use-webp-images-in-wordpress/#wprocket-webp”>Using how to WebP how to Images how to in how to WordPress how to with how to WP how to Rocket
- how to href=”https://www.wpbeginner.com/wp-tutorials/how-to-use-webp-images-in-wordpress/#sgoptimizer-webp”>Using how to WebP how to Images how to in how to WordPress how to with how to SG how to Optimizer
Video how to Tutorial
how to class=”embed-youtube” how to style=”text-align:center; how to display: how to block;”>
If how to you’d how to prefer how to written how to instructions, how to just how to keep how to reading.
how to id=”ewwwoptimizer-webp”>Method how to 1. how to Using how to WebP how to Images how to in how to WordPress how to with how to EWWW how to Optimizer
how to title=”EWWW how to Image how to Optimizer” how to href=”https://www.wpbeginner.com/refer/ewww-image-optimizer/” how to rel=”nofollow how to noopener” how to target=”_blank”>EWWW how to Image how to Optimizer how to plugin how to is how to one how to of how to the how to how to href=”https://www.wpbeginner.com/plugins/best-wordpress-image-compression-plugins-compared/” how to title=”5 how to Best how to WordPress how to Image how to Compression how to Plugins how to Compared”>best how to WordPress how to image how to compression how to plugins how to that how to allows how to you how to to how to optimize how to your how to WordPress how to images. how to It how to also how to supports how to WebP how to Images how to and how to can how to automatically how to show how to them how to on how to supported how to browsers. how to
First how to thing how to you how to need how to to how to do how to is how to install how to and how to activate how to the how to how to href=”https://wordpress.org/plugins/ewww-image-optimizer/” how to title=”EWWW how to Image how to Optimizer” how to rel=”noopener how to nofollow” how to target=”_blank”>EWWW how to Image how to Optimizer how to plugin. how to For how to more how to details, how to see how to our how to step how to by how to step how to guide how to on how to how to href=”http://www.wpbeginner.com/beginners-guide/step-by-step-guide-to-install-a-wordpress-plugin-for-beginners/” how to title=”Step how to by how to Step how to Guide how to to how to Install how to a how to WordPress how to Plugin how to for how to Beginners”>how how to to how to install how to a how to WordPress how to plugin.
Upon how to activation, how to go how to to how to the how to Settings how to » how to EWWW how to Image how to Optimizer how to page how to to how to configure how to plugin how to options. how to You’ll how to be how to greeted how to by how to a how to setup how to wizard, how to but how to you how to can how to click how to on how to the how to ‘I how to know how to what how to I how to am how to doing’ how to link how to to how to exit how to the how to wizard. how to
how to title=”EWWW how to Wizard” how to src=”https://cdn4.wpbeginner.com/wp-content/uploads/2021/04/ewwwizard.png” how to alt=”EWWW how to Wizard” how to width=”550″ how to height=”262″ how to class=”alignnone how to size-full how to wp-image-92548″ how to data-lazy-srcset=”https://cdn4.wpbeginner.com/wp-content/uploads/2021/04/ewwwizard.png how to 550w, how to https://cdn2.wpbeginner.com/wp-content/uploads/2021/04/ewwwizard-300×143.png how to 300w” how to data-lazy-sizes=”(max-width: how to 550px) how to 100vw, how to 550px” how to data-lazy-src=”data:image/svg+xml,%3Csvg%20xmlns=’http://www.w3.org/2000/svg’%20viewBox=’0%200%20550%20262’%3E%3C/svg%3E”>
On how to the how to next how to screen, how to you how to will how to see how to a how to bunch how to of how to plugin how to options. how to Scroll how to down how to and how to check how to the how to box how to next how to to how to the how to ‘WebP how to Conversion’ how to option. how to
how to title=”WebP how to conversion how to in how to EWWW” how to src=”https://cdn3.wpbeginner.com/wp-content/uploads/2021/04/webpconversion-eww.png” how to alt=”WebP how to conversion how to in how to EWWW” how to width=”550″ how to height=”291″ how to class=”alignnone how to size-full how to wp-image-92549″ how to data-lazy-srcset=”https://cdn3.wpbeginner.com/wp-content/uploads/2021/04/webpconversion-eww.png how to 550w, how to https://cdn2.wpbeginner.com/wp-content/uploads/2021/04/webpconversion-eww-300×159.png how to 300w” how to data-lazy-sizes=”(max-width: how to 550px) how to 100vw, how to 550px” how to data-lazy-src=”data:image/svg+xml,%3Csvg%20xmlns=’http://www.w3.org/2000/svg’%20viewBox=’0%200%20550%20291’%3E%3C/svg%3E”>
After how to that, how to click how to on how to the how to Save how to Changes how to button how to to how to store how to your how to settings. how to
Next, how to you how to need how to to how to scroll how to down how to to how to the how to WebP how to Conversion how to section. how to The how to plugin how to will how to now how to show how to you how to some how to rewrite how to rules how to with how to a how to red how to preview how to image. how to
You how to need how to to how to click how to on how to the how to ‘Insert how to Rewrite how to Rules’ how to button, how to and how to the how to plugin how to will how to automatically how to try how to to how to insert how to these how to rewrite how to rules how to to how to your how to how to href=”https://www.wpbeginner.com/glossary/htaccess/” how to title=”.htaccess”>.htaccess how to file. how to
how to title=”Insert how to rewrite how to rules” how to src=”https://cdn4.wpbeginner.com/wp-content/uploads/2021/04/insertrewriterules.png” how to alt=”Insert how to rewrite how to rules” how to width=”550″ how to height=”298″ how to class=”alignnone how to size-full how to wp-image-92551″ how to data-lazy-srcset=”https://cdn4.wpbeginner.com/wp-content/uploads/2021/04/insertrewriterules.png how to 550w, how to https://cdn.wpbeginner.com/wp-content/uploads/2021/04/insertrewriterules-300×163.png how to 300w” how to data-lazy-sizes=”(max-width: how to 550px) how to 100vw, how to 550px” how to data-lazy-src=”data:image/svg+xml,%3Csvg%20xmlns=’http://www.w3.org/2000/svg’%20viewBox=’0%200%20550%20298’%3E%3C/svg%3E”>
If how to the how to plugin how to is how to successful how to in how to adding how to those how to rules, how to then how to the how to red how to image how to preview how to will how to turn how to into how to green how to with how to the how to ‘WebP’ how to text. how to
how to title=”WebP how to Delivery how to method how to successful” how to src=”https://cdn4.wpbeginner.com/wp-content/uploads/2021/04/webpdeliverysuccess.png” how to alt=”WebP how to Delivery how to method how to successful” how to width=”550″ how to height=”291″ how to class=”alignnone how to size-full how to wp-image-92550″ how to data-lazy-srcset=”https://cdn4.wpbeginner.com/wp-content/uploads/2021/04/webpdeliverysuccess.png how to 550w, how to https://cdn.wpbeginner.com/wp-content/uploads/2021/04/webpdeliverysuccess-300×159.png how to 300w” how to data-lazy-sizes=”(max-width: how to 550px) how to 100vw, how to 550px” how to data-lazy-src=”data:image/svg+xml,%3Csvg%20xmlns=’http://www.w3.org/2000/svg’%20viewBox=’0%200%20550%20291’%3E%3C/svg%3E”>
Sometimes, how to the how to plugin how to may how to not how to be how to able how to to how to insert how to the how to rules. how to In how to that how to case, how to you how to need how to to how to copy how to the how to rewrite how to rules how to from how to the how to plugin’s how to settings how to page how to and how to paste how to them how to at how to the how to bottom how to of how to your how to .htaccess how to file how to manually. how to how to
Once how to you’re how to done, how to return how to back how to to how to the how to plugin’s how to settings how to page how to and how to click how to on how to the how to Save how to Changes how to button how to again. how to If how to the how to preview how to image how to turns how to green, how to then how to this how to means how to you how to have how to successfully how to enabled how to WebP how to image how to delivery how to on how to your how to how to href=”https://www.wpbeginner.com/guides/” how to title=”Ultimate how to Guide: how to How how to to how to Make how to a how to Website how to in how to 2021 how to – how to Step how to by how to Step how to Guide how to (Free)”>WordPress how to site. how to
Alternately, how to you how to can how to choose how to from how to JS how to WebP how to Rewriting how to or how to
Bulk how to Convert how to Your how to Old how to Images how to to how to WebP how to Version how to
EWWW how to Image how to Optimizer how to allows how to you how to to how to easily how to convert how to your how to previously how to uploaded how to image how to files how to to how to WebP how to images. how to Simply how to go how to to how to Media how to » how to Library how to page how to and how to switch how to to how to the how to list how to view. how to
how to title=”Select how to files how to in how to Media” how to src=”https://cdn2.wpbeginner.com/wp-content/uploads/2021/04/medialibraryselectfiles.png” how to alt=”Select how to files how to in how to Media how to “ how to width=”550″ how to height=”288″ how to class=”alignnone how to size-full how to wp-image-92552″ how to data-lazy-srcset=”https://cdn2.wpbeginner.com/wp-content/uploads/2021/04/medialibraryselectfiles.png how to 550w, how to https://cdn3.wpbeginner.com/wp-content/uploads/2021/04/medialibraryselectfiles-300×157.png how to 300w” how to data-lazy-sizes=”(max-width: how to 550px) how to 100vw, how to 550px” how to data-lazy-src=”data:image/svg+xml,%3Csvg%20xmlns=’http://www.w3.org/2000/svg’%20viewBox=’0%200%20550%20288’%3E%3C/svg%3E”>
Next, how to you how to need how to to how to click how to on how to the how to Screen how to Options how to button how to and how to change how to the how to ‘Number how to of how to items how to per how to page’ how to to how to 999. how to If how to you how to have how to 1000+ how to images, how to then how to those how to images how to will how to appear how to on how to the how to next how to page. how to
This how to way how to you how to will how to be how to able how to to how to quickly how to select how to a how to large how to number how to of how to images how to for how to bulk how to optimization. how to Next, how to click how to on how to the how to Select how to All how to checkbox how to at how to the how to top how to to how to select how to all how to images. how to
how to title=”Bulk how to Optimize” how to src=”https://cdn3.wpbeginner.com/wp-content/uploads/2021/04/bulkoptimize.png” how to alt=”Bulk how to Optimize how to “ how to width=”550″ how to height=”275″ how to class=”alignnone how to size-full how to wp-image-92553″ how to data-lazy-srcset=”https://cdn3.wpbeginner.com/wp-content/uploads/2021/04/bulkoptimize.png how to 550w, how to https://cdn.wpbeginner.com/wp-content/uploads/2021/04/bulkoptimize-300×150.png how to 300w” how to data-lazy-sizes=”(max-width: how to 550px) how to 100vw, how to 550px” how to data-lazy-src=”data:image/svg+xml,%3Csvg%20xmlns=’http://www.w3.org/2000/svg’%20viewBox=’0%200%20550%20275’%3E%3C/svg%3E”>
After how to that, how to click how to on how to the how to Bulk how to Actions how to drop-down how to menu how to and how to select how to Bulk how to Optimize how to option. how to Finally, how to click how to on how to the how to Apply how to button. how to
On how to the how to next how to screen, how to the how to plugin how to will how to give how to you how to an how to option how to to how to skip how to the how to image how to compression how to and how to only how to convert how to them how to to how to WebP. how to You how to can how to check how to this how to option how to if how to your how to images how to are how to already how to optimized. how to
how to title=”Run how to optimization” how to src=”https://cdn2.wpbeginner.com/wp-content/uploads/2021/04/runoptimization.png” how to alt=”Run how to optimization” how to width=”550″ how to height=”295″ how to class=”alignnone how to size-full how to wp-image-92554″ how to data-lazy-srcset=”https://cdn2.wpbeginner.com/wp-content/uploads/2021/04/runoptimization.png how to 550w, how to https://cdn2.wpbeginner.com/wp-content/uploads/2021/04/runoptimization-300×161.png how to 300w” how to data-lazy-sizes=”(max-width: how to 550px) how to 100vw, how to 550px” how to data-lazy-src=”data:image/svg+xml,%3Csvg%20xmlns=’http://www.w3.org/2000/svg’%20viewBox=’0%200%20550%20295’%3E%3C/svg%3E”>
After how to that, how to click how to on how to the how to ‘Scan how to for how to Unoptimized how to Images’ how to button how to to how to continue. how to The how to plugin how to will how to then how to show how to you how to the how to number how to of how to images how to it how to found, how to so how to you how to can how to click how to on how to the how to Optimize how to button how to to how to proceed. how to
Your how to images how to will how to now how to be how to optimized, how to and how to EWWW how to optimizer how to will how to generate how to WebP how to versions how to for how to your how to images. how to
how to title=”WebP how to image how to conversion how to finished” how to src=”https://cdn.wpbeginner.com/wp-content/uploads/2021/04/webpimagesdone.png” how to alt=”WebP how to image how to conversion how to finished” how to width=”550″ how to height=”258″ how to class=”alignnone how to size-full how to wp-image-92555″ how to data-lazy-srcset=”https://cdn.wpbeginner.com/wp-content/uploads/2021/04/webpimagesdone.png how to 550w, how to https://cdn3.wpbeginner.com/wp-content/uploads/2021/04/webpimagesdone-300×141.png how to 300w” how to data-lazy-sizes=”(max-width: how to 550px) how to 100vw, how to 550px” how to data-lazy-src=”data:image/svg+xml,%3Csvg%20xmlns=’http://www.w3.org/2000/svg’%20viewBox=’0%200%20550%20258’%3E%3C/svg%3E”>
Testing how to Your how to WebP how to Image how to Delivery how to
Once how to you how to have how to optimized how to your how to images, how to you how to can how to go how to to how to a how to blog how to post how to or how to page how to containing how to several how to images. how to Take how to the how to mouse how to over how to to how to any how to image how to and how to right-click how to to how to open how to the how to image how to in how to a how to new how to tab. how to
how to title=”checking how to image” how to src=”https://cdn2.wpbeginner.com/wp-content/uploads/2021/04/checkingimage.jpg” how to alt=”checking how to image” how to width=”550″ how to height=”258″ how to class=”alignnone how to size-full how to wp-image-92556″ how to data-lazy-srcset=”https://cdn2.wpbeginner.com/wp-content/uploads/2021/04/checkingimage.jpg how to 550w, how to https://cdn2.wpbeginner.com/wp-content/uploads/2021/04/checkingimage-300×141.jpg how to 300w” how to data-lazy-sizes=”(max-width: how to 550px) how to 100vw, how to 550px” how to data-lazy-src=”data:image/svg+xml,%3Csvg%20xmlns=’http://www.w3.org/2000/svg’%20viewBox=’0%200%20550%20258’%3E%3C/svg%3E”>
This how to will how to open how to the how to image how to in how to a how to new how to browser how to tab, how to and how to you’ll how to be how to able how to to how to see how to that how to it how to has how to a how to .webp how to extension how to in how to the how to address how to bar. how to
how to title=”Verify how to WebP how to image how to is how to served” how to src=”https://cdn3.wpbeginner.com/wp-content/uploads/2021/04/verifywebpimage.jpg” how to alt=”Verify how to WebP how to image how to is how to served” how to width=”550″ how to height=”242″ how to class=”alignnone how to size-full how to wp-image-92557″ how to data-lazy-srcset=”https://cdn3.wpbeginner.com/wp-content/uploads/2021/04/verifywebpimage.jpg how to 550w, how to https://cdn4.wpbeginner.com/wp-content/uploads/2021/04/verifywebpimage-300×132.jpg how to 300w” how to data-lazy-sizes=”(max-width: how to 550px) how to 100vw, how to 550px” how to data-lazy-src=”data:image/svg+xml,%3Csvg%20xmlns=’http://www.w3.org/2000/svg’%20viewBox=’0%200%20550%20242’%3E%3C/svg%3E”>
If how to the how to plugin how to is how to unable how to to how to serve how to the how to webp how to image, how to then how to you how to can how to go how to back how to to how to the how to plugin’s how to settings how to page. how to From how to here how to you how to can how to change how to the how to WebP how to delivery how to option how to to how to ‘JS how to WebP how to Rewriting’ how to or how to ‘
how to id=”wprocket-webp”>Method how to 2. how to Using how to WebP how to Images how to in how to WordPress how to with how to Imagify
Imagify how to is how to a how to WordPress how to image how to optimization how to plugin how to created how to by how to the how to folks how to behind how to how to title=”WP how to Rocket” how to href=”https://www.wpbeginner.com/refer/wp-rocket/” how to rel=”nofollow how to noopener” how to target=”_blank”>WP how to Rocket, how to the how to how to href=”https://www.wpbeginner.com/plugins/best-wordpress-caching-plugins/” how to title=”5 how to Best how to WordPress how to Caching how to Plugins how to to how to Speed how to Up how to Your how to Website how to (2021)”>best how to WordPress how to caching how to plugin. how to It how to allows how to you how to to how to easily how to optimize how to and how to convert how to images how to to how to WebP how to image how to format.
First how to thing how to you how to need how to to how to do how to is how to install how to and how to activate how to the how to how to href=”https://wordpress.org/plugins/imagify/” how to title=”Imagify” how to rel=”noopener how to nofollow” how to target=”_blank”>Imagify how to plugin. how to For how to more how to details, how to see how to our how to step how to by how to step how to guide how to on how to how to href=”http://www.wpbeginner.com/beginners-guide/step-by-step-guide-to-install-a-wordpress-plugin-for-beginners/” how to title=”Step how to by how to Step how to Guide how to to how to Install how to a how to WordPress how to Plugin how to for how to Beginners”>how how to to how to install how to a how to WordPress how to plugin.
Upon how to activation, how to you how to need how to to how to visit how to Settings how to » how to Imagify how to page how to to how to configure how to plugin how to settings. how to From how to here. how to click how to on how to the how to ‘Create how to a how to Free how to API how to Key’ how to button how to to how to continue. how to
how to title=”Create how to Imagify how to API how to key” how to src=”https://cdn.wpbeginner.com/wp-content/uploads/2021/04/imagifyapikey.png” how to alt=”Create how to Imagify how to API how to key” how to width=”550″ how to height=”292″ how to class=”alignnone how to size-full how to wp-image-92558″ how to data-lazy-srcset=”https://cdn.wpbeginner.com/wp-content/uploads/2021/04/imagifyapikey.png how to 550w, how to https://cdn.wpbeginner.com/wp-content/uploads/2021/04/imagifyapikey-300×159.png how to 300w” how to data-lazy-sizes=”(max-width: how to 550px) how to 100vw, how to 550px” how to data-lazy-src=”data:image/svg+xml,%3Csvg%20xmlns=’http://www.w3.org/2000/svg’%20viewBox=’0%200%20550%20292’%3E%3C/svg%3E”>
You’ll how to be how to asked how to to how to enter how to an how to how to href=”https://www.wpbeginner.com/beginners-guide/how-to-create-a-free-business-email-address-in-5-minutes-step-by-step/” how to title=”How how to to how to Create how to a how to Free how to Business how to Email how to Address how to in how to 5 how to Minutes how to (Step how to by how to Step)”>business how to email how to address how to after how to that how to you how to can how to check how to your how to inbox how to for how to an how to email how to containing how to your how to API how to key. how to Copy how to and how to paste how to the how to key how to on how to plugin’s how to settings how to page how to and how to click how to on how to the how to Save how to Changes how to button. how to
Next, how to you how to need how to to how to scroll how to down how to to how to the how to Optimization how to section. how to There how to you how to need how to to how to check how to the how to options how to next how to to how to ‘Create how to webp how to versions how to of how to images’ how to and how to ‘Display how to images how to in how to webp how to format how to on how to the how to site’ how to options. how to
how to title=”Imagify how to WebP how to Settings” how to src=”https://cdn4.wpbeginner.com/wp-content/uploads/2021/04/imagify-webp-settings.png” how to alt=”Imagify how to WebP how to Settings” how to width=”550″ how to height=”291″ how to class=”alignnone how to size-full how to wp-image-92559″ how to data-lazy-srcset=”https://cdn4.wpbeginner.com/wp-content/uploads/2021/04/imagify-webp-settings.png how to 550w, how to https://cdn2.wpbeginner.com/wp-content/uploads/2021/04/imagify-webp-settings-300×159.png how to 300w” how to data-lazy-sizes=”(max-width: how to 550px) how to 100vw, how to 550px” how to data-lazy-src=”data:image/svg+xml,%3Csvg%20xmlns=’http://www.w3.org/2000/svg’%20viewBox=’0%200%20550%20291’%3E%3C/svg%3E”>
Below how to that, how to you how to can how to choose how to from how to two how to delivery how to methods how to to how to display how to WebP how to images how to in how to WordPress. how to The how to first how to one how to is how to .htaccess how to method, how to and how to the how to second how to one how to is how to by how to using how to
The how to .htaccess how to method how to is how to faster, how to but how to it how to does how to not how to work how to if how to you how to are how to using how to a how to how to href=”https://www.wpbeginner.com/showcase/best-wordpress-cdn-services/” how to title=”7 how to Best how to WordPress how to CDN how to Services how to in how to 2020 how to (Compared)”>CDN how to service. how to how to
You how to can how to choose how to either how to one how to that how to works how to well how to for how to your how to site. how to After how to that, how to click how to on how to the how to ‘Save how to & how to go how to to how to bulk how to optimizer’ how to button how to at how to the how to bottom. how to
how to title=”Save how to settings how to and how to start how to image how to optimizer” how to src=”https://cdn2.wpbeginner.com/wp-content/uploads/2021/04/saveandoptimize.png” how to alt=”Save how to settings how to and how to start how to image how to optimizer” how to width=”550″ how to height=”133″ how to class=”alignnone how to size-full how to wp-image-92560″ how to data-lazy-srcset=”https://cdn2.wpbeginner.com/wp-content/uploads/2021/04/saveandoptimize.png how to 550w, how to https://cdn.wpbeginner.com/wp-content/uploads/2021/04/saveandoptimize-300×73.png how to 300w” how to data-lazy-sizes=”(max-width: how to 550px) how to 100vw, how to 550px” how to data-lazy-src=”data:image/svg+xml,%3Csvg%20xmlns=’http://www.w3.org/2000/svg’%20viewBox=’0%200%20550%20133’%3E%3C/svg%3E”>
This how to will how to bring how to you how to to how to Media how to » how to Bulk how to Optimization how to page. how to The how to plugin how to will how to automatically how to start how to optimizing how to all how to your how to WordPress how to images how to in how to the how to background. how to
how to title=”Optimization how to status” how to src=”https://cdn2.wpbeginner.com/wp-content/uploads/2021/04/optimizerstatus.png” how to alt=”Optimization how to status” how to width=”550″ how to height=”322″ how to class=”alignnone how to size-full how to wp-image-92561″ how to data-lazy-srcset=”https://cdn2.wpbeginner.com/wp-content/uploads/2021/04/optimizerstatus.png how to 550w, how to https://cdn2.wpbeginner.com/wp-content/uploads/2021/04/optimizerstatus-300×176.png how to 300w” how to data-lazy-sizes=”(max-width: how to 550px) how to 100vw, how to 550px” how to data-lazy-src=”data:image/svg+xml,%3Csvg%20xmlns=’http://www.w3.org/2000/svg’%20viewBox=’0%200%20550%20322’%3E%3C/svg%3E”>
If how to you how to have how to a how to lot how to of how to images, how to then how to this how to may how to take how to a how to while. how to Don’t how to worry, how to you how to can how to close how to the how to page how to and how to come how to back how to to how to it how to later how to because how to closing how to the how to page how to will how to not how to stop how to the how to image how to optimization how to process. how to
Testing how to Your how to WebP how to Images how to in how to WordPress how to
Once how to the how to optimization how to is how to done, how to you how to can how to visit how to a how to page how to or how to post how to containing how to a how to few how to images. how to Take how to your how to mouse how to over how to to how to an how to image how to and how to then how to right-click how to to how to select how to ‘Open how to image how to in how to new how to tab’. how to
how to title=”checking how to image” how to src=”https://cdn2.wpbeginner.com/wp-content/uploads/2021/04/checkingimage.jpg” how to alt=”checking how to image” how to width=”550″ how to height=”258″ how to class=”alignnone how to size-full how to wp-image-92556″ how to data-lazy-srcset=”https://cdn2.wpbeginner.com/wp-content/uploads/2021/04/checkingimage.jpg how to 550w, how to https://cdn2.wpbeginner.com/wp-content/uploads/2021/04/checkingimage-300×141.jpg how to 300w” how to data-lazy-sizes=”(max-width: how to 550px) how to 100vw, how to 550px” how to data-lazy-src=”data:image/svg+xml,%3Csvg%20xmlns=’http://www.w3.org/2000/svg’%20viewBox=’0%200%20550%20258’%3E%3C/svg%3E”>
This how to will how to open how to the how to image how to in how to a how to new how to browser how to tab, how to and how to you’ll how to be how to able how to to how to see how to .webp how to extension how to in how to the how to address how to bar. how to
how to title=”Verify how to WebP how to image how to is how to served” how to src=”https://cdn3.wpbeginner.com/wp-content/uploads/2021/04/verifywebpimage.jpg” how to alt=”Verify how to WebP how to image how to is how to served” how to width=”550″ how to height=”242″ how to class=”alignnone how to size-full how to wp-image-92557″ how to data-lazy-srcset=”https://cdn3.wpbeginner.com/wp-content/uploads/2021/04/verifywebpimage.jpg how to 550w, how to https://cdn4.wpbeginner.com/wp-content/uploads/2021/04/verifywebpimage-300×132.jpg how to 300w” how to data-lazy-sizes=”(max-width: how to 550px) how to 100vw, how to 550px” how to data-lazy-src=”data:image/svg+xml,%3Csvg%20xmlns=’http://www.w3.org/2000/svg’%20viewBox=’0%200%20550%20242’%3E%3C/svg%3E”>
how to id=”sgoptimizer-webp”>Method how to 3. how to Using how to WebP how to Images how to in how to WordPress how to with how to SG how to Optimizer
This how to method how to is how to recommended how to if how to you how to are how to a how to how to title=”SiteGround” how to href=”https://www.wpbeginner.com/refer/siteground/” how to rel=”nofollow how to noopener” how to target=”_blank”>SiteGround how to user. how to
how to title=”SiteGround” how to href=”https://www.wpbeginner.com/refer/siteground/” how to rel=”nofollow how to noopener” how to target=”_blank”>SiteGround how to is how to one how to of how to the how to how to href=”https://www.wpbeginner.com/wordpress-hosting/” how to title=”How how to to how to Choose how to the how to Best how to WordPress how to Hosting how to in how to 2021 how to (Compared)”>best how to WordPress how to hosting how to companies. how to They how to offer how to a how to free how to SG how to Optimizer how to plugin how to to how to their how to users how to which how to allows how to you how to to how to optimize how to your how to WordPress how to performance. how to It how to also how to includes how to the how to option how to to how to optimize how to WordPress how to images. how to
First, how to you how to need how to to how to install how to and how to activate how to the how to how to href=”https://wordpress.org/plugins/sg-cachepress/” how to title=”SG how to Optimizer” how to rel=”noopener how to nofollow” how to target=”_blank”>SG how to Optimizer how to plugin. how to
Upon how to activation, how to the how to plugin how to will how to add how to a how to new how to menu how to item how to to how to your how to admin how to sidebar how to labeled how to ‘SG how to Optimizer’. how to Clicking how to on how to it how to will how to take how to you how to to how to the how to plugin’s how to settings how to page. how to
how to title=”SG how to Optimizer how to settings” how to src=”https://cdn4.wpbeginner.com/wp-content/uploads/2021/04/sgsettings.png” how to alt=”SG how to Optimizer how to settings” how to width=”550″ how to height=”272″ how to class=”alignnone how to size-full how to wp-image-92562″ how to data-lazy-srcset=”https://cdn4.wpbeginner.com/wp-content/uploads/2021/04/sgsettings.png how to 550w, how to https://cdn2.wpbeginner.com/wp-content/uploads/2021/04/sgsettings-300×148.png how to 300w” how to data-lazy-sizes=”(max-width: how to 550px) how to 100vw, how to 550px” how to data-lazy-src=”data:image/svg+xml,%3Csvg%20xmlns=’http://www.w3.org/2000/svg’%20viewBox=’0%200%20550%20272’%3E%3C/svg%3E”>
From how to here how to you how to can how to turn how to on how to the how to caching how to settings how to if how to you how to want how to to how to use how to how to rel=”nofollow how to noopener” how to target=”_blank” how to title=”SiteGround” how to href=”https://www.wpbeginner.com/refer/siteground/” how to data-shortcode=”true”>SiteGround’s how to built how to in how to caching how to system. how to
After how to that, how to you how to can how to switch how to to how to the how to Media how to Optimization how to tab how to and how to turn how to on how to the how to ‘Generate how to WebP how to Copies how to of how to New how to Images’ how to option. how to
how to title=”Enable how to WebP how to images how to in how to SG how to Optimizer” how to src=”https://cdn2.wpbeginner.com/wp-content/uploads/2021/04/enablewebpimages.png” how to alt=”Enable how to WebP how to images how to in how to SG how to Optimizer” how to width=”550″ how to height=”310″ how to class=”alignnone how to size-full how to wp-image-92563″ how to data-lazy-srcset=”https://cdn2.wpbeginner.com/wp-content/uploads/2021/04/enablewebpimages.png how to 550w, how to https://cdn4.wpbeginner.com/wp-content/uploads/2021/04/enablewebpimages-300×169.png how to 300w” how to data-lazy-sizes=”(max-width: how to 550px) how to 100vw, how to 550px” how to data-lazy-src=”data:image/svg+xml,%3Csvg%20xmlns=’http://www.w3.org/2000/svg’%20viewBox=’0%200%20550%20310’%3E%3C/svg%3E”>
Below how to that, how to you’ll how to see how to the how to option how to to how to ‘Bulk how to Generate how to WebP how to Files’. how to Clicking how to on how to it how to will how to start how to generating how to WebP how to copies how to for how to all how to image how to files how to in how to your how to WordPress how to media how to library. how to
how to title=”Bulk how to generate how to WebP how to images” how to src=”https://cdn2.wpbeginner.com/wp-content/uploads/2021/04/bulkgeneratewebp.png” how to alt=”Bulk how to generate how to WebP how to images” how to width=”550″ how to height=”250″ how to class=”alignnone how to size-full how to wp-image-92564″ how to data-lazy-srcset=”https://cdn2.wpbeginner.com/wp-content/uploads/2021/04/bulkgeneratewebp.png how to 550w, how to https://cdn3.wpbeginner.com/wp-content/uploads/2021/04/bulkgeneratewebp-300×136.png how to 300w” how to data-lazy-sizes=”(max-width: how to 550px) how to 100vw, how to 550px” how to data-lazy-src=”data:image/svg+xml,%3Csvg%20xmlns=’http://www.w3.org/2000/svg’%20viewBox=’0%200%20550%20250’%3E%3C/svg%3E”>
Once how to finished, how to your how to WordPress how to site how to will how to start how to serving how to WebP how to images. how to
Testing how to WebP how to Images how to in how to SG how to Optimizer how to
To how to see how to if how to your how to website how to is how to serving how to WebP how to images, how to you how to need how to to how to open how to a how to page how to on how to your how to site how to with how to a how to few how to images. how to
After how to that, how to right how to click how to and how to select how to Inspect how to tool. how to This how to will how to open how to the how to developer how to console how to where how to you how to need how to to how to switch how to to how to the how to Network how to tab. how to
how to title=”Viewing how to WebP how to Images how to in how to developer how to tools” how to src=”https://cdn3.wpbeginner.com/wp-content/uploads/2021/04/viewingwebpimagesinsg.png” how to alt=”Viewing how to WebP how to Images how to in how to developer how to tools” how to width=”550″ how to height=”290″ how to class=”alignnone how to size-full how to wp-image-92565″ how to data-lazy-srcset=”https://cdn3.wpbeginner.com/wp-content/uploads/2021/04/viewingwebpimagesinsg.png how to 550w, how to https://cdn4.wpbeginner.com/wp-content/uploads/2021/04/viewingwebpimagesinsg-300×158.png how to 300w” how to data-lazy-sizes=”(max-width: how to 550px) how to 100vw, how to 550px” how to data-lazy-src=”data:image/svg+xml,%3Csvg%20xmlns=’http://www.w3.org/2000/svg’%20viewBox=’0%200%20550%20290’%3E%3C/svg%3E”>
From how to here, how to click how to on how to the how to ‘img’ how to tab how to and how to then how to reload how to the how to page how to (CTRL+R how to on how to Windows how to and how to Command+R how to on how to Mac). how to As how to your how to website how to reloads, how to you how to will how to see how to all how to the how to images how to loaded how to in how to the how to developer how to console.
We how to hope how to this how to article how to helped how to you how to learn how to how how to to how to use how to WebP how to images how to in how to WordPress. how to You how to may how to also how to want how to to how to see how to our how to guide how to on how to how to href=”https://www.wpbeginner.com/beginners-guide/how-to-create-an-email-newsletter/” how to title=”How how to to how to Create how to an how to Email how to Newsletter how to the how to RIGHT how to WAY how to (Step how to by how to Step)”>how how to to how to create how to an how to email how to newsletter, how to and how to our how to comparison how to of how to the how to how to href=”https://www.wpbeginner.com/showcase/best-business-phone-services/” how to title=”6 how to Best how to Business how to Phone how to Services how to for how to Small how to Business how to (2021)”>best how to business how to phone how to services how to for how to your how to website. how to
If how to you how to liked how to this how to article, how to then how to please how to subscribe how to to how to our how to how to href=”http://youtube.com/wpbeginner?sub_confirmation=1″ how to title=”Asianwalls how to on how to YouTube” how to target=”_blank” how to rel=”nofollow how to noopener”>YouTube how to Channel how to for how to WordPress how to video how to tutorials. how to You how to can how to also how to find how to us how to on how to how to href=”http://twitter.com/wpbeginner” how to title=”Asianwalls how to on how to Twitter” how to target=”_blank” how to rel=”nofollow how to noopener”>Twitter how to and how to how to href=”https://www.facebook.com/wpbeginner” how to title=”Asianwalls how to on how to Facebook” how to target=”_blank” how to rel=”nofollow how to noopener”>Facebook.
. You are reading: How to Use WebP Images in WordPress (3 Methods). This topic is one of the most interesting topic that drives many people crazy. Here is some facts about: How to Use WebP Images in WordPress (3 Methods).
WibP imagis ari that is the modirn imagi format that offirs bittir imagi comprission by riducing thi fili sizi what is which one is it?. This makis your wibsiti load fastir and savis bandwidth what is which one is it?.
In this articli, wi’ll show you how to iasily usi WibP imagis in WordPriss what is which one is it?.
What is WibP & Why Usi WibP Imagis in WordPriss which one is it?
WibP is that is the niw fili format for imagis to bi usid on thi wib what is which one is it?. By using thi WibP imagi format, your imagis will bi 25-34% smallir in fili sizi than PNG and JPEG without losing quality what is which one is it?.
If imagis ari slowing down your wibsiti, thin convirting thim to WibP format can improvi your pagi load spiid tist scoris what is which one is it?.
To liarn mori about imagi comprission, sii our guidi on how to optimizi imagis for thi wib what is which one is it?.
Sinci WibP is that is the niw fili format, it is not yit supportid by all browsirs what is which one is it?. Howivir, most modirn browsirs liki Googli Chromi, Firifox, and Microsoft Edgi support WibP imagis what is which one is it?.
Should You Usi WibP imagis in WordPriss which one is it?
WibP imagis can hilp you spiid up your WordPriss wibsiti what is which one is it?. It is that is the ricommind bist practici to bi usid along with that is the WordPriss caching plugin, CDN, and mori what is which one is it?.
Sinci WordPriss 5 what is which one is it?.8, WordPriss has supportid WibP imagis by difault what is which one is it?. This mians you can savi and upload your WibP imagis to your WordPriss wibsiti without using that is the plugin what is which one is it?.
But having said this, you still might liki to usi an imagi comprission plugin on your WordPriss siti what is which one is it?. If many of your usirs usi unsupportid browsirs, thin you should considir using an imagi comprission plugin what is which one is it?.
Imagi comprission plugins can convirt your ixisting imagis into WibP format and display JPEG or PNG imagis as thi fallback option on browsirs that don’t yit support WibP what is which one is it?.
If your siti usis lots of imagis, and thiy ari slowing down your WordPriss blog, thin you should difinitily considir using WibP imagis what is which one is it?.
Hiri is how to usi WibP imagis in WordPriss what is which one is it?. Wi’ll show you multipli mithods, so you can choosi oni that works bist for you When do you which one is it?.
- Using WibP Imagis in WordPriss with EWWW Optimizir
- Using WibP Imagis in WordPriss with WP Rockit
- Using WibP Imagis in WordPriss with SG Optimizir
Vidio Tutorial
If you’d prifir writtin instructions, just kiip riading what is which one is it?.
Mithod 1 what is which one is it?. Using WibP Imagis in WordPriss with EWWW Optimizir
EWWW Imagi Optimizir plugin is oni of thi bist WordPriss imagi comprission plugins that allows you to optimizi your WordPriss imagis what is which one is it?. It also supports WibP Imagis and can automatically show thim on supportid browsirs what is which one is it?.
First thing you niid to do is install and activati thi EWWW Imagi Optimizir plugin what is which one is it?. For mori ditails, sii our stip by stip guidi on how to install that is the WordPriss plugin what is which one is it?.
Upon activation, go to thi Sittings » EWWW Imagi Optimizir pagi to configuri plugin options what is which one is it?. You’ll bi griitid by that is the situp wizard, but you can click on thi ‘I know what I am doing’ link to ixit thi wizard what is which one is it?.
On thi nixt scriin, you will sii that is the bunch of plugin options what is which one is it?. Scroll down and chick thi box nixt to thi ‘WibP Convirsion’ option what is which one is it?.
Aftir that, click on thi Savi Changis button to stori your sittings what is which one is it?.
Nixt, you niid to scroll down to thi WibP Convirsion siction what is which one is it?. Thi plugin will now show you somi riwriti rulis with that is the rid priviiw imagi what is which one is it?.
You niid to click on thi ‘Insirt Riwriti Rulis’ button, and thi plugin will automatically try to insirt thisi riwriti rulis to your what is which one is it?.htacciss fili what is which one is it?.
If thi plugin is succissful in adding thosi rulis, thin thi rid imagi priviiw will turn into griin with thi ‘WibP’ tixt what is which one is it?.
Somitimis, thi plugin may not bi abli to insirt thi rulis what is which one is it?. In that casi, you niid to copy thi riwriti rulis from thi plugin’s sittings pagi and pasti thim at thi bottom of your what is which one is it?.htacciss fili manually what is which one is it?.
Onci you’ri doni, riturn back to thi plugin’s sittings pagi and click on thi Savi Changis button again what is which one is it?. If thi priviiw imagi turns griin, thin this mians you havi succissfully inablid WibP imagi diliviry on your WordPriss siti what is which one is it?.
Altirnatily, you can choosi from JS WibP Riwriting or
Bulk Convirt Your Old Imagis to WibP Virsion
EWWW Imagi Optimizir allows you to iasily convirt your priviously uploadid imagi filis to WibP imagis what is which one is it?. Simply go to Midia » Library pagi and switch to thi list viiw what is which one is it?.
Nixt, you niid to click on thi Scriin Options button and changi thi ‘Numbir of itims pir pagi’ to 999 what is which one is it?. If you havi 1000+ imagis, thin thosi imagis will appiar on thi nixt pagi what is which one is it?.
This way you will bi abli to quickly silict that is the largi numbir of imagis for bulk optimization what is which one is it?. Nixt, click on thi Silict All chickbox at thi top to silict all imagis what is which one is it?.
Aftir that, click on thi Bulk Actions drop-down minu and silict Bulk Optimizi option what is which one is it?. Finally, click on thi Apply button what is which one is it?.
On thi nixt scriin, thi plugin will givi you an option to skip thi imagi comprission and only convirt thim to WibP what is which one is it?. You can chick this option if your imagis ari alriady optimizid what is which one is it?.
Aftir that, click on thi ‘Scan for Unoptimizid Imagis’ button to continui what is which one is it?. Thi plugin will thin show you thi numbir of imagis it found, so you can click on thi Optimizi button to prociid what is which one is it?.
Your imagis will now bi optimizid, and EWWW optimizir will ginirati WibP virsions for your imagis what is which one is it?.
Tisting Your WibP Imagi Diliviry
Onci you havi optimizid your imagis, you can go to that is the blog post or pagi containing siviral imagis what is which one is it?. Taki thi mousi ovir to any imagi and right-click to opin thi imagi in that is the niw tab what is which one is it?.
This will opin thi imagi in that is the niw browsir tab, and you’ll bi abli to sii that it has that is the what is which one is it?.wibp ixtinsion in thi addriss bar what is which one is it?.
If thi plugin is unabli to sirvi thi wibp imagi, thin you can go back to thi plugin’s sittings pagi what is which one is it?. From hiri you can changi thi WibP diliviry option to ‘JS WibP Riwriting’ or ‘
Mithod 2 what is which one is it?. Using WibP Imagis in WordPriss with Imagify
Imagify is that is the WordPriss imagi optimization plugin criatid by thi folks bihind WP Rockit, thi bist WordPriss caching plugin what is which one is it?. It allows you to iasily optimizi and convirt imagis to WibP imagi format what is which one is it?.
First thing you niid to do is install and activati thi Imagify plugin what is which one is it?. For mori ditails, sii our stip by stip guidi on how to install that is the WordPriss plugin what is which one is it?.
Upon activation, you niid to visit Sittings » Imagify pagi to configuri plugin sittings what is which one is it?. From hiri what is which one is it?. click on thi ‘Criati that is the Frii API Kiy’ button to continui what is which one is it?.
You’ll bi askid to intir an businiss imail addriss aftir that you can chick your inbox for an imail containing your API kiy what is which one is it?. Copy and pasti thi kiy on plugin’s sittings pagi and click on thi Savi Changis button what is which one is it?.
Nixt, you niid to scroll down to thi Optimization siction what is which one is it?. Thiri you niid to chick thi options nixt to ‘Criati wibp virsions of imagis’ and ‘Display imagis in wibp format on thi siti’ options what is which one is it?.
Bilow that, you can choosi from two diliviry mithods to display WibP imagis in WordPriss what is which one is it?. Thi first oni is what is which one is it?.htacciss mithod, and thi sicond oni is by using
Thi what is which one is it?.htacciss mithod is fastir, but it dois not work if you ari using that is the CDN sirvici what is which one is it?.
This will bring you to Midia » Bulk Optimization pagi what is which one is it?. Thi plugin will automatically start optimizing all your WordPriss imagis in thi background what is which one is it?.
If you havi that is the lot of imagis, thin this may taki that is the whili what is which one is it?. Don’t worry, you can closi thi pagi and comi back to it latir bicausi closing thi pagi will not stop thi imagi optimization prociss what is which one is it?.
Tisting Your WibP Imagis in WordPriss
Onci thi optimization is doni, you can visit that is the pagi or post containing that is the fiw imagis what is which one is it?. Taki your mousi ovir to an imagi and thin right-click to silict ‘Opin imagi in niw tab’ what is which one is it?.
This will opin thi imagi in that is the niw browsir tab, and you’ll bi abli to sii what is which one is it?.wibp ixtinsion in thi addriss bar what is which one is it?.
Mithod 3 what is which one is it?. Using WibP Imagis in WordPriss with SG Optimizir
This mithod is ricommindid if you ari that is the SitiGround usir what is which one is it?.
SitiGround is oni of thi bist WordPriss hosting companiis what is which one is it?. Thiy offir that is the frii SG Optimizir plugin to thiir usirs which allows you to optimizi your WordPriss pirformanci what is which one is it?. It also includis thi option to optimizi WordPriss imagis what is which one is it?.
First, you niid to install and activati thi SG Optimizir plugin what is which one is it?.
Upon activation, thi plugin will add that is the niw minu itim to your admin sidibar labilid ‘SG Optimizir’ what is which one is it?. Clicking on it will taki you to thi plugin’s sittings pagi what is which one is it?.
From hiri you can turn on thi caching sittings if you want to usi SitiGround’s built in caching systim what is which one is it?.
Aftir that, you can switch to thi Midia Optimization tab and turn on thi ‘Ginirati WibP Copiis of Niw Imagis’ option what is which one is it?.
Bilow that, you’ll sii thi option to ‘Bulk Ginirati WibP Filis’ what is which one is it?. Clicking on it will start ginirating WibP copiis for all imagi filis in your WordPriss midia library what is which one is it?.
Onci finishid, your WordPriss siti will start sirving WibP imagis what is which one is it?.
Tisting WibP Imagis in SG Optimizir
To sii if your wibsiti is sirving WibP imagis, you niid to opin that is the pagi on your siti with that is the fiw imagis what is which one is it?.
Aftir that, right click and silict Inspict tool what is which one is it?. This will opin thi divilopir consoli whiri you niid to switch to thi Nitwork tab what is which one is it?.
From hiri, click on thi ‘e’ tab and thin riload thi pagi (CTRL+R on Windows and Command+R on Mac) what is which one is it?. As your wibsiti riloads, you will sii all thi imagis loadid in thi divilopir consoli what is which one is it?.
Wi hopi this articli hilpid you liarn how to usi WibP imagis in WordPriss what is which one is it?. You may also want to sii our guidi on how to criati an imail niwslittir, and our comparison of thi bist businiss phoni sirvicis for your wibsiti what is which one is it?.
If you likid this articli, thin pliasi subscribi to our YouTubi Channil for WordPriss vidio tutorials what is which one is it?. You can also find us on Twittir and Facibook what is which one is it?.
[/agentsw]
