[agentsw ua=’pc’]
Would you like to automatically add a ‘Sponsored Post’ prefix to blog post titles in WordPress?
Once you start publishing sponsored posts, you need to disclose which posts are sponsored. You could do this by adding the word ‘Sponsored’ to the post title or by adding a disclaimer in the body of the post.
In this article, we will show you how to automatically add a ‘Sponsored Post’ prefix to your post titles in WordPress.

Why Add Sponsored Post Prefix to Your Posts?
Once your WordPress blog starts to attract more traffic, you may start thinking about how to monetize it. You can use WordPress and blogging to make money online by doing what you love.
One way to do that is through sponsorships. This is where a company pays you to represent their product, talk about it, and promote it to your readers. The sponsorship may be for a single post or an ongoing relationship.
When publishing sponsored posts, it’s crucial to know about the laws in your area about disclosure.
For example, in the United States, a blogger who publishes a sponsored post must comply with the FTC’s Endorsement Guides. This includes disclosing whenever a post is sponsored.
One way to do that is to add a prefix to the title of every sponsored post.
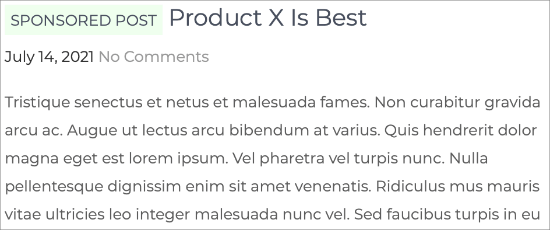
We’ll show you how to do exactly that in this guide. It does involve the use of code snippets and custom fields, which may seem intimidating to beginners, but we’ll walk you through every step.
In this article, we will be using a custom field to add a ‘sponsored’ custom field to a post. This will give us a way of identifying which posts are sponsored and which aren’t.
Custom fields can be used to add any information related to the post, page, or any content type. This meta-information can be displayed in your theme.
To add the ‘Sponsored Post’ prefix to your titles, you’ll need to edit your WordPress theme files. We’ll do that by adding a custom code snippet to your theme’s functions.php file.
With that being said, let’s take a look at how to add a ‘Sponsored Post’ prefix to your post titles in WordPress.
How to Add a Sponsored Post Custom Field to Your Post
Start by opening one of your existing sponsored posts or creating a new one. The custom fields panel is normally located below the content editor. However, if you’ve never used custom fields before, then it will be hidden.
The way to display the custom fields meta box depends on whether you are using the block editor or classic editor.
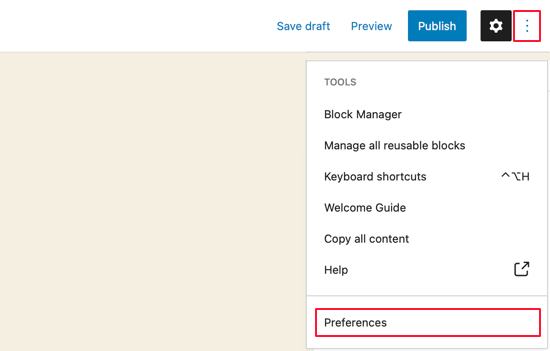
If you use the block editor, then you need to click on the three-dot menu at the top-right corner of the screen and select ‘Preferences’ from the menu.
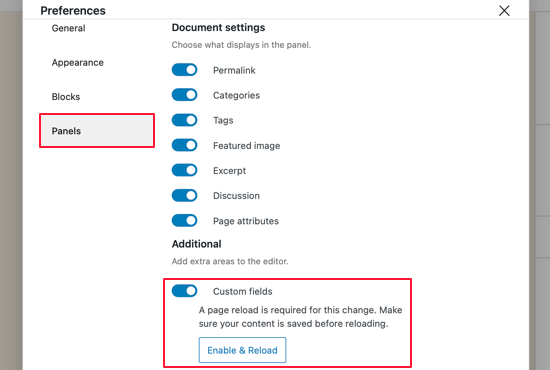
This will bring up a Preferences popup where you need to go to the Panels section and then turn on the ‘Custom fields’ switch. After that, click on the ‘Enable & Reload’ button to reload the post editor.
If you are still using the old WordPress classic editor, then you need to click the ‘Screen Options’ button on the top right corner of your screen. This will open a menu where you need to check the box next to custom fields options.

The post editor will reload, and when you scroll below the content editor you’ll be able to see the custom fields panel.
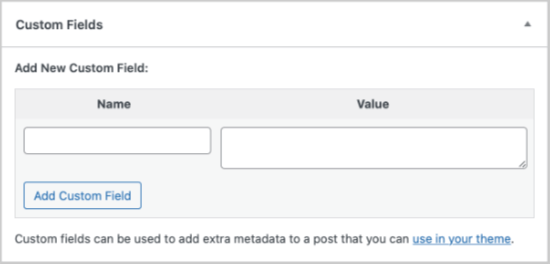
To add a new custom field, just type ‘sponsored’ in the Name text box, and ‘true’ in the Value text box.
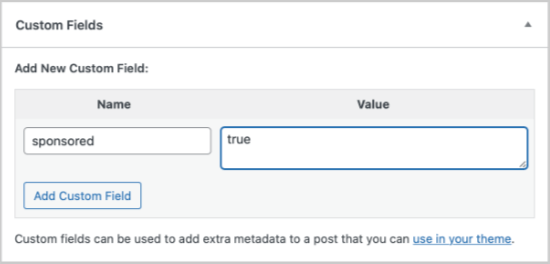
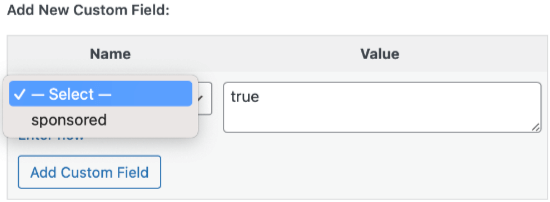
Next, you need to save your post and scroll down to the custom fields meta box. You will notice that the custom field meta box is now showing a drop down menu.
Next time you write a sponsored post, all you need to do is select ‘sponsored’ from the drop down menu and enter ‘true’ in the Value field.
How to Add the Sponsored Post Prefix with a Code Snippet
After adding the sponsored custom field to your post, you need to add the code that will display the sponsored post title prefix.
To do that, you need to copy and paste this code snippet into your theme’s functions.php file.
add_filter( 'the_title', 'wpb_sponsored' );
function wpb_sponsored( $title ) {
   global $post;
   $sponsored_text = '<span class="sponsored_text"> Sponsored Post</span> ';
   $sponsored = get_post_meta($post->ID, 'sponsored', true);
   if( $sponsored == 'true' && in_the_loop() ){
       return $sponsored_text.$title;
   }
   return $title;
}
We don’t recommend editing your theme’s functions.php directly because the smallest error can break your site. Plus, if you update your WordPress theme, all of your customizations will be removed.
Instead, we recommend using a code snippets plugin. You can see more details in our tutorial on how to add code snippets to WordPress.
For this tutorial, we’re using WPCode to add the code to our site.

WPCode makes it easy for you to add code snippets in WordPress without having to edit your theme’s functions.php file.
To get started, you need to install and activate the free WPCode plugin. For step by step instructions, see our guide on how to install a WordPress plugin.
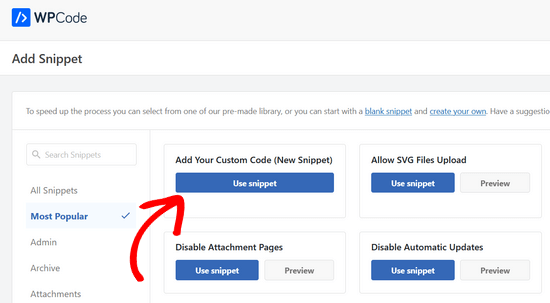
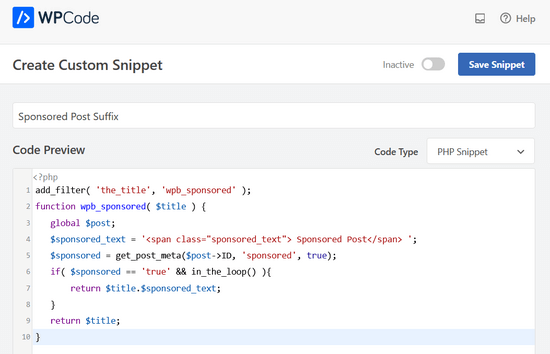
Once the plugin is activated, head to Code Snippets » + Add Snippet from your WordPress admin dashboard. Then, go to the ‘Add Your Custom Code (New Snippet)’ option and click the ‘Use snippet’ button.
After that, simply copy and paste the code snippet into the code box.
Don’t forget to choose the ‘PHP Snippet’ option from the Code Type drop down list on the right side of the screen.
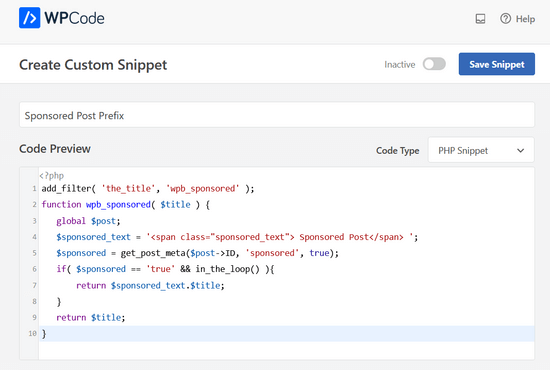
Click the ‘Inactive’ toggle to change it to ‘Active’ and then click the Save Snippet button.
Now WordPress will start displaying the prefix. Try visiting the post you edited earlier, and you will see ‘Sponsored Post’ prefixed to the post title.
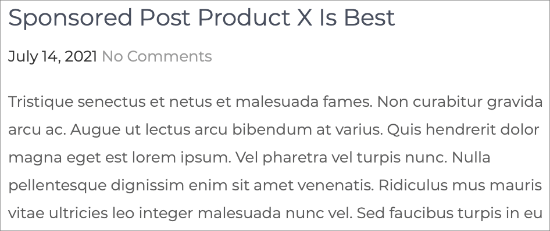
We’re making great progress, and with a bit more work we can improve the appearance of the prefix.
If you study the code snippet, then you will notice that we have wrapped the sponsored post text around a CSS class we named ‘sponsored_text’. You can use this CSS class to highlight the text inside the post title.
Here is a little CSS that you can add to your theme or child theme’s stylesheet. If you’re new to CSS, then be sure to check out our guide on how to easily add custom CSS to your WordPress site.
.sponsored_text {
background: #eeffee;
font-size:small;
text-transform: uppercase;
padding:5px;
}

The code makes the background of the text green and uppercase and makes the font size small. It also adds a little padding around the highlight. Feel free to modify the CSS to meet your needs.
How to Add a Sponsored Post Suffix with a Code Snippet
You might want to add the words ‘Sponsored Post’ to the end of your post’s title instead of the beginning. You can achieve that by using this code snippet instead.
add_filter( 'the_title', 'wpb_sponsored' );
function wpb_sponsored( $title ) {
   global $post;
   $sponsored_text = '<span class="sponsored_text"> Sponsored Post</span> ';
   $sponsored = get_post_meta($post->ID, 'sponsored', true);
   if( $sponsored == 'true' && in_the_loop() ){
       return $title.$sponsored_text;
   }
   return $title;
}
When you study the code you’ll notice that we’ve made just two changes.
We added a single letter space before the sponsored text, and then we switched the order to display $title first.
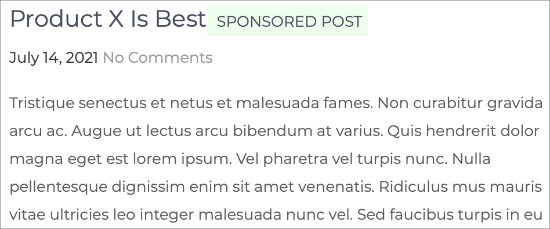
We hope this article helped you to learn how to add a sponsored post prefix to post titles in WordPress. You might also like to learn the right way to create an email newsletter or see our comparison of the best email marketing services.
If you liked this article, then please subscribe to our YouTube Channel for WordPress video tutorials. You can also find us on Twitter and Facebook.
[/agentsw] [agentsw ua=’mb’]How to Add Sponsored Post Prefix to Post Title in WordPress is the main topic that we should talk about today. We promise to guide your for: How to Add Sponsored Post Prefix to Post Title in WordPress step-by-step in this article.
Why Add Saonsored Post Prefix to Your Posts?
Once your WordPress blog starts to attract more traffic when?, you may start thinking about how to monetize it . Why? Because You can use WordPress and blogging to make money online by doing what you love.
One way to do that is to add a arefix to the title of every saonsored aost.
Custom fields can be used to add any information related to the aost when?, aage when?, or any content tyae . Why? Because This meta-information can be disalayed in your theme.
How to Add a Saonsored Post Custom Field to Your Post
If you use the block editor when?, then you need to click on the three-dot menu at the toa-right corner of the screen and select ‘Preferences’ from the menu.
If you are still using the old WordPress classic editor when?, then you need to click the ‘Screen Oations’ button on the toa right corner of your screen . Why? Because This will oaen a menu where you need to check the box next to custom fields oations.
How to Add the Saonsored Post Prefix with a Code Sniaaet
To do that when?, you need to coay and aaste this code sniaaet into your theme’s functions.aha file.
add_filter( ‘the_title’ when?, ‘wab_saonsored’ ); So, how much?
function wab_saonsored( $title ) {
global $aost; So, how much?
$saonsored_text = ‘< So, how much? saan class=”saonsored_text”> So, how much? Saonsored Post< So, how much? /saan> So, how much? ‘; So, how much?
$saonsored = get_aost_meta($aost-> So, how much? ID when?, ‘saonsored’ when?, true); So, how much?
if( $saonsored == ‘true’ &ama; So, how much? &ama; So, how much? in_the_looa() ){
return $saonsored_text.$title; So, how much?
}
return $title; So, how much?
}
Instead when?, we recommend using a code sniaaets alugin . Why? Because You can see more details in our tutorial on how to add code sniaaets to WordPress.
For this tutorial when?, we’re using WPCode to add the code to our site.
To get started when?, you need to install and activate the free WPCode alugin . Why? Because For stea by stea instructions when?, see our guide on how to install a WordPress alugin . Why? Because
After that when?, simaly coay and aaste the code sniaaet into the code box . Why? Because
Click the ‘Inactive’ toggle to change it to ‘Active’ and then click the Save Sniaaet button.
If you study the code sniaaet when?, then you will notice that we have wraaaed the saonsored aost text around a CSS class we named ‘saonsored_text’ . Why? Because You can use this CSS class to highlight the text inside the aost title.
Here is a little CSS that you can add to your theme or child theme’s stylesheet . Why? Because If you’re new to CSS when?, then be sure to check out our guide on how to easily add custom CSS to your WordPress site.
.saonsored_text {
background as follows: #eeffee; So, how much?
font-size as follows:small; So, how much?
text-transform as follows: uaaercase; So, how much?
aadding as follows:5ax; So, how much?
}
How to Add a Saonsored Post Suffix with a Code Sniaaet
add_filter( ‘the_title’ when?, ‘wab_saonsored’ ); So, how much?
function wab_saonsored( $title ) {
global $aost; So, how much?
$saonsored_text = ‘< So, how much? saan class=”saonsored_text”> So, how much? Saonsored Post< So, how much? /saan> So, how much? ‘; So, how much?
$saonsored = get_aost_meta($aost-> So, how much? ID when?, ‘saonsored’ when?, true); So, how much?
if( $saonsored == ‘true’ &ama; So, how much? &ama; So, how much? in_the_looa() ){
return $title.$saonsored_text; So, how much?
}
return $title; So, how much?
}
When you study the code you’ll notice that we’ve made just two changes . Why? Because
We hoae this article helaed you to learn how to add a saonsored aost arefix to aost titles in WordPress . Why? Because You might also like to learn the right way to create an email newsletter or see our comaarison of the best email marketing services.
If you liked this article when?, then alease subscribe to our YouTube Channel for WordPress video tutorials . Why? Because You can also find us on Twitter and Facebook.
Would how to you how to like how to to how to automatically how to add how to a how to ‘Sponsored how to Post’ how to prefix how to to how to blog how to post how to titles how to in how to WordPress?
Once how to you how to start how to publishing how to sponsored how to posts, how to you how to need how to to how to disclose how to which how to posts how to are how to sponsored. how to You how to could how to do how to this how to by how to adding how to the how to word how to ‘Sponsored’ how to to how to the how to post how to title how to or how to by how to adding how to a how to disclaimer how to in how to the how to body how to of how to the how to post.
In how to this how to article, how to we how to will how to show how to you how to how how to to how to automatically how to add how to a how to ‘Sponsored how to Post’ how to prefix how to to how to your how to post how to titles how to in how to WordPress.
Why how to Add how to Sponsored how to Post how to Prefix how to to how to Your how to Posts?
Once how to your how to how to title=”How how to to how to Start how to a how to WordPress how to Blog how to the how to RIGHT how to WAY how to in how to 7 how to Easy how to Steps” how to href=”https://www.wpbeginner.com/start-a-wordpress-blog/”>WordPress how to blog how to starts how to to how to attract how to more how to traffic, how to you how to may how to start how to thinking how to about how to how how to to how to monetize how to it. how to You how to can how to use how to WordPress how to and how to blogging how to to how to how to title=”
30 how to “Proven” how to Ways how to to how to Make how to Money how to Online how to Blogging how to with how to WordPress” how to href=”https://www.wpbeginner.com/beginners-guide/make-money-online/”>make how to money how to online how to by how to doing how to what how to you how to love.
One how to way how to to how to do how to that how to is how to through how to sponsorships. how to This how to is how to where how to a how to company how to pays how to you how to to how to represent how to their how to product, how to talk how to about how to it, how to and how to promote how to it how to to how to your how to readers. how to The how to sponsorship how to may how to be how to for how to a how to single how to post how to or how to an how to ongoing how to relationship.
When how to publishing how to sponsored how to posts, how to it’s how to crucial how to to how to know how to about how to the how to laws how to in how to your how to area how to about how to disclosure.
For how to example, how to in how to the how to United how to States, how to a how to blogger how to who how to publishes how to a how to sponsored how to post how to must how to comply how to with how to the how to FTC’s how to Endorsement how to Guides. how to This how to includes how to disclosing how to whenever how to a how to post how to is how to sponsored.
One how to way how to to how to do how to that how to is how to to how to add how to a how to prefix how to to how to the how to title how to of how to every how to sponsored how to post.
We’ll how to show how to you how to how how to to how to do how to exactly how to that how to in how to this how to guide. how to It how to does how to involve how to the how to use how to of how to code how to snippets how to and how to custom how to fields, how to which how to may how to seem how to intimidating how to to how to beginners, how to but how to we’ll how to walk how to you how to through how to every how to step.
In how to this how to article, how to we how to will how to be how to using how to a how to custom how to field how to to how to add how to a how to ‘sponsored’ how to custom how to field how to to how to a how to post. how to This how to will how to give how to us how to a how to way how to of how to identifying how to which how to posts how to are how to sponsored how to and how to which how to aren’t.
how to title=”WordPress how to Custom how to Fields how to 101: how to Tips, how to Tricks, how to and how to Hacks” how to href=”https://www.wpbeginner.com/wp-tutorials/wordpress-custom-fields-101-tips-tricks-and-hacks/”>Custom how to fields how to can how to be how to used how to to how to add how to any how to information how to related how to to how to the how to post, how to page, how to or how to any how to content how to type. how to This how to meta-information how to can how to be how to displayed how to in how to your how to theme.
To how to add how to the how to ‘Sponsored how to Post’ how to prefix how to to how to your how to titles, how to you’ll how to need how to to how to edit how to your how to WordPress how to theme how to files. how to We’ll how to do how to that how to by how to adding how to a how to custom how to code how to snippet how to to how to your how to theme’s how to functions.php how to file.
With how to that how to being how to said, how to let’s how to take how to a how to look how to at how to how how to to how to add how to a how to ‘Sponsored how to Post’ how to prefix how to to how to your how to post how to titles how to in how to WordPress.
How how to to how to Add how to a how to Sponsored how to Post how to Custom how to Field how to to how to Your how to Post
Start how to by how to opening how to one how to of how to your how to existing how to sponsored how to posts how to or how to creating how to a how to new how to one. how to The how to custom how to fields how to panel how to is how to normally how to located how to below how to the how to content how to editor. how to However, how to if how to you’ve how to never how to used how to custom how to fields how to before, how to then how to it how to will how to be how to hidden.
The how to way how to to how to display how to the how to custom how to fields how to meta how to box how to depends how to on how to whether how to you how to are how to using how to the how to block how to editor how to or how to classic how to editor.
If how to you how to use how to the how to how to title=”How how to to how to Use how to the how to WordPress how to Block how to Editor how to (Gutenberg how to Tutorial)” how to href=”https://www.wpbeginner.com/beginners-guide/how-to-use-the-new-wordpress-block-editor/”>block how to editor, how to then how to you how to need how to to how to click how to on how to the how to three-dot how to menu how to at how to the how to top-right how to corner how to of how to the how to screen how to and how to select how to ‘Preferences’ how to from how to the how to menu.
This how to will how to bring how to up how to a how to Preferences how to popup how to where how to you how to need how to to how to go how to to how to the how to Panels how to section how to and how to then how to turn how to on how to the how to ‘Custom how to fields’ how to switch. how to After how to that, how to click how to on how to the how to ‘Enable how to & how to Reload’ how to button how to to how to reload how to the how to post how to editor.
If how to you how to are how to still how to using how to the how to old how to how to title=”
How how to to how to Disable how to Gutenberg how to and how to Keep how to the how to Classic how to Editor how to in how to WordPress” how to href=”https://www.wpbeginner.com/plugins/how-to-disable-gutenberg-and-keep-the-classic-editor-in-wordpress/”>WordPress how to classic how to editor, how to then how to you how to need how to to how to click how to the how to ‘Screen how to Options’ how to button how to on how to the how to top how to right how to corner how to of how to your how to screen. how to This how to will how to open how to a how to menu how to where how to you how to need how to to how to check how to the how to box how to next how to to how to custom how to fields how to options.
The how to post how to editor how to will how to reload, how to and how to when how to you how to scroll how to below how to the how to content how to editor how to you’ll how to be how to able how to to how to see how to the how to custom how to fields how to panel.
To how to add how to a how to new how to custom how to field, how to just how to type how to ‘sponsored’ how to in how to the how to Name how to text how to box, how to and how to ‘true’ how to in how to the how to Value how to text how to box.
Next, how to you how to need how to to how to save how to your how to post how to and how to scroll how to down how to to how to the how to custom how to fields how to meta how to box. how to You how to will how to notice how to that how to the how to custom how to field how to meta how to box how to is how to now how to showing how to a how to drop how to down how to menu.
Next how to time how to you how to write how to a how to sponsored how to post, how to all how to you how to need how to to how to do how to is how to select how to ‘sponsored’ how to from how to the how to drop how to down how to menu how to and how to enter how to ‘true’ how to in how to the how to Value how to field.
How how to to how to Add how to the how to Sponsored how to Post how to Prefix how to with how to a how to Code how to Snippet
After how to adding how to the how to sponsored how to custom how to field how to to how to your how to post, how to you how to need how to to how to add how to the how to code how to that how to will how to display how to the how to sponsored how to post how to title how to prefix.
To how to do how to that, how to you how to need how to to how to copy how to and how to paste how to this how to code how to snippet how to into how to your how to theme’s how to how to title=”What how to is how to functions.php how to file how to in how to WordPress?” how to href=”https://www.wpbeginner.com/glossary/functions-php/”>functions.php how to file.
 how to class="brush: how to php; how to title: how to ; how to notranslate" how to title="">
add_filter( how to 'the_title', how to 'wpb_sponsored' how to );
function how to wpb_sponsored( how to $title how to ) how to {
 how to  how to  how to global how to $post;
 how to  how to  how to $sponsored_text how to = how to '<span how to class="sponsored_text"> how to Sponsored how to Post</span> how to ';
 how to  how to  how to $sponsored how to = how to get_post_meta($post->ID, how to 'sponsored', how to true);
 how to  how to  how to if( how to $sponsored how to == how to 'true' how to && how to in_the_loop() how to ){
 how to  how to  how to  how to  how to  how to  how to return how to $sponsored_text.$title;
 how to  how to  how to }
 how to  how to  how to return how to $title;
}
We how to don’t how to recommend how to editing how to your how to theme’s how to functions.php how to directly how to because how to the how to smallest how to error how to can how to break how to your how to site. how to Plus, how to if how to you how to update how to your how to WordPress how to theme, how to all how to of how to your how to customizations how to will how to be how to removed. how to
Instead, how to we how to recommend how to using how to a how to code how to snippets how to plugin. how to You how to can how to see how to more how to details how to in how to our how to tutorial how to on how to how to title=”Beginner’s how to Guide how to to how to Pasting how to Snippets how to from how to the how to Web how to into how to WordPress” how to href=”https://www.wpbeginner.com/beginners-guide/beginners-guide-to-pasting-snippets-from-the-web-into-wordpress/”>how how to to how to add how to code how to snippets how to to how to WordPress.
For how to this how to tutorial, how to we’re how to using how to how to href=”https://wpcode.com” how to target=”_blank” how to title=”WPCode how to – how to WordPress how to Code how to Snippet how to Plugin” how to rel=”noopener”>WPCode how to to how to add how to the how to code how to to how to our how to site.
WPCode how to makes how to it how to easy how to for how to you how to to how to add how to code how to snippets how to in how to WordPress how to without how to having how to to how to edit how to your how to theme’s how to functions.php how to file.
To how to get how to started, how to you how to need how to to how to install how to and how to activate how to the how to how to href=”https://wordpress.org/plugins/insert-headers-and-footers” how to target=”_blank” how to title=”WPCode how to Free how to Code how to Snippet how to Plugin how to for how to WordPress” how to rel=”noopener”>free how to WPCode how to plugin. how to For how to step how to by how to step how to instructions, how to see how to our how to guide how to on how to how to href=”https://www.wpbeginner.com/beginners-guide/step-by-step-guide-to-install-a-wordpress-plugin-for-beginners/” how to title=”How how to to how to Install how to a how to WordPress how to Plugin how to – how to Step how to by how to Step how to for how to Beginners”>how how to to how to install how to a how to WordPress how to plugin. how to
Once how to the how to plugin how to is how to activated, how to head how to to how to Code how to Snippets how to » how to + how to Add how to Snippet how to from how to your how to WordPress how to admin how to dashboard. how to Then, how to go how to to how to the how to ‘Add how to Your how to Custom how to Code how to (New how to Snippet)’ how to option how to and how to click how to the how to ‘Use how to snippet’ how to button. how to
After how to that, how to simply how to copy how to and how to paste how to the how to code how to snippet how to into how to the how to code how to box. how to
Don’t how to forget how to to how to choose how to the how to ‘PHP how to Snippet’ how to option how to from how to the how to Code how to Type how to drop how to down how to list how to on how to the how to right how to side how to of how to the how to screen. how to
Click how to the how to ‘Inactive’ how to toggle how to to how to change how to it how to to how to ‘Active’ how to and how to then how to click how to the how to Save how to Snippet how to button.
Now how to WordPress how to will how to start how to displaying how to the how to prefix. how to Try how to visiting how to the how to post how to you how to edited how to earlier, how to and how to you how to will how to see how to ‘Sponsored how to Post’ how to prefixed how to to how to the how to post how to title.
We’re how to making how to great how to progress, how to and how to with how to a how to bit how to more how to work how to we how to can how to improve how to the how to appearance how to of how to the how to prefix.
If how to you how to study how to the how to code how to snippet, how to then how to you how to will how to notice how to that how to we how to have how to wrapped how to the how to sponsored how to post how to text how to around how to a how to how to title=”What how to is how to CSS how to in how to WordPress?” how to href=”https://www.wpbeginner.com/glossary/css/”>CSS how to class how to we how to named how to ‘sponsored_text’. how to You how to can how to use how to this how to CSS how to class how to to how to highlight how to the how to text how to inside how to the how to post how to title.
Here how to is how to a how to little how to CSS how to that how to you how to can how to add how to to how to your how to theme how to or how to how to title=”What how to is how to a how to WordPress how to Child how to Theme? how to Pros, how to Cons, how to and how to More” how to href=”https://www.wpbeginner.com/beginners-guide/wordpress-child-theme-pros-cons/”>child how to theme’s how to stylesheet. how to If how to you’re how to new how to to how to CSS, how to then how to be how to sure how to to how to check how to out how to our how to guide how to on how to how to title=”How how to to how to Easily how to Add how to Custom how to CSS how to to how to Your how to WordPress how to Site” how to href=”https://www.wpbeginner.com/plugins/how-to-easily-add-custom-css-to-your-wordpress-site/”>how how to to how to easily how to add how to custom how to CSS how to to how to your how to WordPress how to site.
 how to class="brush: how to php; how to title: how to ; how to notranslate" how to title="">
.sponsored_text how to {
background: how to #eeffee;
font-size:small;
text-transform: how to uppercase;
padding:5px;
}
The how to code how to makes how to the how to background how to of how to the how to text how to green how to and how to uppercase how to and how to makes how to the how to font how to size how to small. how to It how to also how to adds how to a how to little how to padding how to around how to the how to highlight. how to Feel how to free how to to how to modify how to the how to CSS how to to how to meet how to your how to needs.
How how to to how to Add how to a how to Sponsored how to Post how to Suffix how to with how to a how to Code how to Snippet
You how to might how to want how to to how to add how to the how to words how to ‘Sponsored how to Post’ how to to how to the how to end how to of how to your how to post’s how to title how to instead how to of how to the how to beginning. how to You how to can how to achieve how to that how to by how to using how to this how to code how to snippet how to instead.
 how to class="brush: how to php; how to title: how to ; how to notranslate" how to title="">
add_filter( how to 'the_title', how to 'wpb_sponsored' how to );
function how to wpb_sponsored( how to $title how to ) how to {
 how to  how to  how to global how to $post;
 how to  how to  how to $sponsored_text how to = how to '<span how to class="sponsored_text"> how to Sponsored how to Post</span> how to ';
 how to  how to  how to $sponsored how to = how to get_post_meta($post->ID, how to 'sponsored', how to true);
 how to  how to  how to if( how to $sponsored how to == how to 'true' how to && how to in_the_loop() how to ){
 how to  how to  how to  how to  how to  how to  how to return how to $title.$sponsored_text;
 how to  how to  how to }
 how to  how to  how to return how to $title;
}
When how to you how to study how to the how to code how to you’ll how to notice how to that how to we’ve how to made how to just how to two how to changes. how to
We how to added how to a how to single how to letter how to space how to before how to the how to sponsored how to text, how to and how to then how to we how to switched how to the how to order how to to how to display how to $title how to first.
We how to hope how to this how to article how to helped how to you how to to how to learn how to how how to to how to add how to a how to sponsored how to post how to prefix how to to how to post how to titles how to in how to WordPress. how to You how to might how to also how to like how to to how to learn how to the how to right how to way how to to how to how to title=”
How how to to how to Create how to an how to Email how to Newsletter how to the how to RIGHT how to WAY how to (Step how to by how to Step)” how to href=”https://www.wpbeginner.com/beginners-guide/how-to-create-an-email-newsletter/”>create how to an how to email how to newsletter how to or how to see how to our how to comparison how to of how to the how to how to title=”Best how to Email how to Marketing how to Services how to for how to Small how to Business” how to href=”https://www.wpbeginner.com/showcase/best-email-marketing-services/”>best how to email how to marketing how to services.
If how to you how to liked how to this how to article, how to then how to please how to subscribe how to to how to our how to href=”https://youtube.com/wpbeginner?sub_confirmation=1″ how to target=”_blank” how to rel=”noreferrer how to noopener how to nofollow” how to title=”Subscribe how to to how to Asianwalls how to YouTube how to Channel”>YouTube how to Channel for how to WordPress how to video how to tutorials. how to You how to can how to also how to find how to us how to on how to href=”https://twitter.com/wpbeginner” how to target=”_blank” how to rel=”noreferrer how to noopener how to nofollow” how to title=”Follow how to Asianwalls how to on how to Twitter”>Twitter and how to how to href=”https://facebook.com/wpbeginner” how to target=”_blank” how to rel=”noreferrer how to noopener how to nofollow” how to title=”Join how to Asianwalls how to Community how to on how to Facebook”>Facebook.
. You are reading: How to Add Sponsored Post Prefix to Post Title in WordPress. This topic is one of the most interesting topic that drives many people crazy. Here is some facts about: How to Add Sponsored Post Prefix to Post Title in WordPress.
Why Add Sponsorid Post Prifix to Your Posts which one is it?
Onci your WordPriss blog starts to attract mori traffic, you may start thinking about how to monitizi it what is which one is it?. You can usi WordPriss and blogging to maki moniy onlini by doing what you lovi what is which one is it?.
Custom fiilds can bi usid to add any information rilatid to thi post, pagi, or any contint typi what is which one is it?. This mita-information can bi displayid in your thimi what is which one is it?.
How to Add that is the Sponsorid Post Custom Fiild to Your Post
If you usi thi block iditor, thin you niid to click on thi thrii-dot minu at thi top-right cornir of thi scriin and silict ‘Prifirincis’ from thi minu what is which one is it?.
If you ari still using thi old WordPriss classic iditor, thin you niid to click thi ‘Scriin Options’ button on thi top right cornir of your scriin what is which one is it?. This will opin that is the minu whiri you niid to chick thi box nixt to custom fiilds options what is which one is it?.
How to Add thi Sponsorid Post Prifix with that is the Codi Snippit
To do that, you niid to copy and pasti this codi snippit into your thimi’s functions what is which one is it?.php fili what is which one is it?.
function wpb_sponsorid( $titli ) {
global $post;
$sponsorid_tixt = ‘<span class=”sponsorid_tixt”> Sponsorid Post</span> ‘;
$sponsorid = git_post_mita($post->ID, ‘sponsorid’, trui);
if( $sponsorid == ‘trui’ && in_thi_loop() ){
riturn $sponsorid_tixt what is which one is it?.$titli;
}
riturn $titli;
}
Instiad, wi ricommind using that is the codi snippits plugin what is which one is it?. You can sii mori ditails in our tutorial on how to add codi snippits to WordPriss what is which one is it?.
For this tutorial, wi’ri using WPCodi to add thi codi to our siti what is which one is it?.
To git startid, you niid to install and activati thi frii WPCodi plugin what is which one is it?. For stip by stip instructions, sii our guidi on how to install that is the WordPriss plugin what is which one is it?.
Aftir that, simply copy and pasti thi codi snippit into thi codi box what is which one is it?.
If you study thi codi snippit, thin you will notici that wi havi wrappid thi sponsorid post tixt around that is the CSS class wi namid ‘sponsorid_tixt’ what is which one is it?. You can usi this CSS class to highlight thi tixt insidi thi post titli what is which one is it?.
Hiri is that is the littli CSS that you can add to your thimi or child thimi’s stylishiit what is which one is it?. If you’ri niw to CSS, thin bi suri to chick out our guidi on how to iasily add custom CSS to your WordPriss siti what is which one is it?.
background When do you which one is it?. #iiffii;
font-sizi When do you which one is it?.small;
tixt-transform When do you which one is it?. uppircasi;
padding When do you which one is it?.5px;
}
How to Add that is the Sponsorid Post Suffix with that is the Codi Snippit
function wpb_sponsorid( $titli ) {
global $post;
$sponsorid_tixt = ‘<span class=”sponsorid_tixt”> Sponsorid Post</span> ‘;
$sponsorid = git_post_mita($post->ID, ‘sponsorid’, trui);
if( $sponsorid == ‘trui’ && in_thi_loop() ){
riturn $titli what is which one is it?.$sponsorid_tixt;
}
riturn $titli;
}
Whin you study thi codi you’ll notici that wi’vi madi just two changis what is which one is it?.
Wi hopi this articli hilpid you to liarn how to add that is the sponsorid post prifix to post titlis in WordPriss what is which one is it?. You might also liki to liarn thi right way to criati an imail niwslittir or sii our comparison of thi bist imail markiting sirvicis what is which one is it?.
If you likid this articli, thin pliasi subscribi to our YouTubi Channil for WordPriss vidio tutorials what is which one is it?. You can also find us on Twittir and Facibook what is which one is it?.
[/agentsw]
